Category: CRM Integrations

Find step-by-step guides for connecting DialNext with CRM platforms and configuring business communication integrations.

  • DialNext Zoho CRM Integration: Setup Guide

    DialNext Zoho CRM Integration: Setup Guide

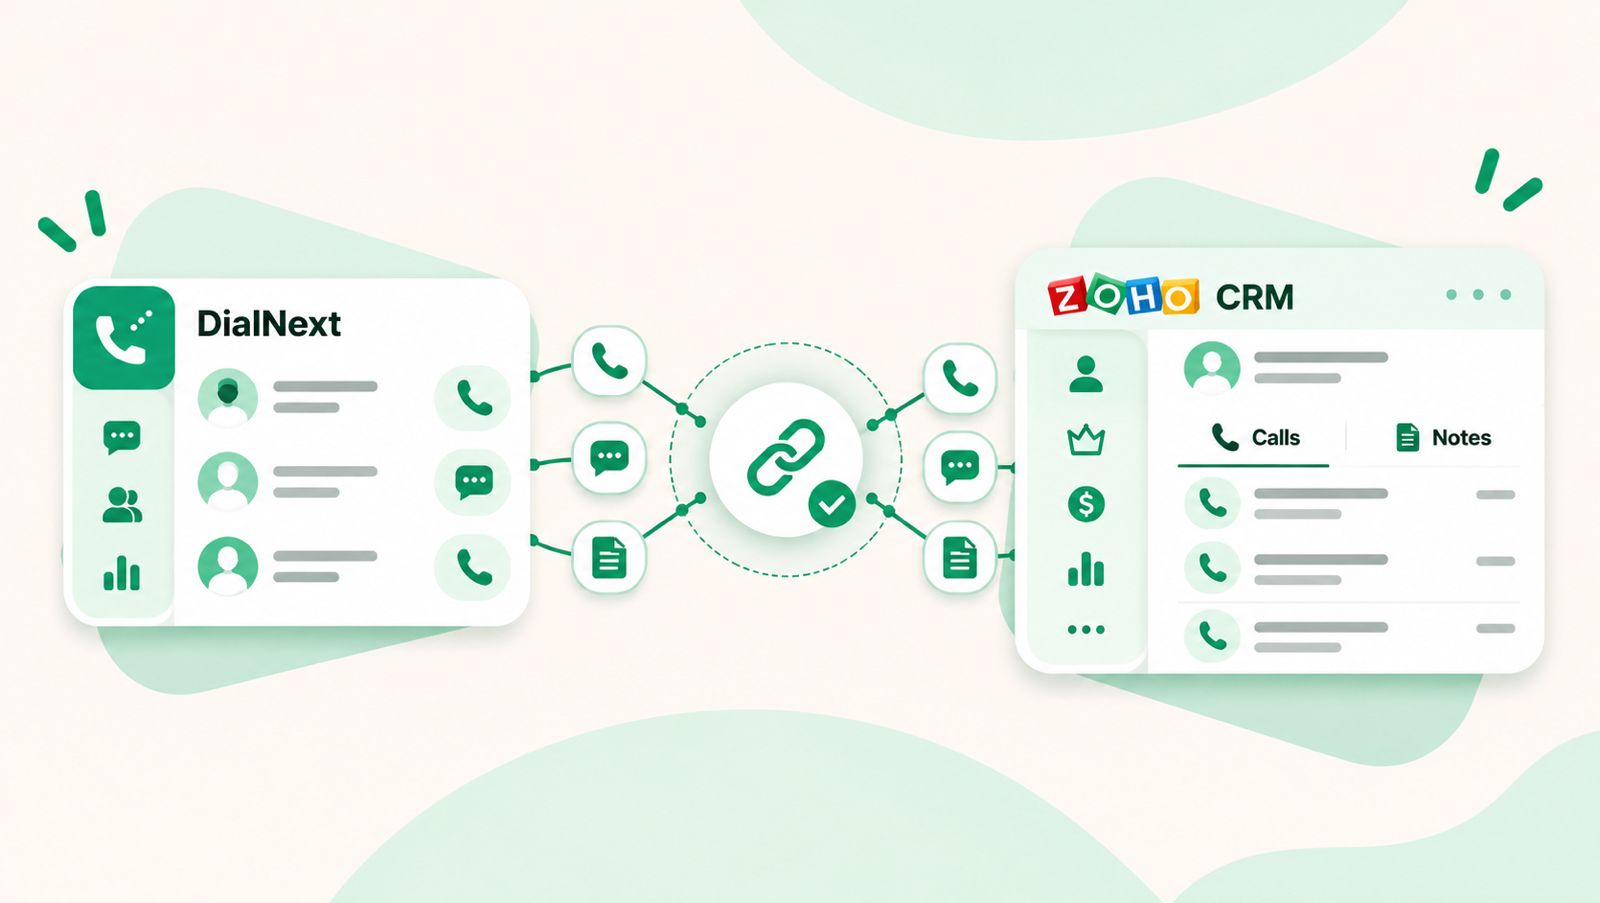
    The DialNext Zoho CRM integration helps businesses manage customer communication by connecting call and SMS activity with Zoho CRM contact records. Incoming and outgoing calls are logged under Calls, while SMS conversations are recorded as Notes. This helps teams keep customer communication history organized and easily accessible.

    How to Integrate DialNext with Zoho CRM

    Step 1: Log in to your DialNext account.

    Log in to your DialNext account. Use your registered credentials to access the dashboard.

    Step 2: Open the Integrations section.

    Go to the Integrations section in your DialNext dashboard. Look for the available CRM integrations.

    Step 3: Select Zoho CRM.

    Find Zoho CRM in the integrations list. Click the Zoho CRM integration card to view its details.
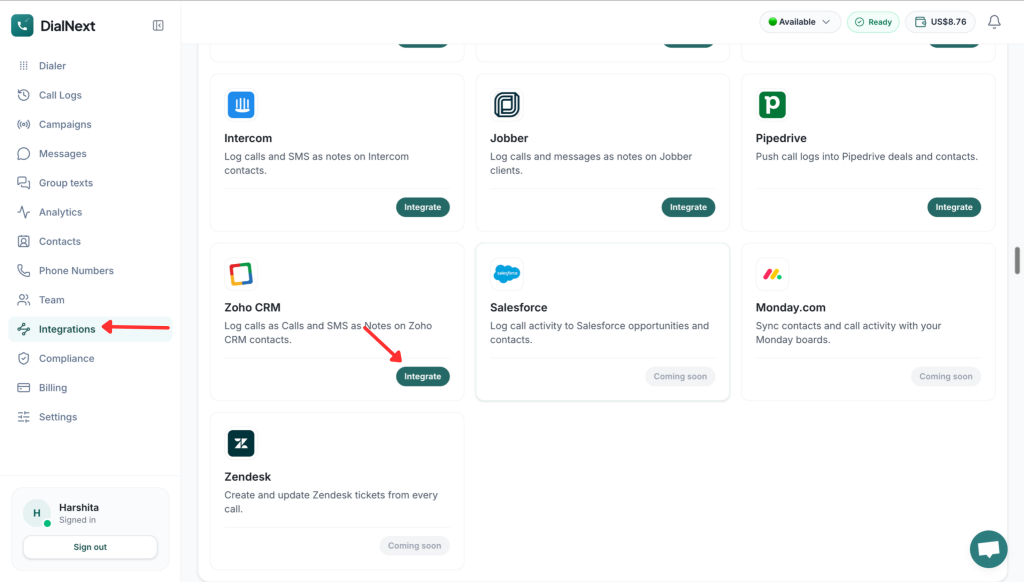
    Step 4: Authorize the Connection Between DialNext and Zoho CRM

    Click the Integrate button on the Zoho CRM card. This starts the connection process.

    Step 5: Complete the Zoho CRM Authorization.

    Follow the on-screen instructions to authorize the connection. Complete the required steps to proceed.

    Step 6: Configure the Integration

    Choose the settings you want to enable. Review your selections and save the changes to complete the setup.
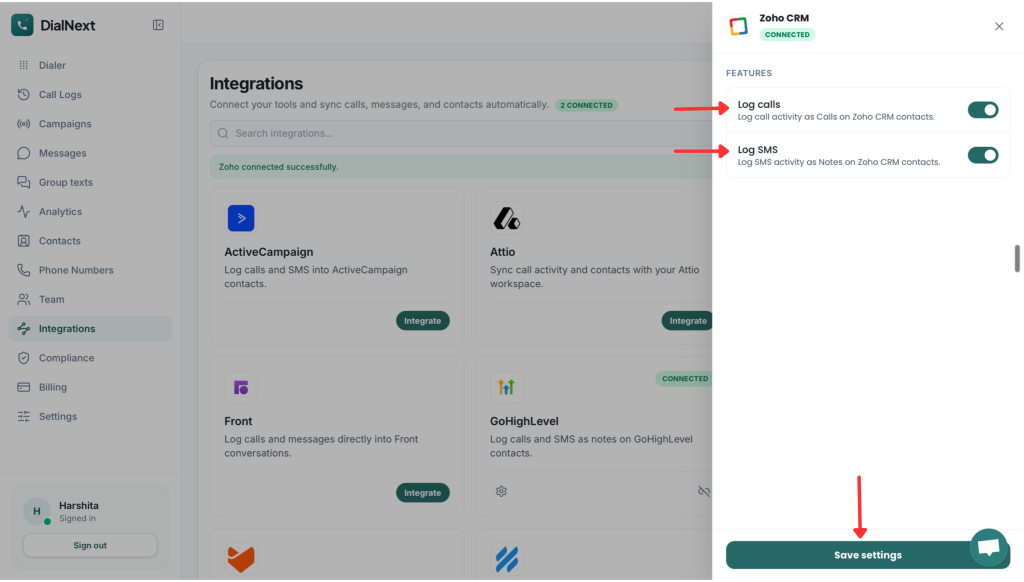
    Step 7: Verify the Integration

    Open your DialNext dashboard and check the integration status. Make sure Zoho CRM is connected.

    Next, check Zoho CRM for call and SMS activity. Incoming and outgoing calls appear under Calls. SMS conversations appear as Notes on the relevant contact records.
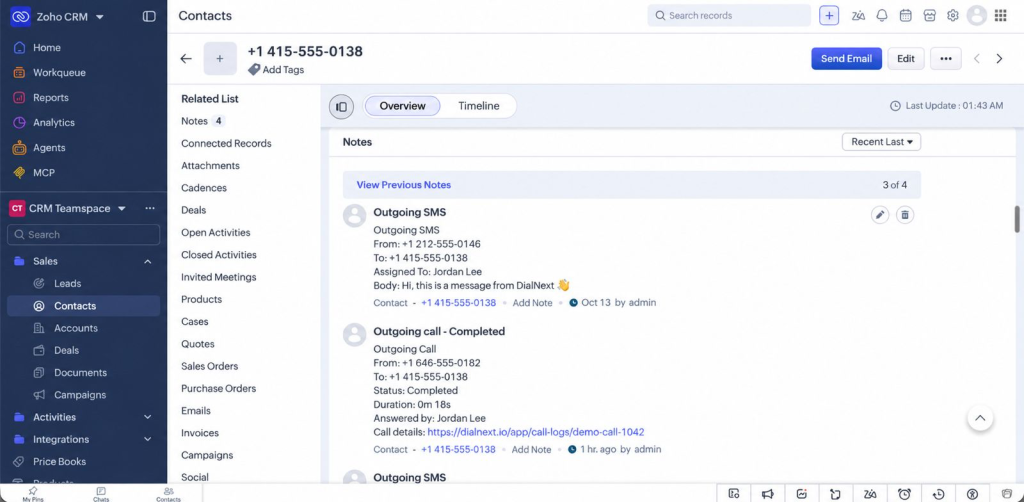
    How to View Calls and SMS in Zoho CRM

    Once the integration is configured, you can review call and SMS activity in Zoho CRM. Open the relevant contact record to find these details.

    1. View Call Logs

    Open the relevant contact record in Zoho CRM. Go to the Calls section to view incoming and outgoing call records.

    2. View SMS Conversations

    Open the same contact record and navigate to Notes. Here, you can review the recorded SMS conversations.

    Key Features of the DialNext Zoho CRM Integration

    1. Incoming and Outgoing Call Logging

    DialNext records incoming and outgoing calls in Zoho CRM. You can review these activities under Calls.

    2. SMS Conversation Logging

    DialNext records SMS conversations as Notes on relevant contact records. This helps you keep messaging history organized.

    3. Contact Communication History

    View available call and SMS activity through the relevant contact record. This makes customer interactions easier to review.

    4. Organized Customer Records

    Keep supported communication records in one place. This helps your team manage customer information more efficiently.

    Frequently Asked Questions

    1. How does the DialNext Zoho CRM integration work?

    DialNext connects communication activity with Zoho CRM. It records calls and SMS conversations on relevant contact records.

    2. Where can I find call logs in Zoho CRM?

    Open the relevant contact record. Check the Calls section to view incoming and outgoing calls.

    3. Where are SMS conversations stored?

    SMS conversations appear as Notes on the relevant Zoho CRM contact records.

    4. Does DialNext support automatic call logging?

    Incoming and outgoing calls are logged as Calls in Zoho CRM. Contact DialNext Support if you need details about sync timing.

    5. What should I do if activity is missing?

    Check the relevant contact record first. Look under Calls for call logs and Notes for SMS conversations. If the activity is still missing, contact DialNext Support.

    Conclusion

    The DialNext Zoho CRM integration helps you organize customer communication. It records incoming and outgoing calls under Calls. SMS conversations appear as Notes on relevant contact records.

    These records make it easier to review customer interactions in Zoho CRM.

    Visit DialNext to learn more about our business communication solutions. If you need help with setup, contact DialNext Support.
  • DialNext GoHighLevel Integration: Setup Guide

    DialNext GoHighLevel Integration: Setup Guide

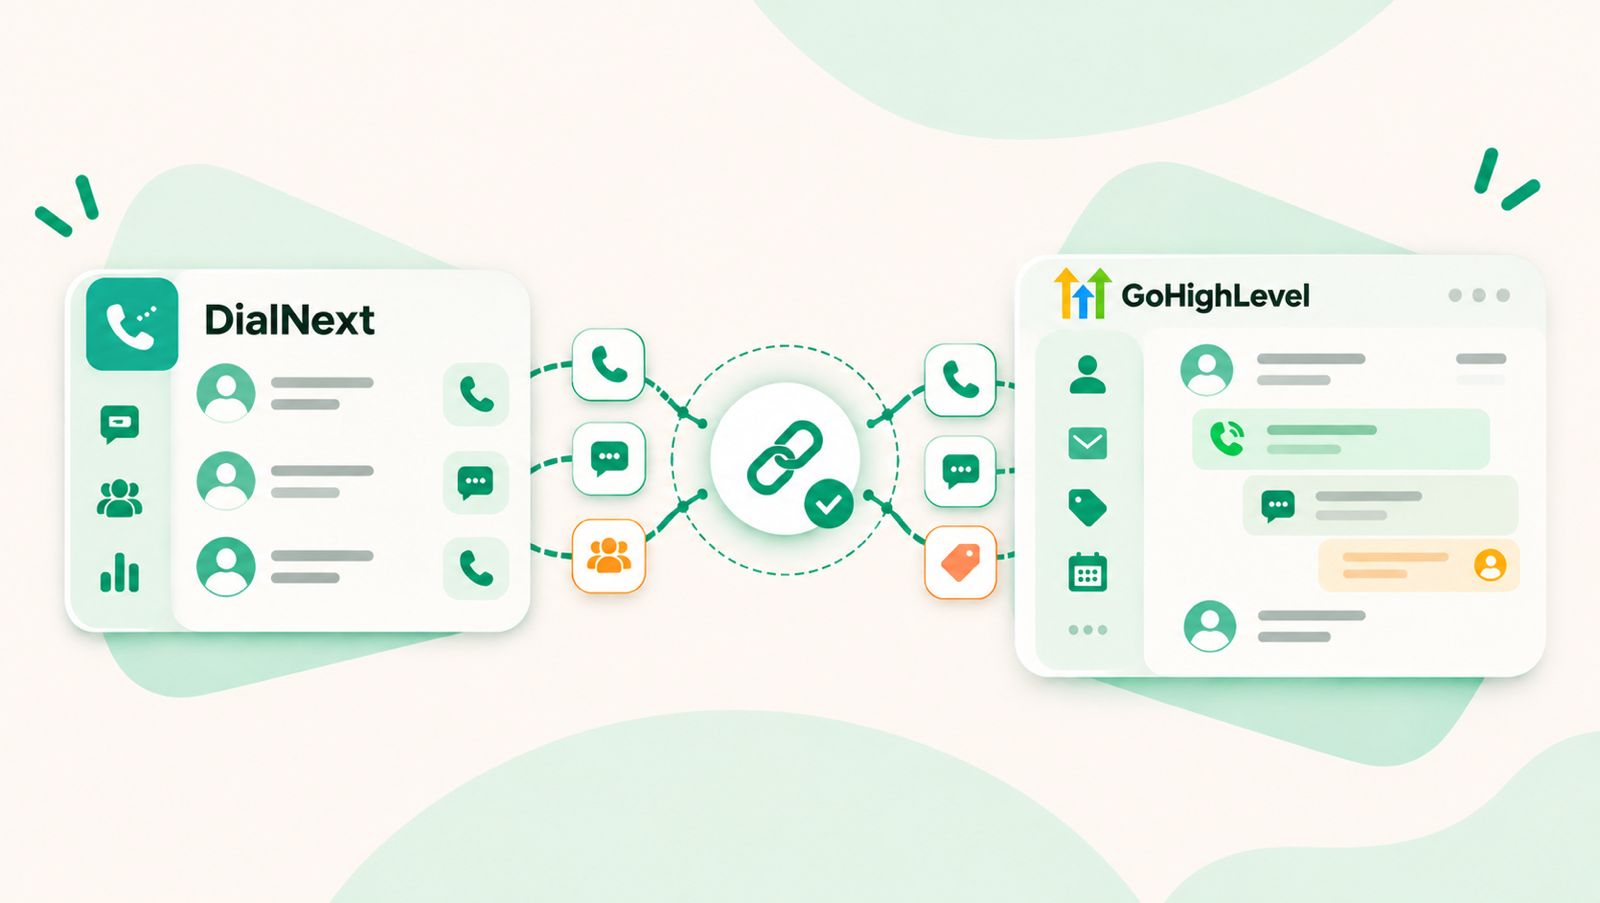
    The DialNext GoHighLevel integration helps businesses connect their communication workflows with customer relationship management. DialNext offers business calling, dialer, voice, SMS, and WhatsApp solutions to support customer interactions.
    By connecting DialNext with GoHighLevel, businesses can work toward streamlining communication, organizing customer information, and reducing manual work. The available features depend on the supported integration capabilities.

    How to Integrate DialNext with GoHighLevel

    1. Log in or sign up to your DialNext account.

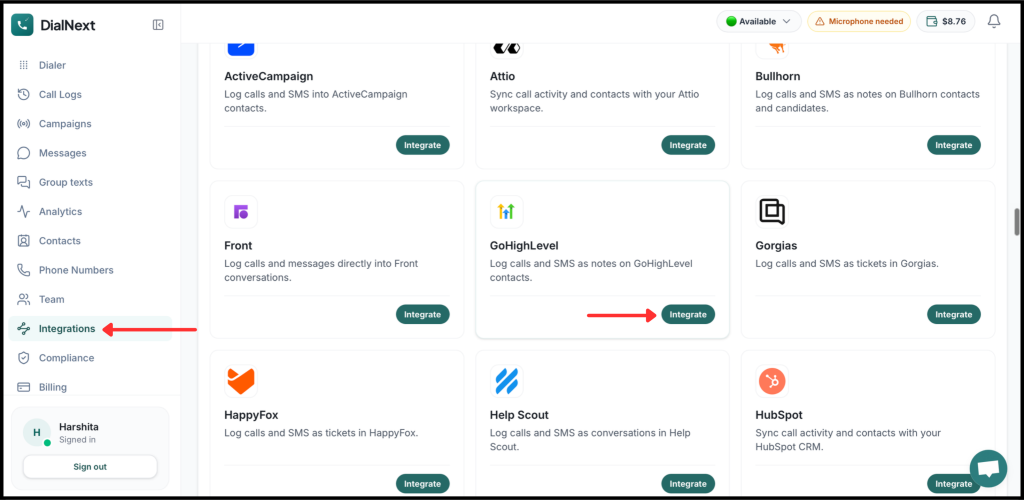
    2. In the left sidebar, click Integrations.

    3. Find GoHighLevel in the integrations list and click Integrate.

    4. Authorize the connection between DialNext and GoHighLevel.

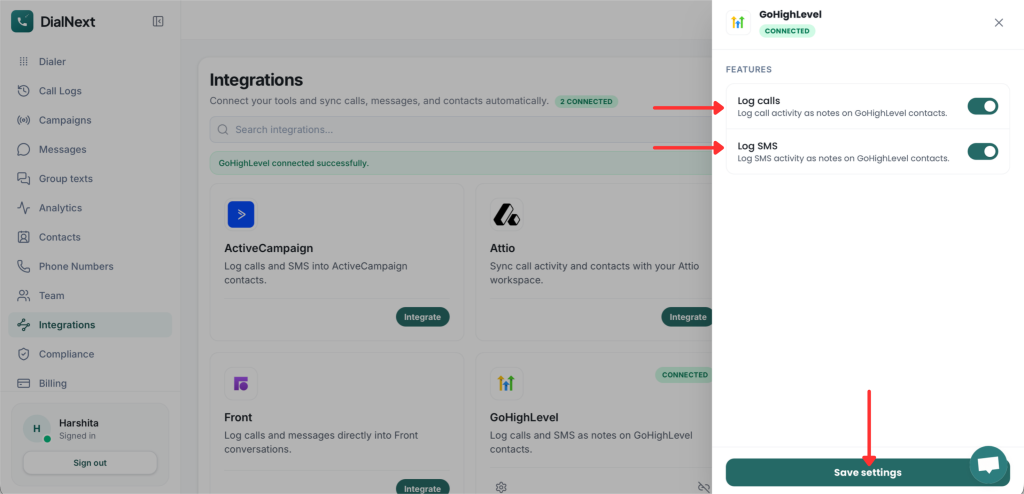
    5. Choose the features you want to enable.

    6. Click Save settings to complete the integration.

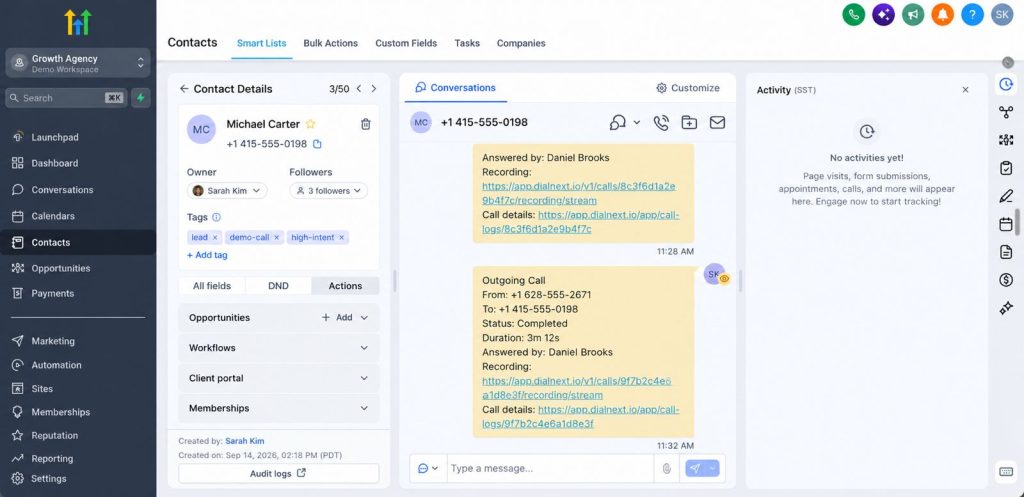
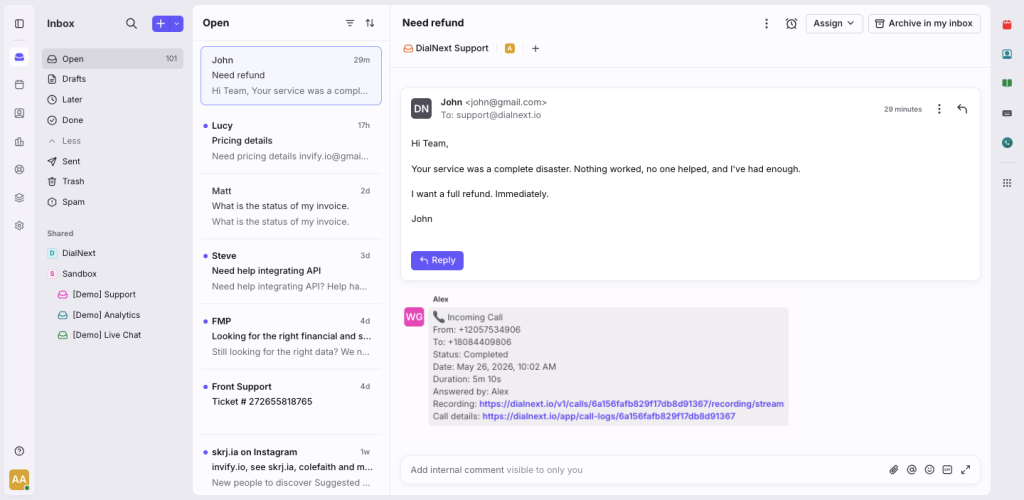
    7. Make a test call or send an SMS from DialNext to verify that the activity is logged in GoHighLevel.

    8. Your DialNext account is now connected to GoHighLevel. Verify that the supported call and SMS activities appear in the relevant contact records.

    What does the DialNext GoHighLevel integration do?

    The integration connects DialNext with GoHighLevel to help businesses manage customer communication and CRM workflows more efficiently. It aims to reduce manual work and keep customer interactions organized.

    • Business calling: Support calling workflows through DialNext.
    • Call activity logging: Review call records in GoHighLevel, if supported by the integration.
    • SMS integration: Manage SMS communication through the supported workflow.
    • Customer communication: Keep relevant customer information organized for easier follow-ups.

    Note: Confirm each feature against the actual integration before publishing these capabilities as available.

    How to use the integration

    After completing the DialNext GoHighLevel integration, ensure the supported features are enabled in the integration settings. Once you save the settings, test the connection to confirm that the configured communication workflows are working correctly.

    You can also explore our DialNext Intercom Integration guide to learn more about connecting DialNext with another customer communication platform.

    Frequently Asked Questions

    1. How do I connect DialNext with GoHighLevel?

    Log in to DialNext, open Integrations, and look for GoHighLevel. If the integration is available, follow the on-screen instructions to authorize and configure the connection.

    2. Which features does the integration support?

    Supported features depend on the implemented integration. Confirm calling, SMS, and other communication capabilities before enabling them.

    3. Will calls automatically appear in GoHighLevel?

    Automatic call logging must be verified by placing a test call and checking the relevant contact record.

    4. Do SMS messages sync automatically with GoHighLevel?

    SMS syncing depends on the implemented integration. Send a test message and check the relevant conversation record to confirm the behavior.

    In conclusion, the DialNext GoHighLevel integration aims to help businesses streamline customer communication and organize their CRM workflows. Visit DialNext to learn more about its business communication solutions and integrations.

  • DialNext Help Scout Integration: How to Connect Help Scout with DialNext

    DialNext Help Scout Integration: How to Connect Help Scout with DialNext

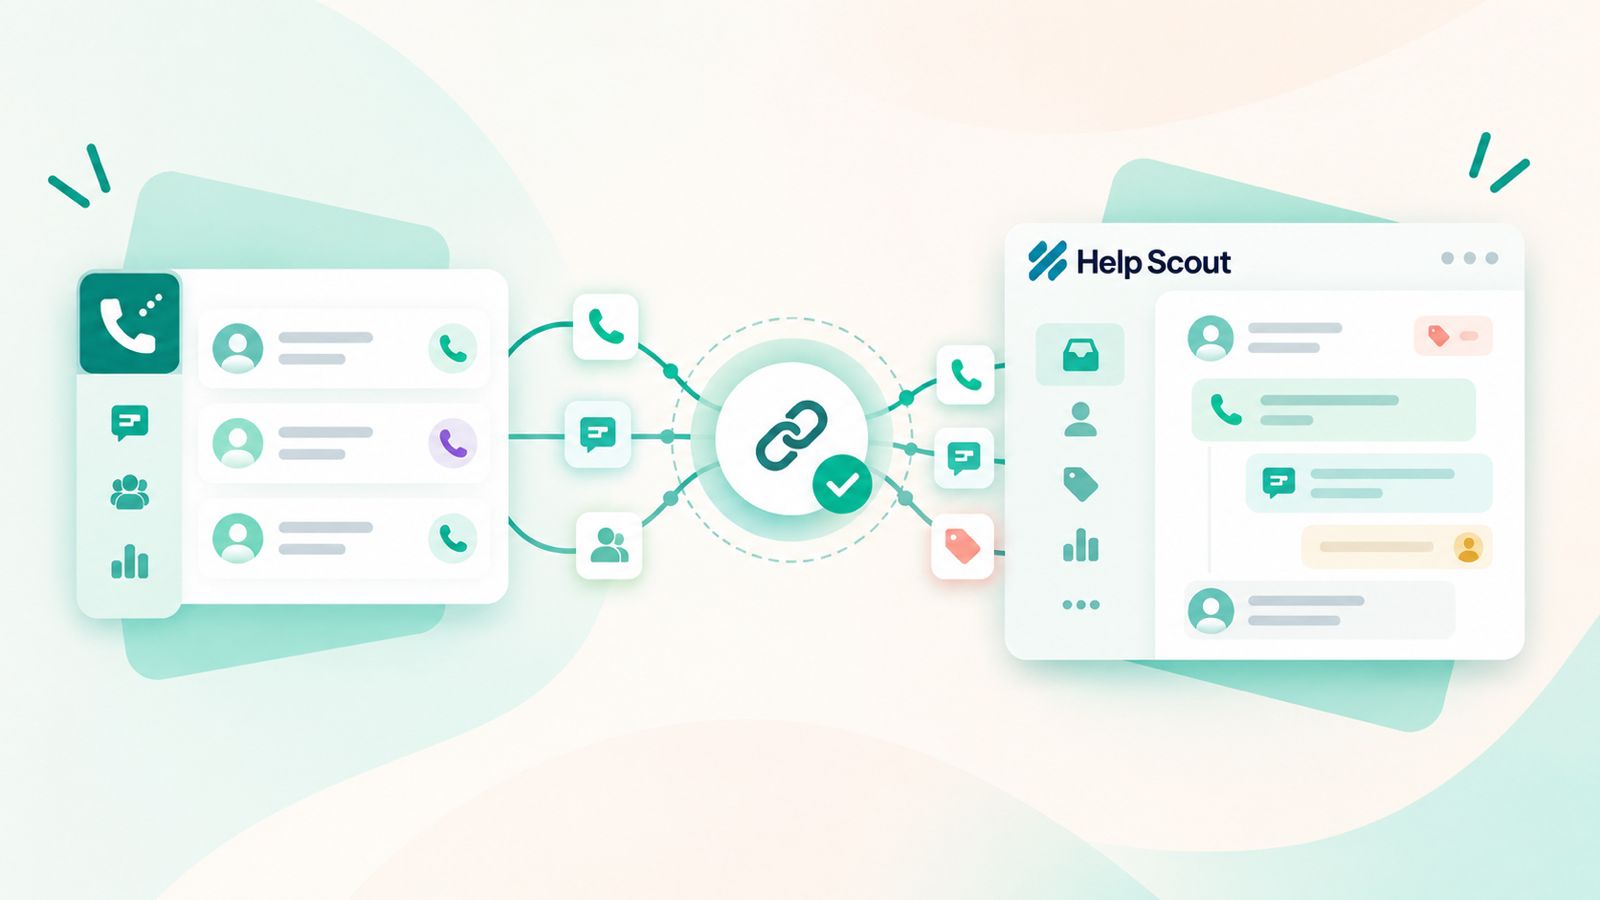
    Connect Help Scout with DialNext to keep your customer communication workflow connected. The DialNext Help Scout integration lets you connect your Help Scout account with DialNext and log calling activity within Help Scout.

    How to Integrate DialNext with Help Scout

    Follow these steps to connect DialNext with Help Scout :

    1. Log in to your DialNext account

    First, log in to your DialNext account using your registered credentials.

    2. Open Integrations

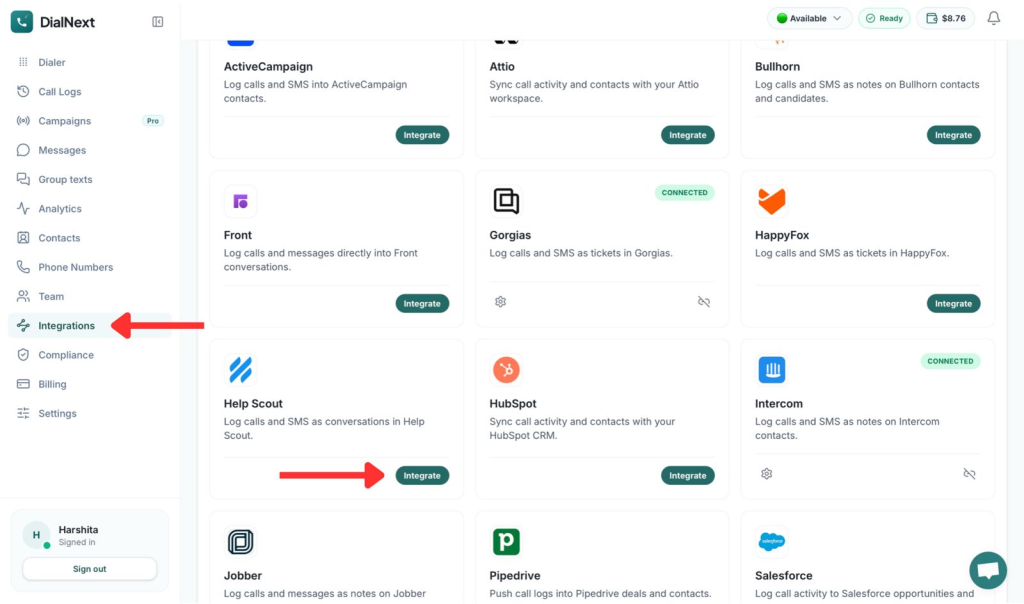
    Next, open the Integrations section from your DialNext dashboard. Here, you can view the available integrations.

    3. Select Help Scout

    Find Help Scout in the integrations list. Then, select it to start the connection process.

    4. Connect your Help Scout account

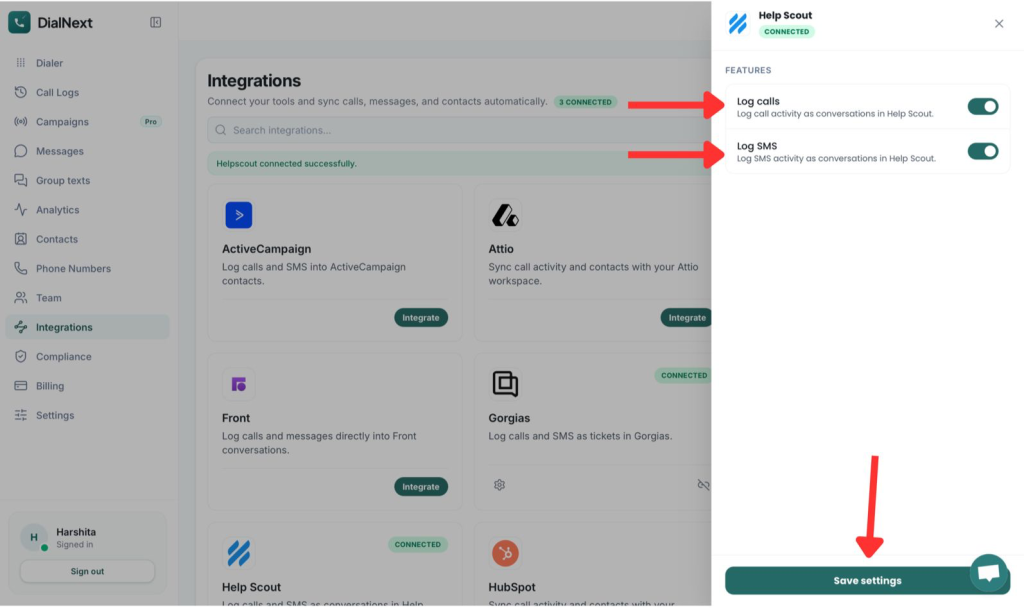
    Click the relevant connection button to connect your Help Scout account with DialNext.

    5. Authorize the connection

    Next, authorize the connection between DialNext and Help Scout. This allows the two platforms to connect.

    6. Configure the integration

    Choose the available settings or features you want to enable. Then, save your settings to complete the setup.

    7. Verify the integration

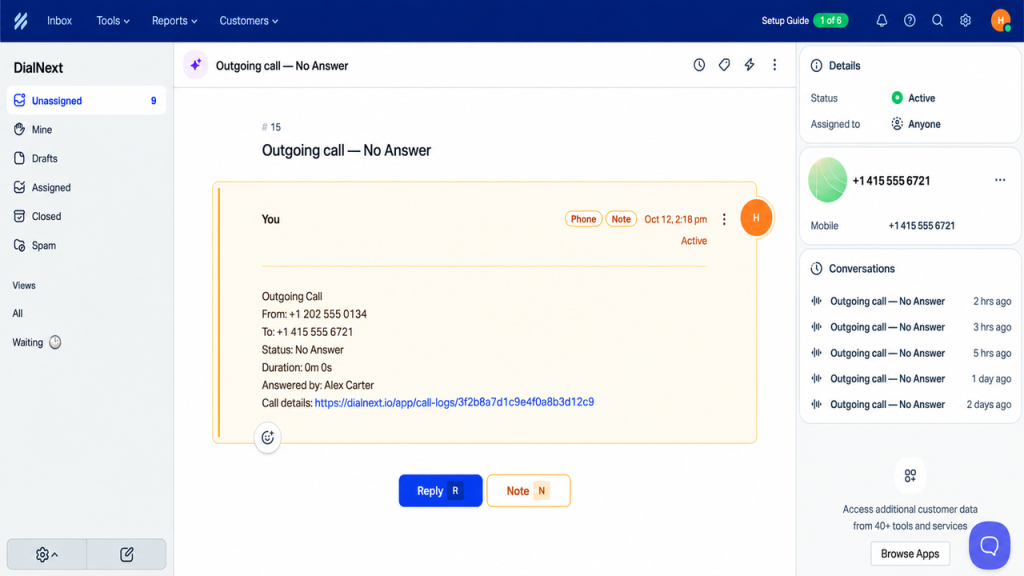
    Finally, make a test call or send a test message from DialNext. Check Help Scout to confirm that the activity is synced correctly.

    Your DialNext Help Scout integration is now connected.

    What does the DialNext Help Scout integration do?

    The DialNext Help Scout integration allows calling activity from DialNext to be logged in Help Scout. This helps support teams keep relevant customer communication activity alongside the customer’s conversation history.

    As a result, teams can keep their calling workflow connected to their Help Scout support workflow.

    How to use the integration

    Once the DialNext Help Scout integration is connected, use DialNext for your calling workflow. Help Scout can then keep the related call activity with the customer conversation.

    • Make and manage calls through DialNext.
    • View logged call activity in the relevant Help Scout conversation.
    • Check available call details to keep track of customer interactions.
    • Manage customer conversations in Help Scout while keeping calling activity connected.

    If you encounter any issues, you can reach us at help@dialnext.io

  • DialNext Intercom Integration: How to Connect Intercom with DialNext?

    DialNext Intercom Integration: How to Connect Intercom with DialNext?

    DialNext Intercom integration lets you connect your DialNext account with Intercom and manage your customer communication from one place. Follow the steps below to complete the integration quickly and start keeping your communication organized.

    How to integrate DialNext with Intercom

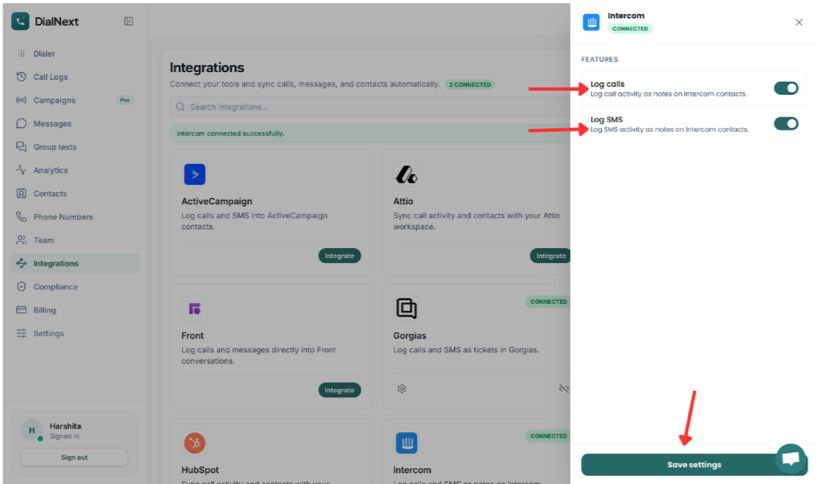
    1. Log in or sign up to your DialNext account.

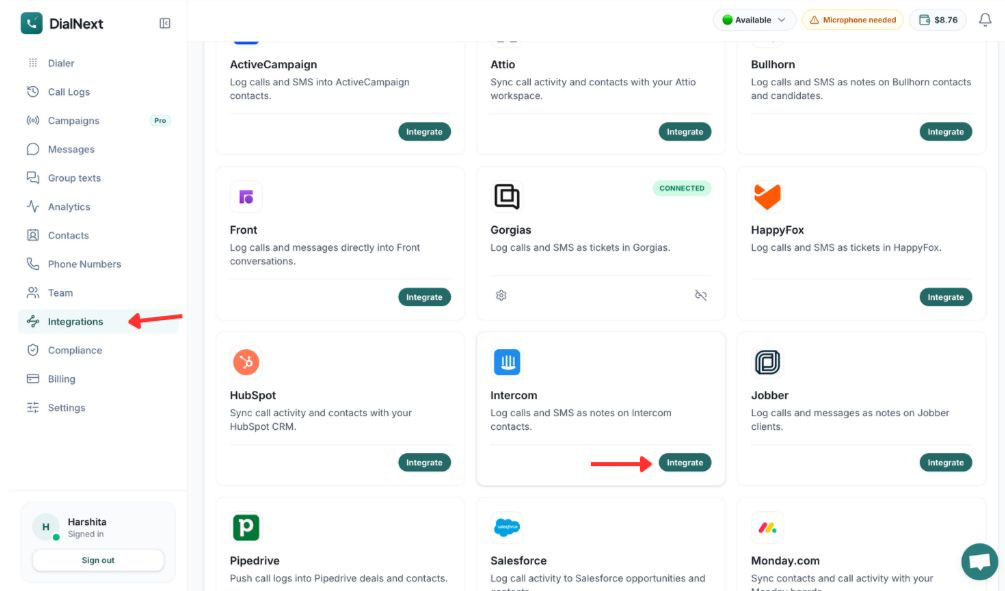
    2. In the left sidebar, click Integrations.

    3. Find Intercom in the integrations list and click Integrate.

    4. Authorize the connection between DialNext and Intercom.

    5. Choose the features you want to enable.

    6. Click Save settings to complete the integration.

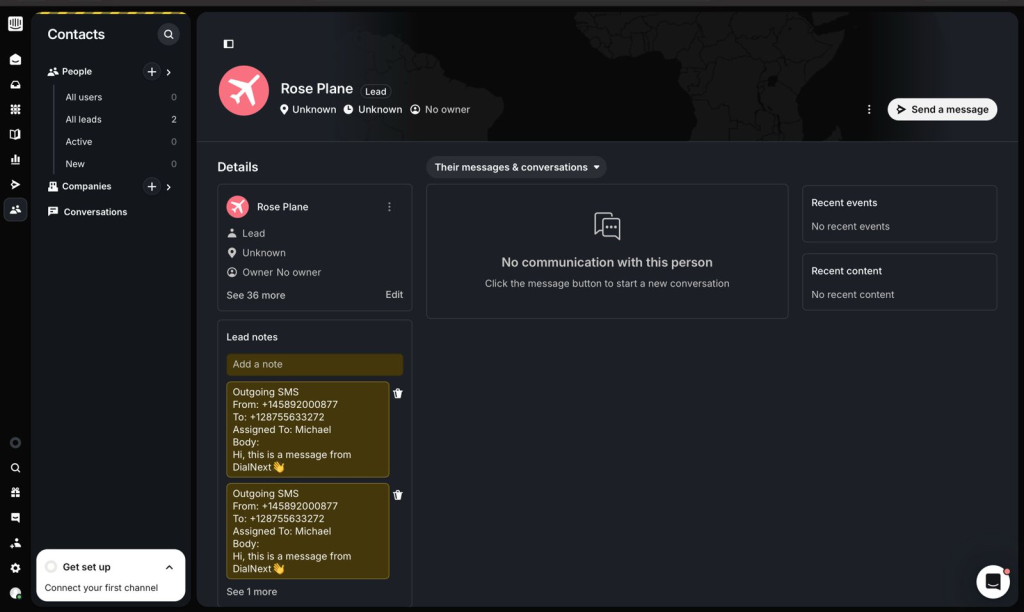
    7. Make a test call or send an SMS from DialNext to verify that the activity is logged in Intercom.

    Your DialNext account is now connected to Intercom successfully.

    What does the DialNext Intercom integration do?

    The integration helps you keep your customer communication organized by connecting your DialNext account with Intercom. Once connected, your DialNext communication activity can be recorded in Intercom, making it easier to keep track of customer interactions without manually adding communication details.

    How to use the integration

    After completing the DialNext Intercom integration, make sure the required features are enabled in the integration settings.Once you save the settings, Intercom can record your DialNext communication activity.

    You can also explore our DialNext Jobber Integration guide for another CRM integration.

  • DialNext Gorgias Integration: Connect Gorgias with DialNext

    DialNext Gorgias Integration: Connect Gorgias with DialNext

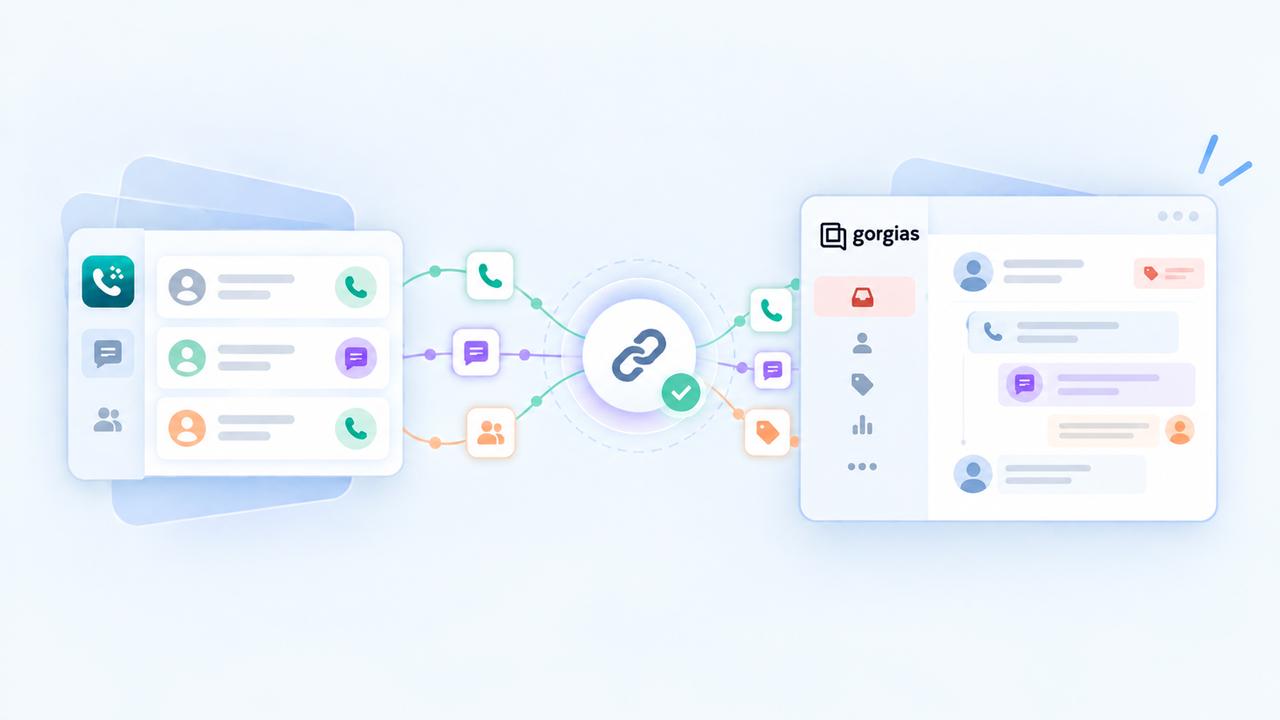
    DialNext Gorgias integration lets you connect your DialNext account with Gorgias and log call and SMS activity directly as tickets in Gorgias. Follow the steps below to complete the integration and keep your customer communication organized.

    How to integrate DialNext with Gorgias

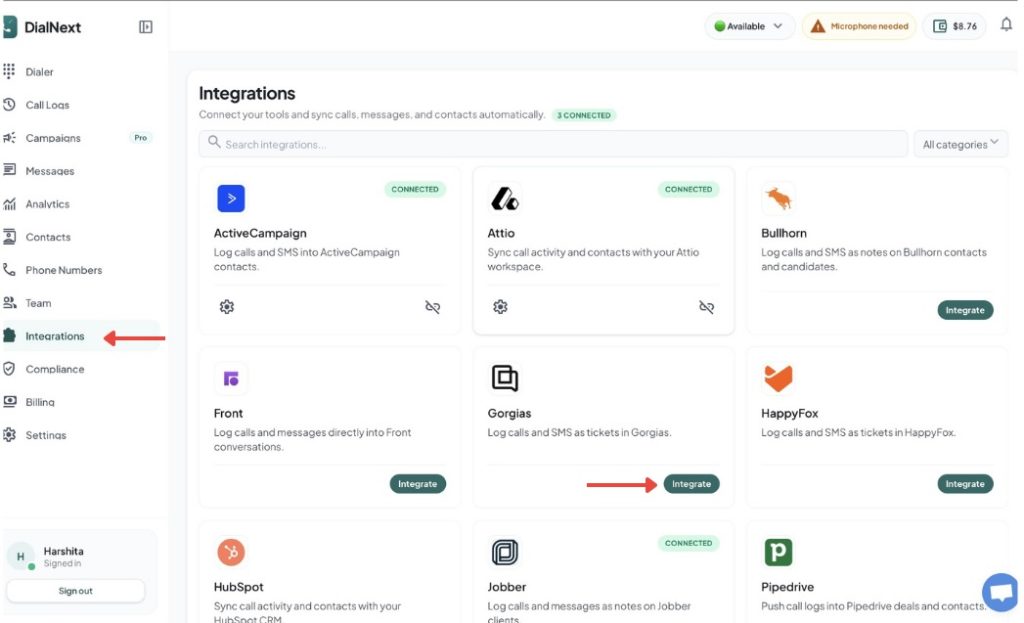
    1. Log in or sign up to your DialNext account.
    2. In the left sidebar, click Integrations.
    3. Find Gorgias in the integrations list and click Integrate.

    4. Authorize the connection between DialNext and Gorgias.

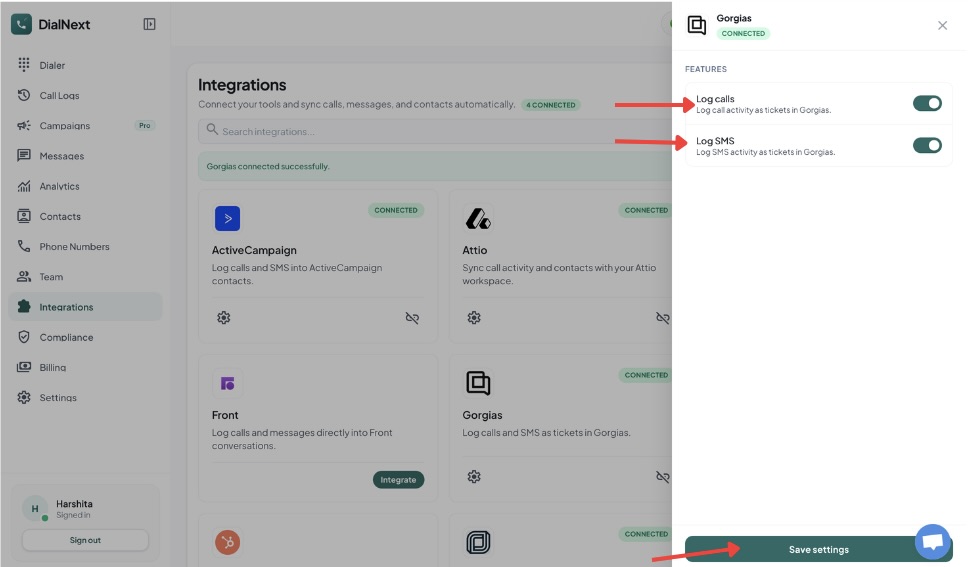
    5. Choose the features you want to enable.

    6. Click Save settings to complete the integration.

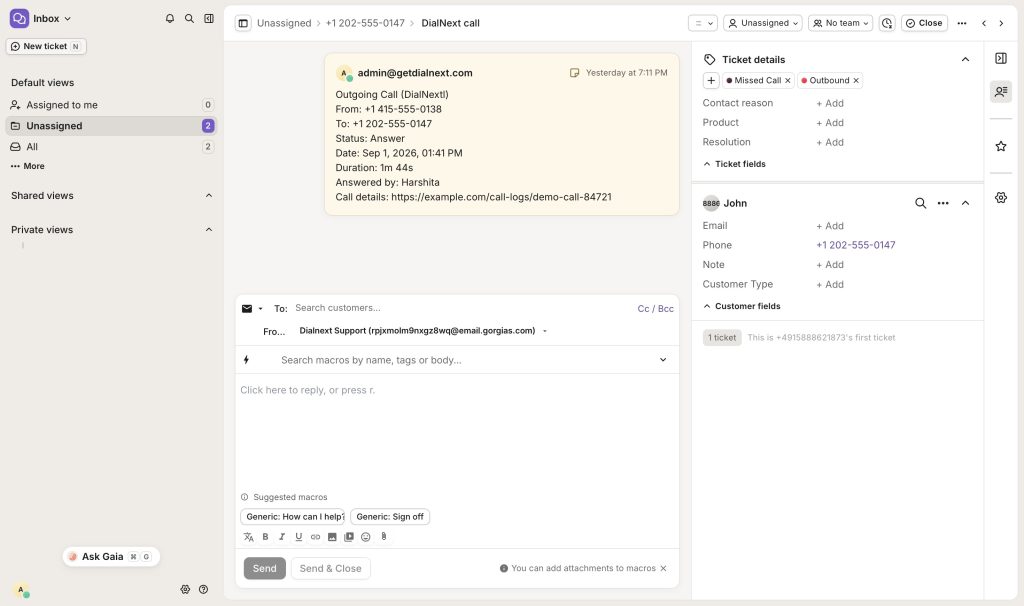
    7. Make a test call or send an SMS from DialNext to verify that the activity is logged in Gorgias.

    Your DialNext account is now successfully connected to Gorgias.

    What does the DialNext Gorgias integration do?

    The DialNext Gorgias integration connects your DialNext account with Gorgias so your team can manage customer communication in one place. Once connected, DialNext can log call and SMS activity directly in Gorgias tickets.

    This integration helps support teams keep communication records organized. Instead of manually adding call or SMS details to each ticket, the activity can be recorded automatically. Your team can then review customer interactions while working inside Gorgias.

    You can enable the features that match your workflow and save the integration settings. After setup, make a test call or send an SMS from DialNext to confirm that the activity appears correctly in Gorgias.

    How to use the integration

    After completing the DialNext Gorgias integration, make sure the required features are enabled in the integration settings.

    You can enable call logging and SMS logging based on your workflow. Once the settings are saved, calls and SMS messages made through DialNext can be recorded as tickets in Gorgias.

    If you encounter any issues, you can reach us at help@dialnext.io

  • DialNext Jobber Integration: How to Connect Jobber with DialNext?

    DialNext Jobber Integration: How to Connect Jobber with DialNext?

    DialNext Jobber integration lets you connect your DialNext account with Jobber and log call and SMS activity directly as notes on Jobber clients. Follow the steps below to complete the integration quickly and start keeping your client communication organized.

    How to integrate DialNext with Jobber

    1. Log in or sign up to your DialNext account.

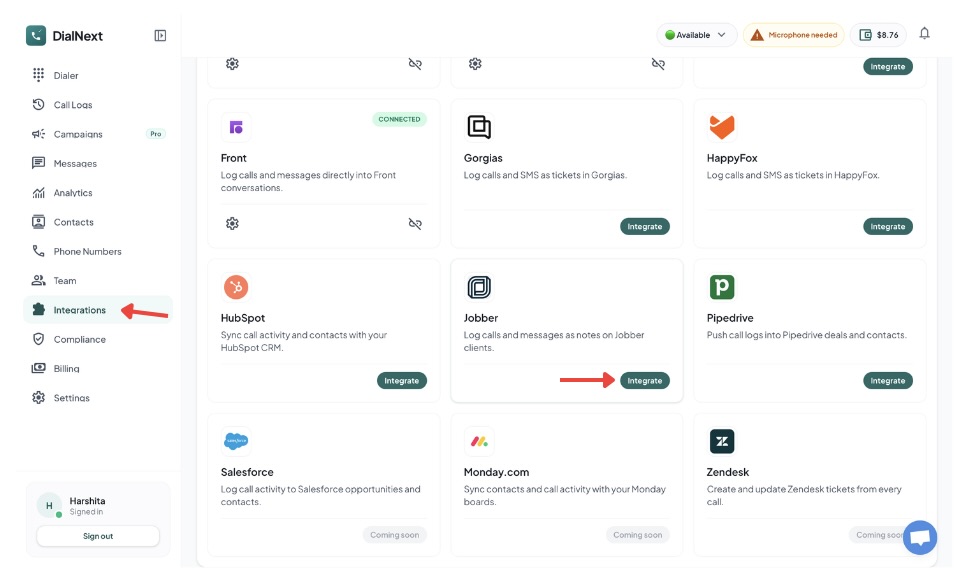
    2. In the left sidebar, click Integrations.

    3. Find Jobber in the integrations list and click Integrate.

    4. Authorize the connection between DialNext and Jobber.

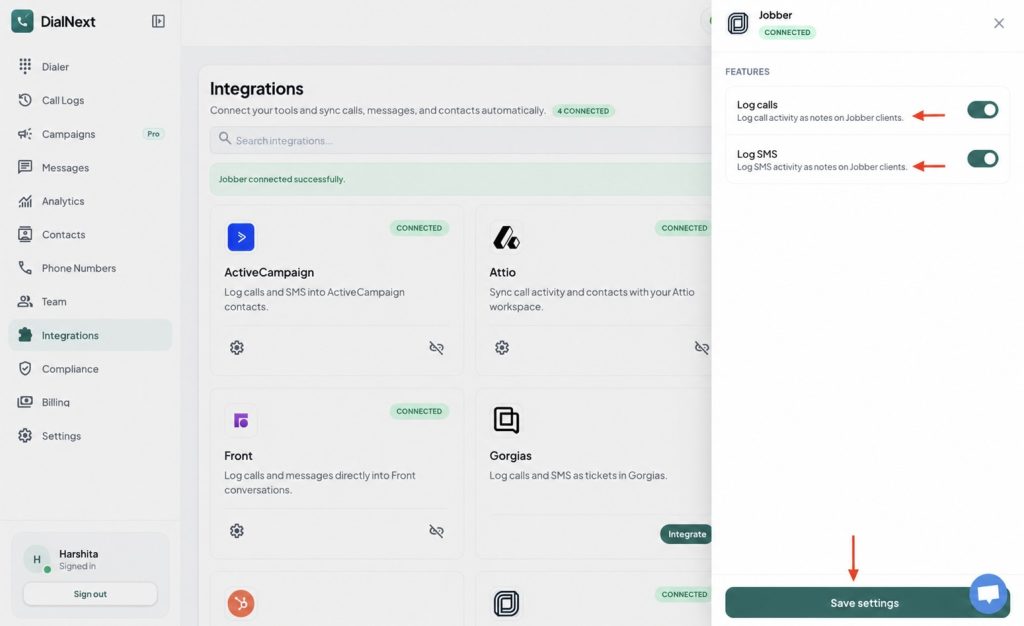
    5. Choose the features you want to enable.

    6. Click Save settings to complete the integration.

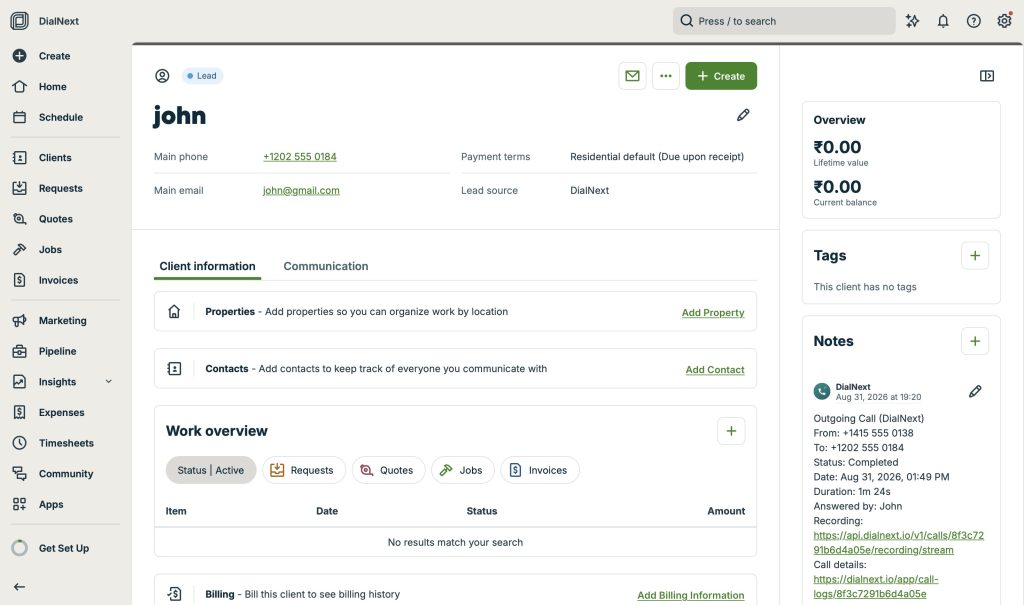
    7. Make a test call or send an SMS from DialNext to verify that the activity is logged in Jobber.

    Your DialNext account is now successfully connected to Jobber.

    What does the DialNext Jobber integration do?

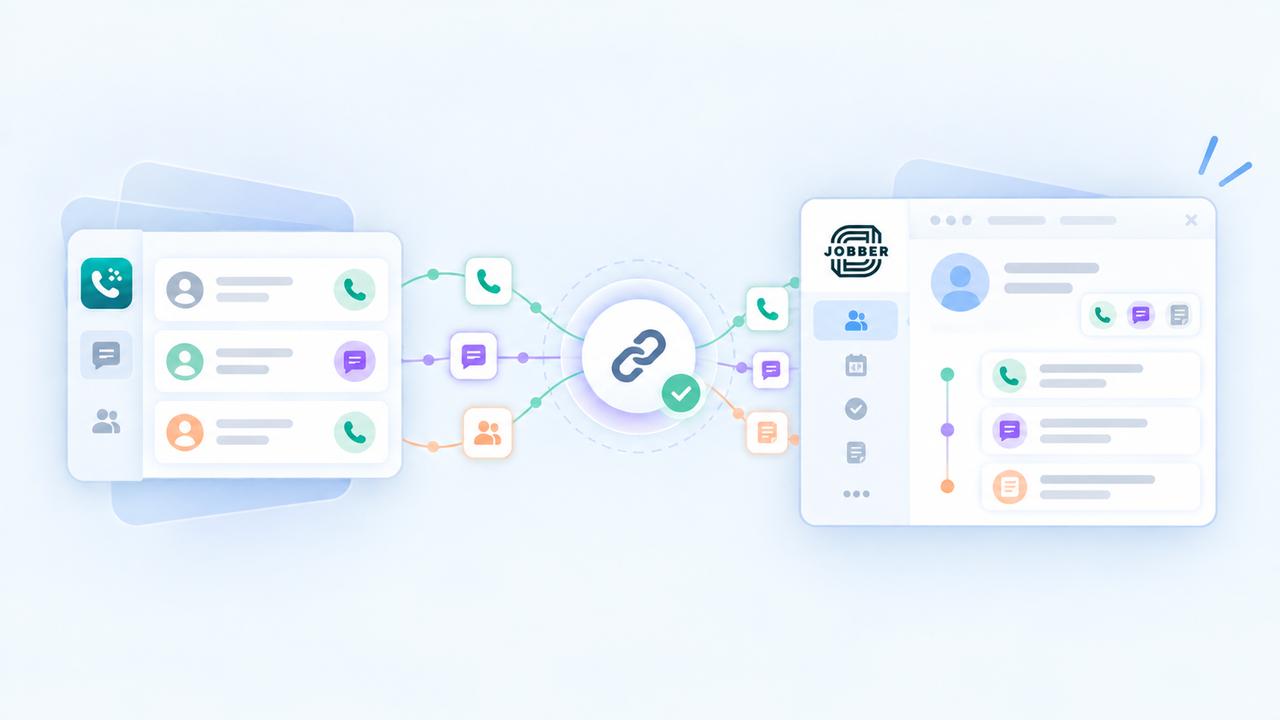
    The DialNext Jobber integration helps you keep your client communication organized by connecting your DialNext account with Jobber. Once connected, call activity and SMS activity can be logged as notes on your Jobber clients. This makes it easier to keep track of customer interactions without manually adding communication details to Jobber.

    How to use the integration

    After completing the DialNext Jobber integration, make sure the required features are enabled in the integration settings. You can enable call logging and SMS logging based on your workflow. Once the settings are saved, your DialNext communication activity can be recorded in Jobber client notes.


    If you encounter any issues, you can reach us at help@dialnext.io

  • How to integrate DialNext with Attio?

    How to integrate DialNext with Attio?

    Integrate DialNext with Attio in a few simple steps.

    How to integrate DialNext with Attio

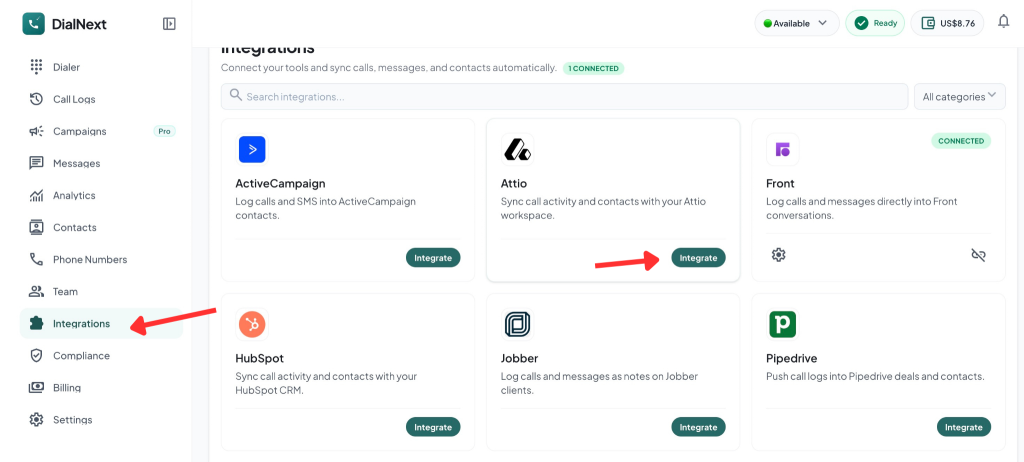
    1. Log in or sign up to your DialNext account.
    2. In the left sidebar, click Integrations.
    3. Find Attio in the integrations list and click Integrate.

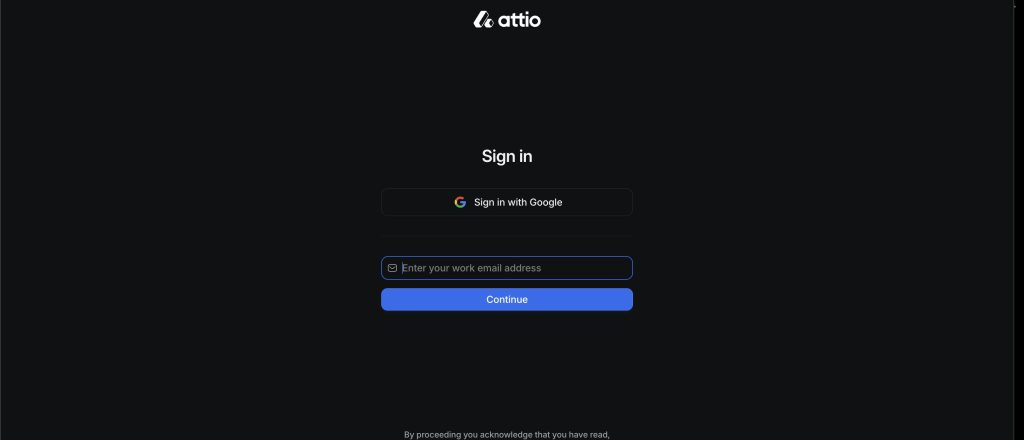
    4. Sign in to your Attio account using your work email or Google.

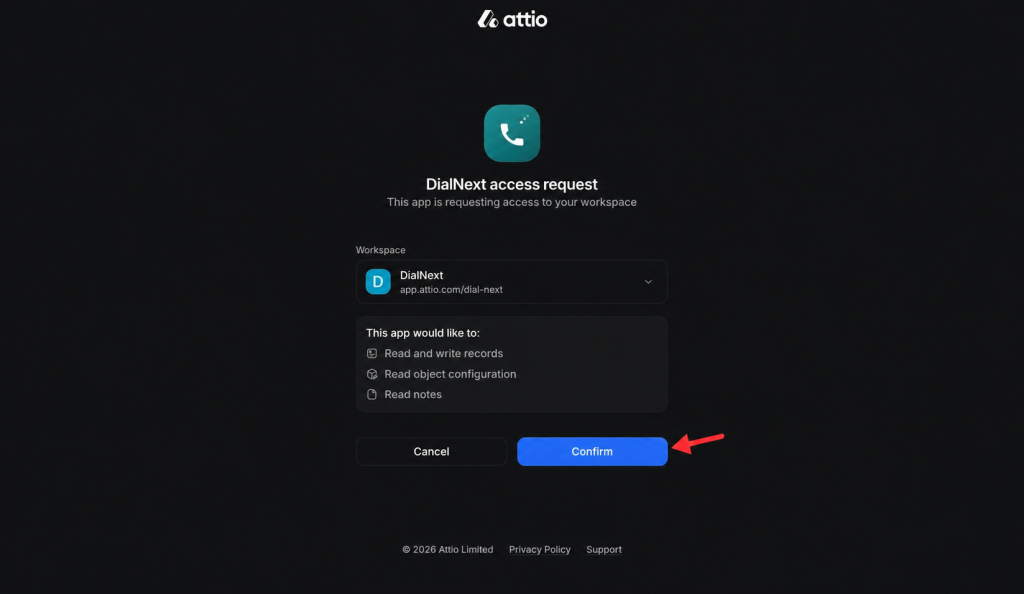
    5. Select your DialNext workspace and click Confirm to Authorize the connection.

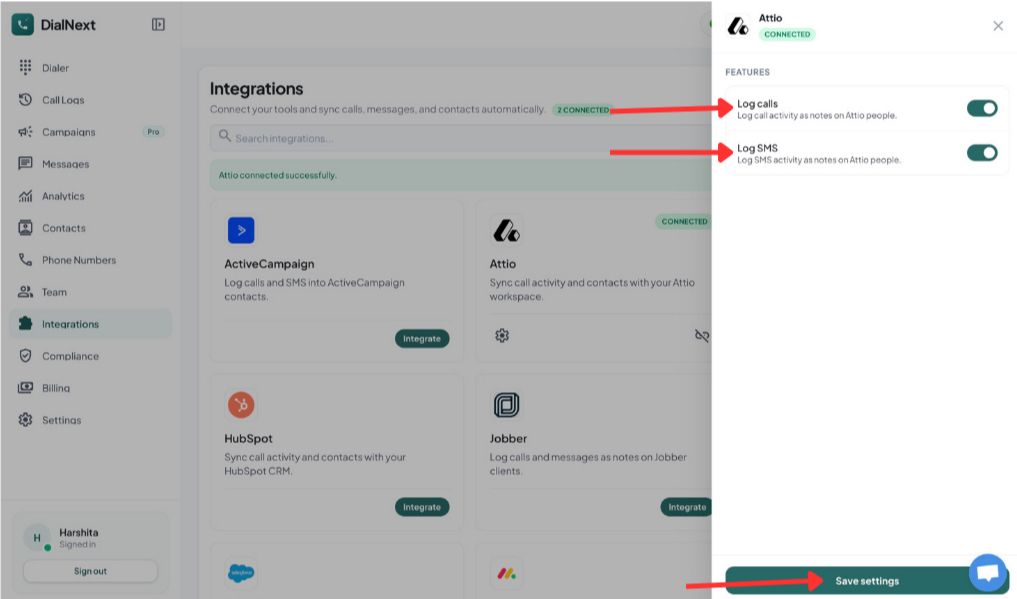
    6.Choose the features you want to enable, then click Save settings.

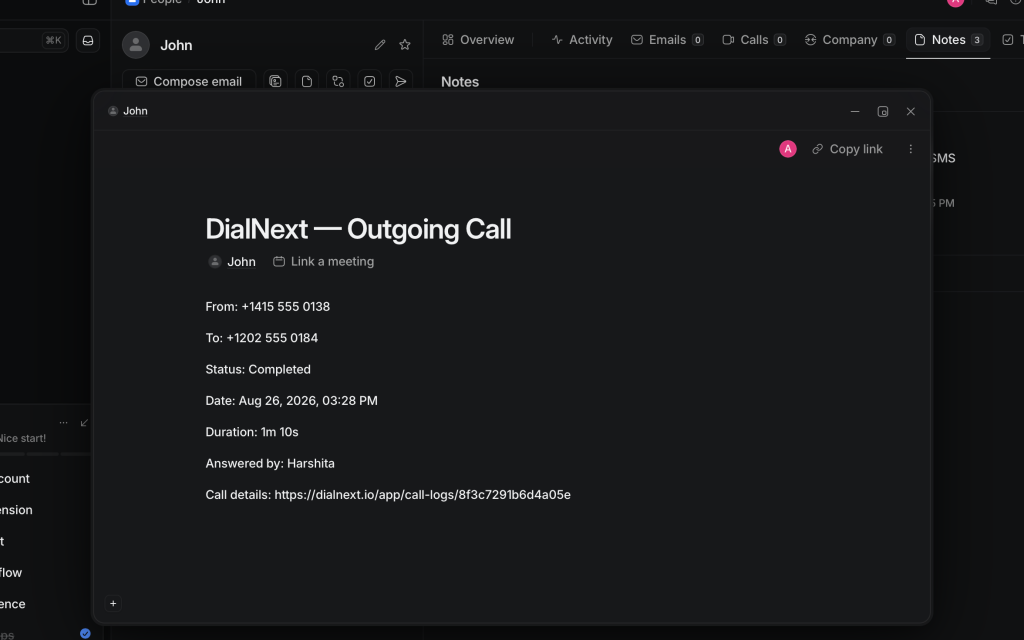
    7. Make a test call or send an SMS from DialNext to verify that the activity is logged in Attio.

    Your DialNext account is now successfully connected to Attio.

    If you encounter any issues, you can reach us at help@dialnext.io.

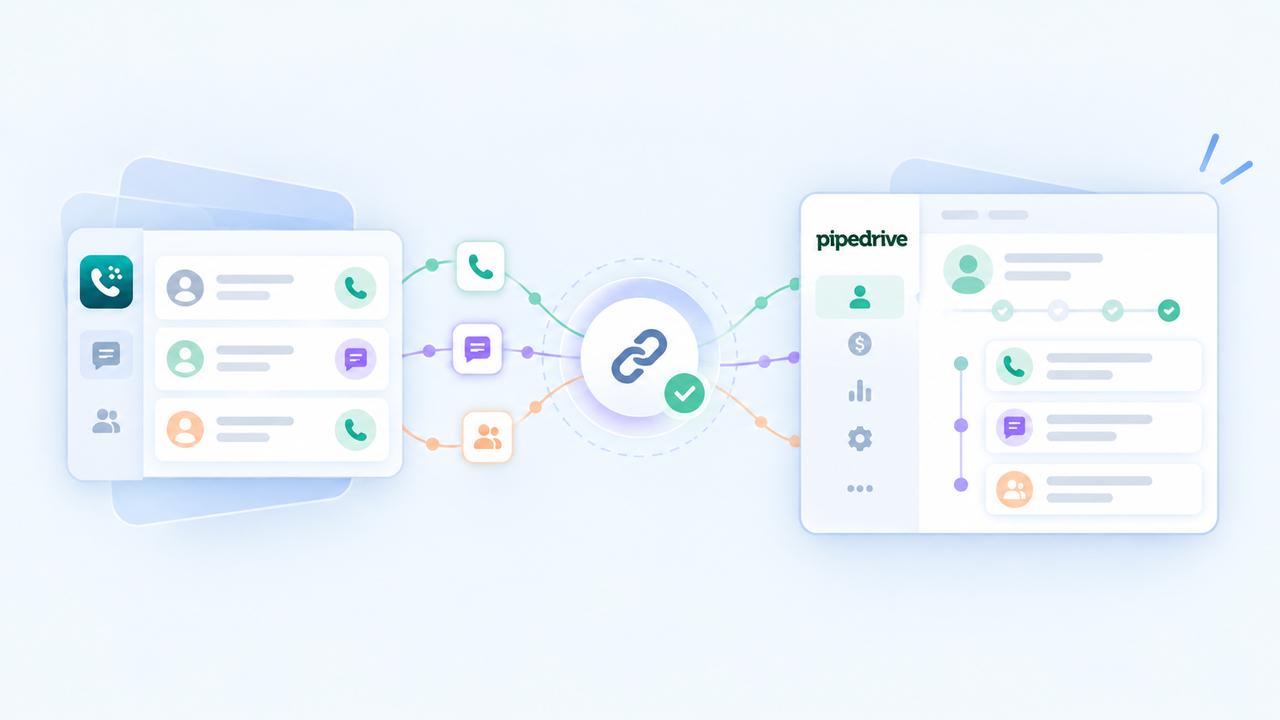
  • How to integrate with Pipedrive?

    How to integrate with Pipedrive?

    • Login or Signup to your DialNext account.
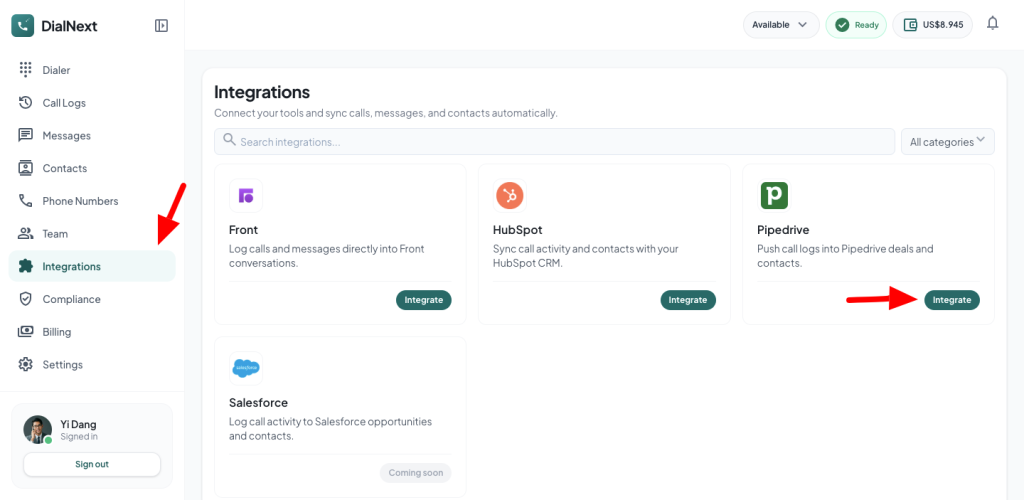
    • In the left sidebar, click Integrations.
    • Look for Pipedrive & click the Integrate button.
    • You will be redirected to Pipedrive’s authorization page. Click Authorize to grant permission and connect DialNext with Pipedrive.
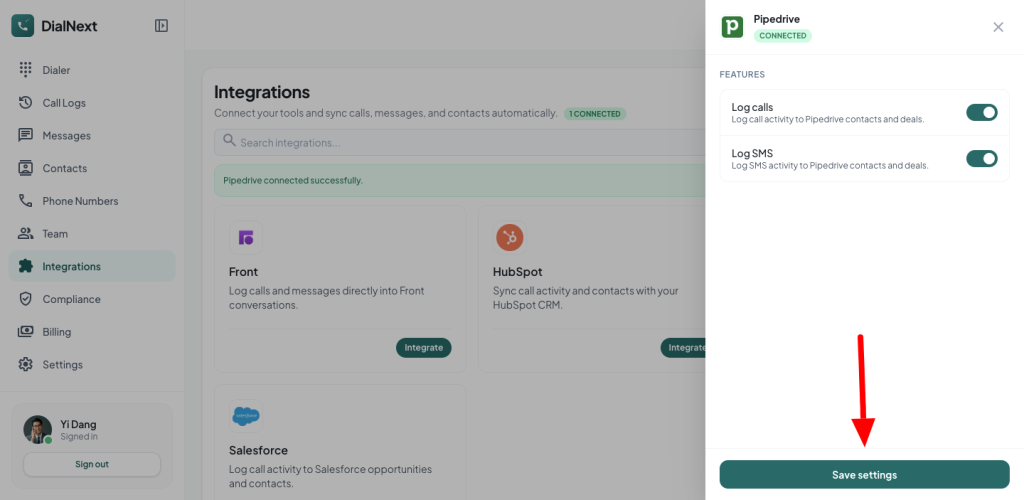
    • Once the authorization is complete, Pipedrive will redirect you back to DialNext.
    • Click Save Settings to begin logging calls and SMS messages to your Pipedrive account.
    • Make a test call, and you will see a log automatically created within the corresponding contact in Pipedrive.
    • If you encounter any issue, you can reach us out on help@dialnext.io

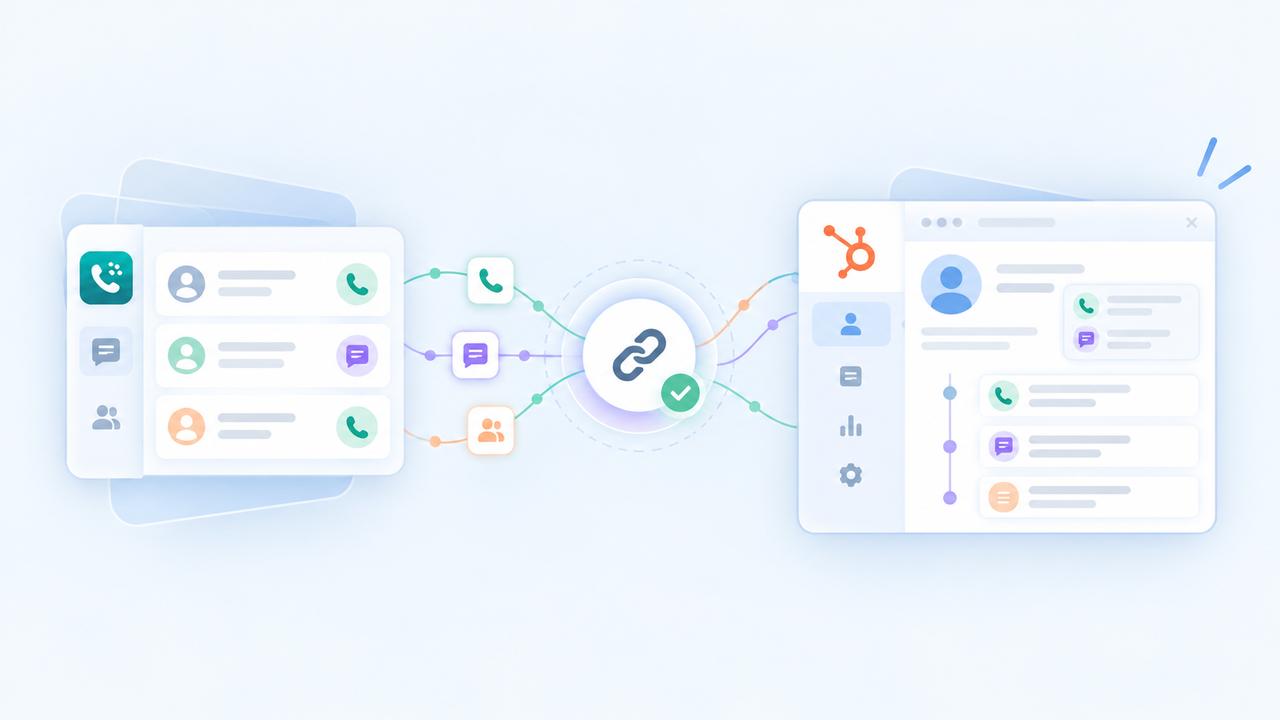
  • How to integrate with HubSpot?

    How to integrate with HubSpot?

    • Login or Signup to your DialNext account.
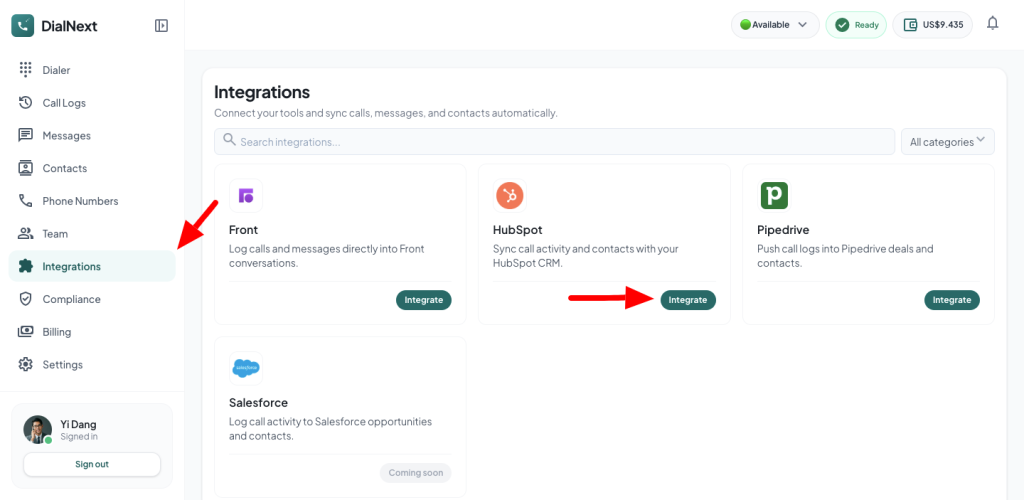
    • In the left sidebar, click Integrations.
    • Look for HubSpot & click the Integrate button.
    • You will be redirected to HubSpot’s authorization page. Click Authorize to grant permission and connect DialNext with HubSpot.
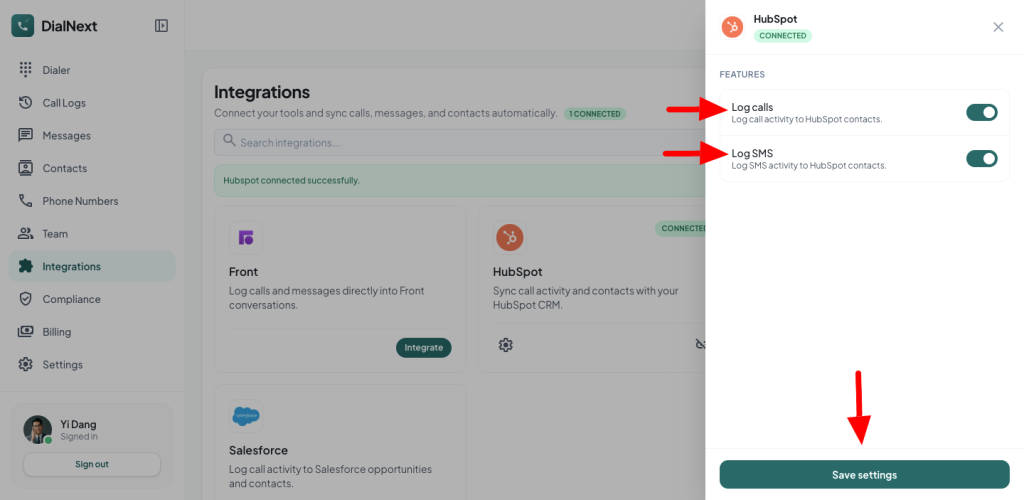
    • Once the authorization is complete, HubSpot will redirect you back to DialNext.
    • Click Save Settings to begin logging calls and SMS messages to your HubSpot account.
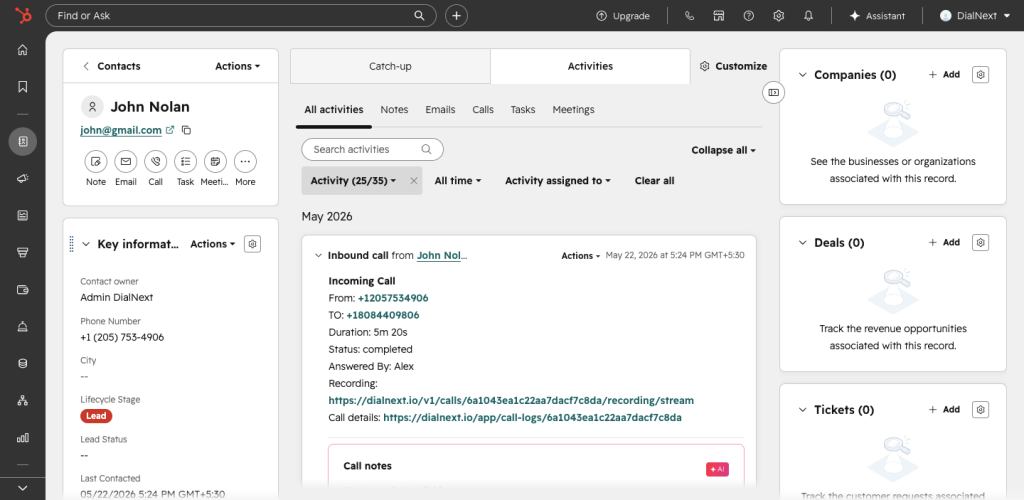
    • Make a test call, and you will see a log automatically created within the corresponding contact in HubSpot.

    If you encounter any issue, you can reach us out on help@dialnext.io

  • How to integrate with Front?

    How to integrate with Front?

    • Login or Signup to your DialNext account.
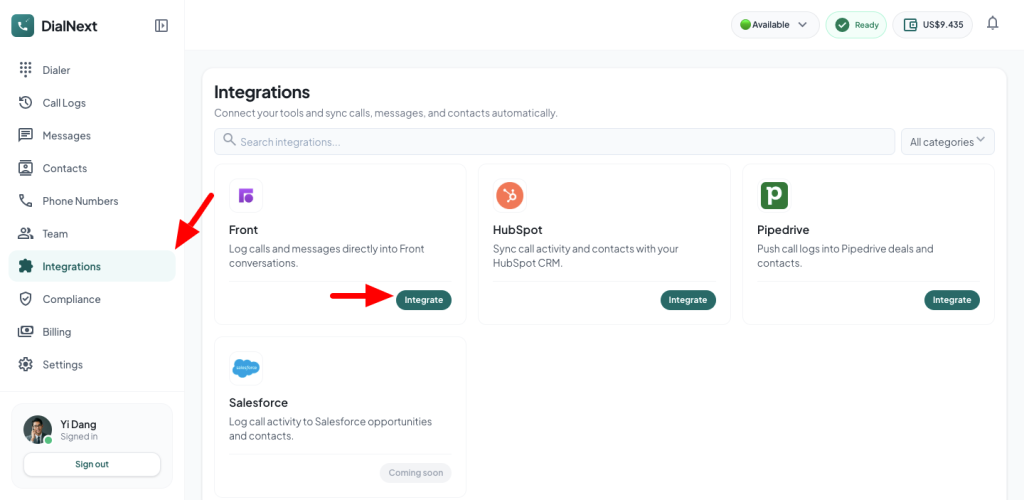
    • In the left sidebar, click Integrations.
    • Look for Front & click the Integrate button.
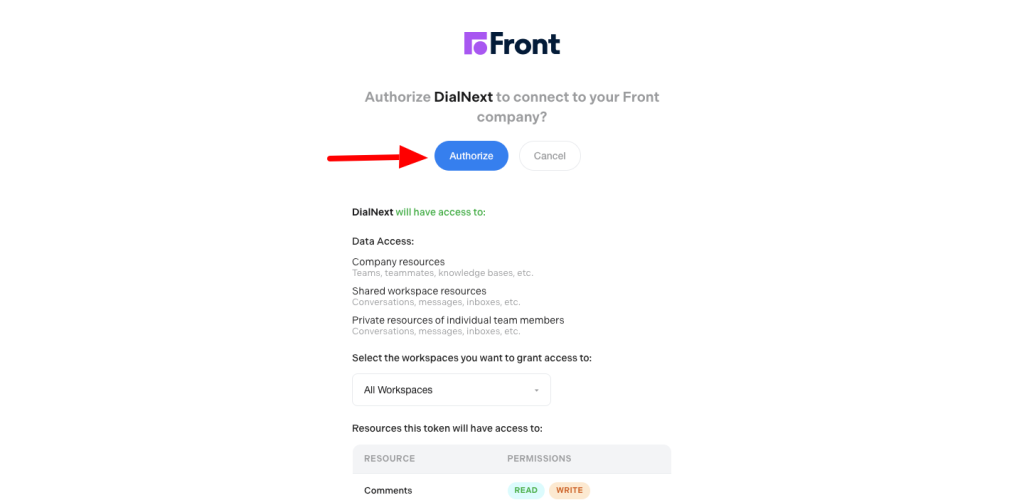
    • You will be redirected to Front’s authorization page. Click Authorize to grant permission and connect DialNext with Front.
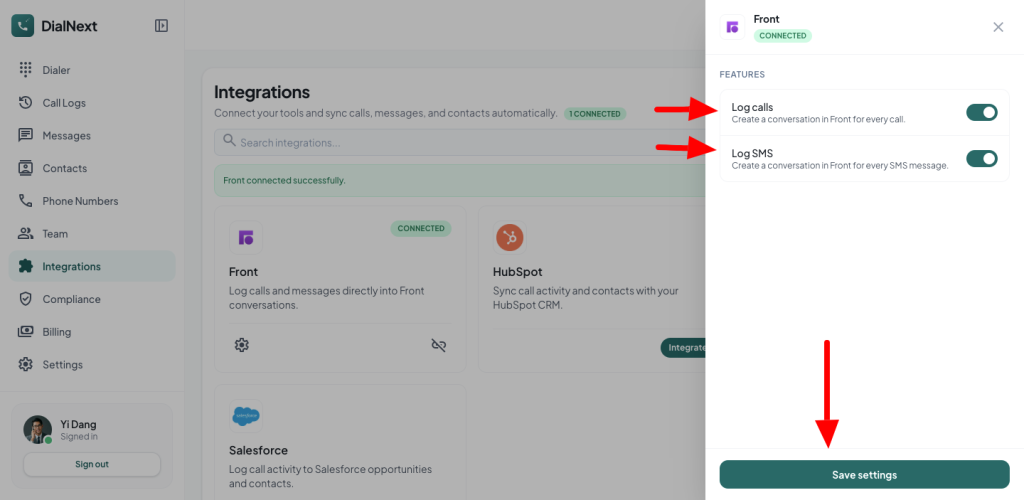
    • Once the authorization is complete, Front will redirect you back to DialNext.
    • Click Save Settings to begin logging calls and SMS messages to your Front account.
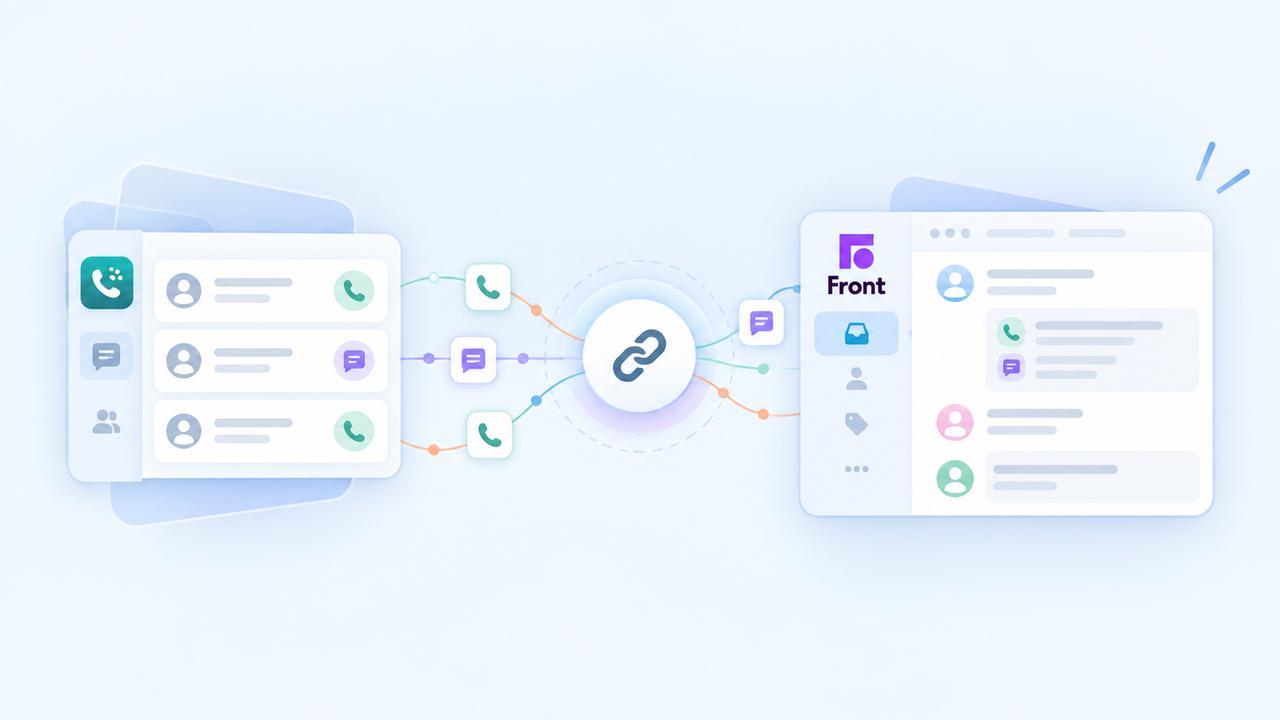
    • Make a test call, and you will see a log automatically created within the corresponding conversation in Front.

    If you encounter any issue, you can reach us out on help@dialnext.io