Tag: Call Management

  • How to Manage Agent Availability in DialNext

    How to Manage Agent Availability in DialNext

    Managing Agent Availability in DialNext helps users communicate their current availability through the platform. By updating your status, you can let teammates know whether you are available, taking a break, attending a meeting, or away from work.

    DialNext provides different status options under the availability menu. You can also view team member presence from the Team Members section.

    In this guide, we will explain how to change your availability status and where to view team member status in DialNext.

    What Is Agent Availability in DialNext?

    Agent Availability in DialNext refers to the status displayed for a user within the platform. It allows users to indicate their current availability using the options provided in the Dialer dashboard.

    For example, you can select Available when you are ready to work or choose Lunch break when you step away for lunch.

    Additionally, the Team Members section displays team member status and voice status, making it easier to view their presence in one place.

    How to Change Your Agent Availability in DialNext

    Follow these steps to update your availability status:

    Step 1: Log in to Your DialNext Account

    First, log in to your DialNext account using your credentials.

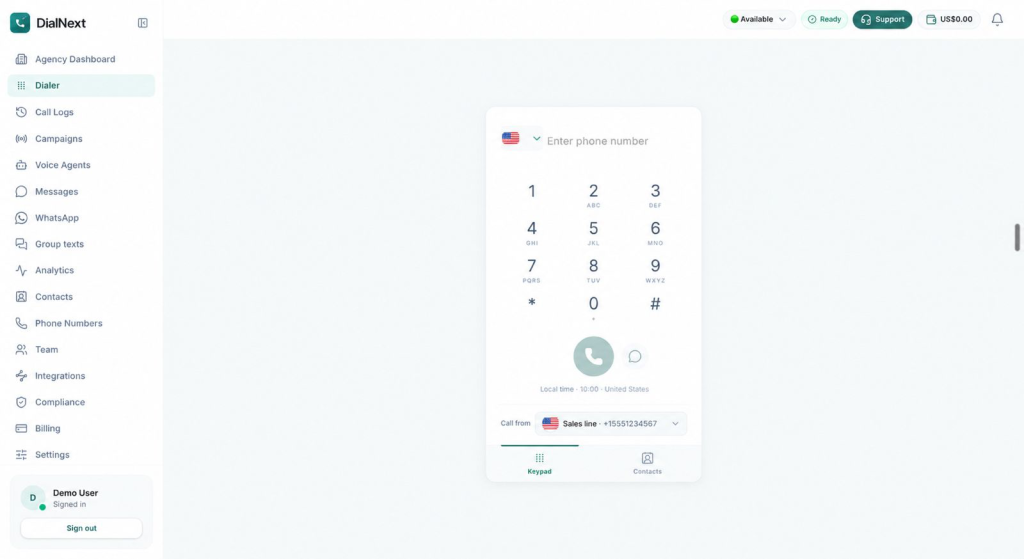
    Next, open the Dialer dashboard. You can access the availability menu from the top-right corner of the dashboard.

    Step 2: Open the Availability Menu

    In the top-right corner, locate your current status. It appears beside a green status indicator.

    Click the status dropdown to view the available options.

    Step 3: Select Your Preferred Status

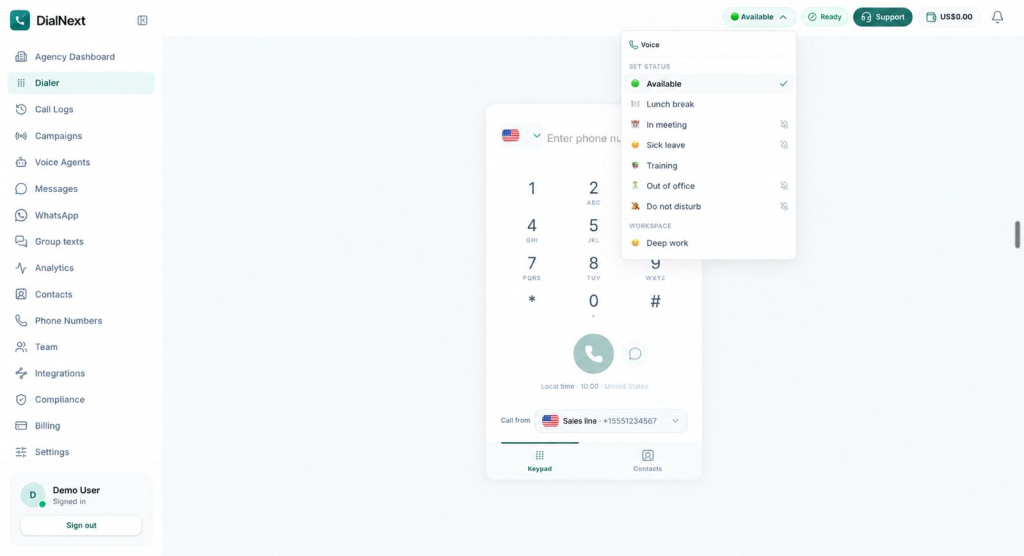
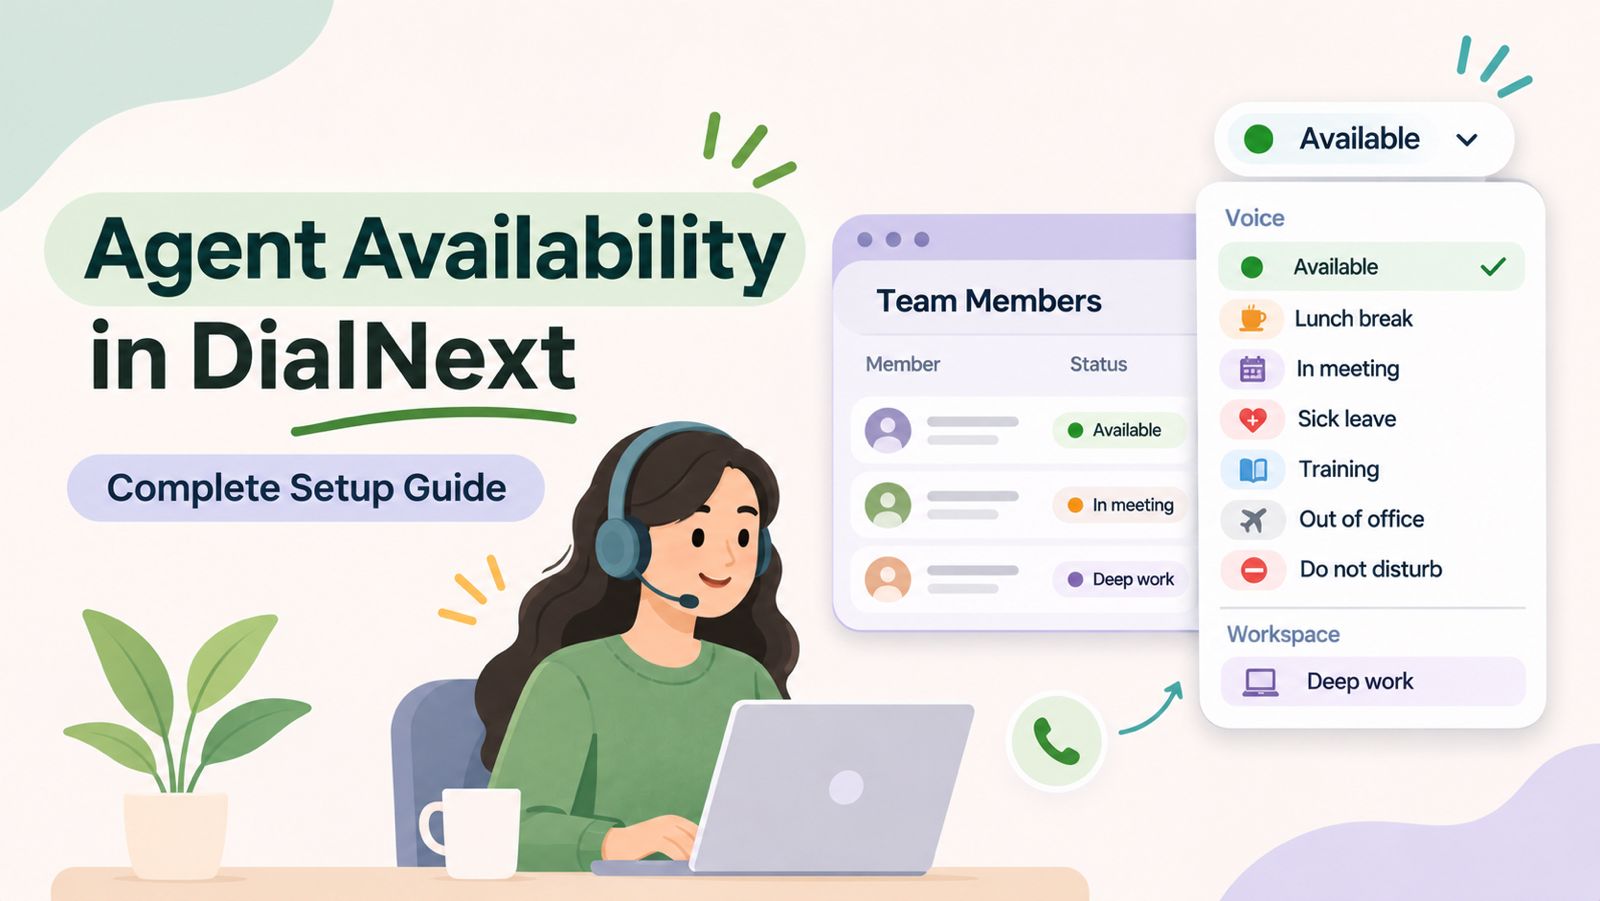
    Once the dropdown opens, you will see the available status options under the Voice section.

    DialNext provides the following options:

    • Available: Select this option when you are available.
    • Lunch break: Use this status when you are taking a lunch break.
    • In meeting: Select this when you are attending a meeting.
    • Sick leave: Choose this when you are away due to illness.
    • Training: Use this when you are participating in training.
    • Out of office: Select this when you are away from work.
    • Do not disturb: Select this option when you want to indicate that you are unavailable.

    Click the status that matches your current situation.

    Step 4: Check Your Updated Status

    After selecting an option, the status displayed in the Dialer dashboard updates to reflect your selection.

    For example, if you select Lunch break, the dropdown displays Lunch break instead of Available.

    Therefore, you can use the same menu whenever you need to update your availability.

    Understanding Voice and Workspace Status Options

    The availability dropdown in DialNext contains separate sections for Voice and Workspace.

    Voice Status Options

    The Voice section includes the following options:

    • Available
    • Lunch break
    • In meeting
    • Sick leave
    • Training
    • Out of office
    • Do not disturb

    These options let you indicate your current work or availability status.

    Workspace Status Option

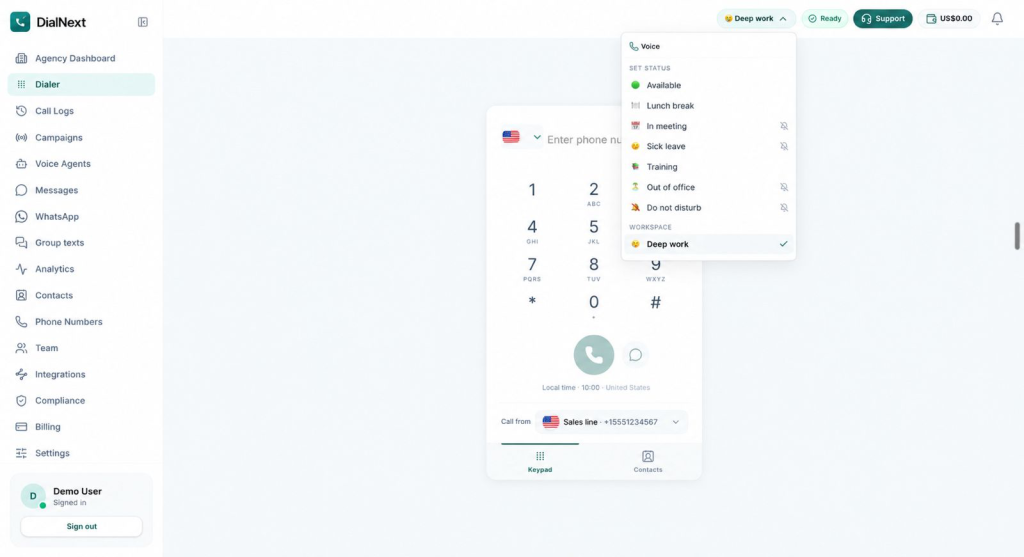
    The Workspace section includes the Deep work option.

    You can select it from the same availability dropdown when you want to indicate that you are focused on deep work.

    How to View Agent Availability in the Team Members Section

    Besides updating your own status, you can also view team member information from the Team Members section.

    Follow these steps:

    Step 1: Open the Team Members Page

    From the DialNext dashboard, navigate to the Team section in the left sidebar.

    Open the Members tab to access the team member list.

    Step 2: Review Team Member Information

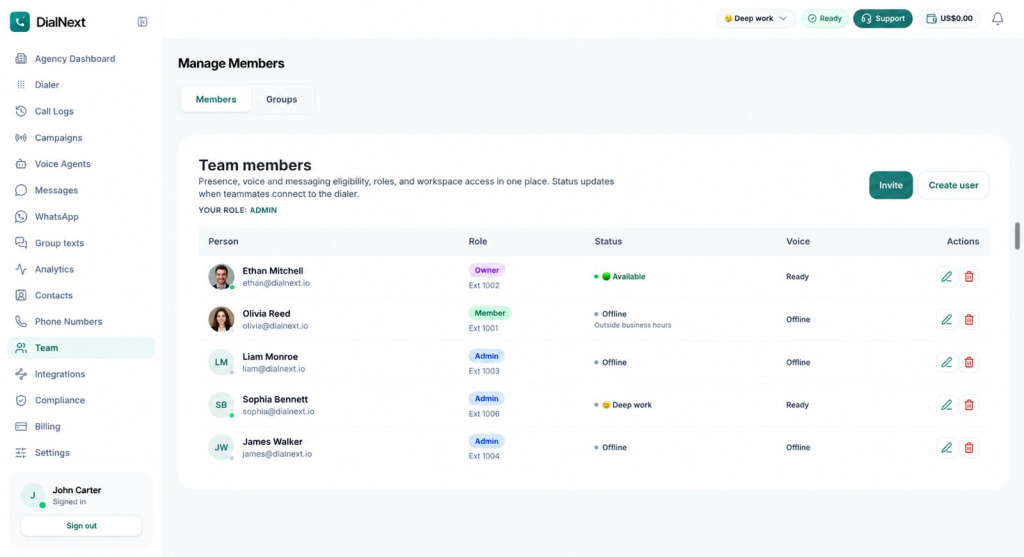
    The Members page displays team information in a table.

    You can find the following details:

    • Person: Displays the team member’s name and email address.
    • Role: Shows the assigned role, such as Owner, Admin, or Member.
    • Status: Displays the member’s presence status, such as Available or Offline.
    • Voice: Shows the voice status, such as Ready or Offline.
    • Actions: Provides available member management actions.

    Additionally, the page brings presence, voice and messaging eligibility, roles, and workspace access information together.

    This makes it easier to review team member details from one place.

    Important Things to Know About Agent Availability

    Before managing your availability in DialNext, keep these points in mind:

    1. Your current status is displayed in the top-right corner of the Dialer dashboard.
    2. You can update your status using the availability dropdown.
    3. Voice and Workspace options appear as separate sections.
    4. The Team Members page displays member status and voice status in separate columns.
    5. The available status options should be selected according to your current work situation.

    Please note that the displayed Status and Voice indicators are separate fields. Their exact operational effects should not be assumed to be the same.

    Frequently Asked Questions

    1. Where can I find Agent Availability in DialNext?

    You can find your availability status in the top-right corner of the Dialer dashboard. Click the status dropdown to view the available options.

    2. Which availability statuses are available in DialNext?

    The Voice section includes Available, Lunch break, In meeting, Sick leave, Training, Out of office, and Do not disturb. The Workspace section also includes Deep work.

    3. How can I change my availability status?

    Open the availability dropdown in the top-right corner of the Dialer dashboard. Then, select the status that matches your current situation.

    4. Where can I view team member availability?

    Navigate to the Team section from the left sidebar and open the Members tab. The table displays team member information, including Status and Voice.

    5. What is the difference between Status and Voice in the Team Members section?

    The Team Members page displays Status and Voice in separate columns. Status can show values such as Available or Offline, while Voice can show values such as Ready or Offline.

    Related Articles

    You may also find these DialNext guides helpful:

    Need Help with Agent Availability?

    If you have questions about managing your availability or need assistance with your DialNext account, contact the DialNext Support Team.

    We’re here to help you!

  • How to Access and Manage Call Recordings in DialNext

    How to Access and Manage Call Recordings in DialNext

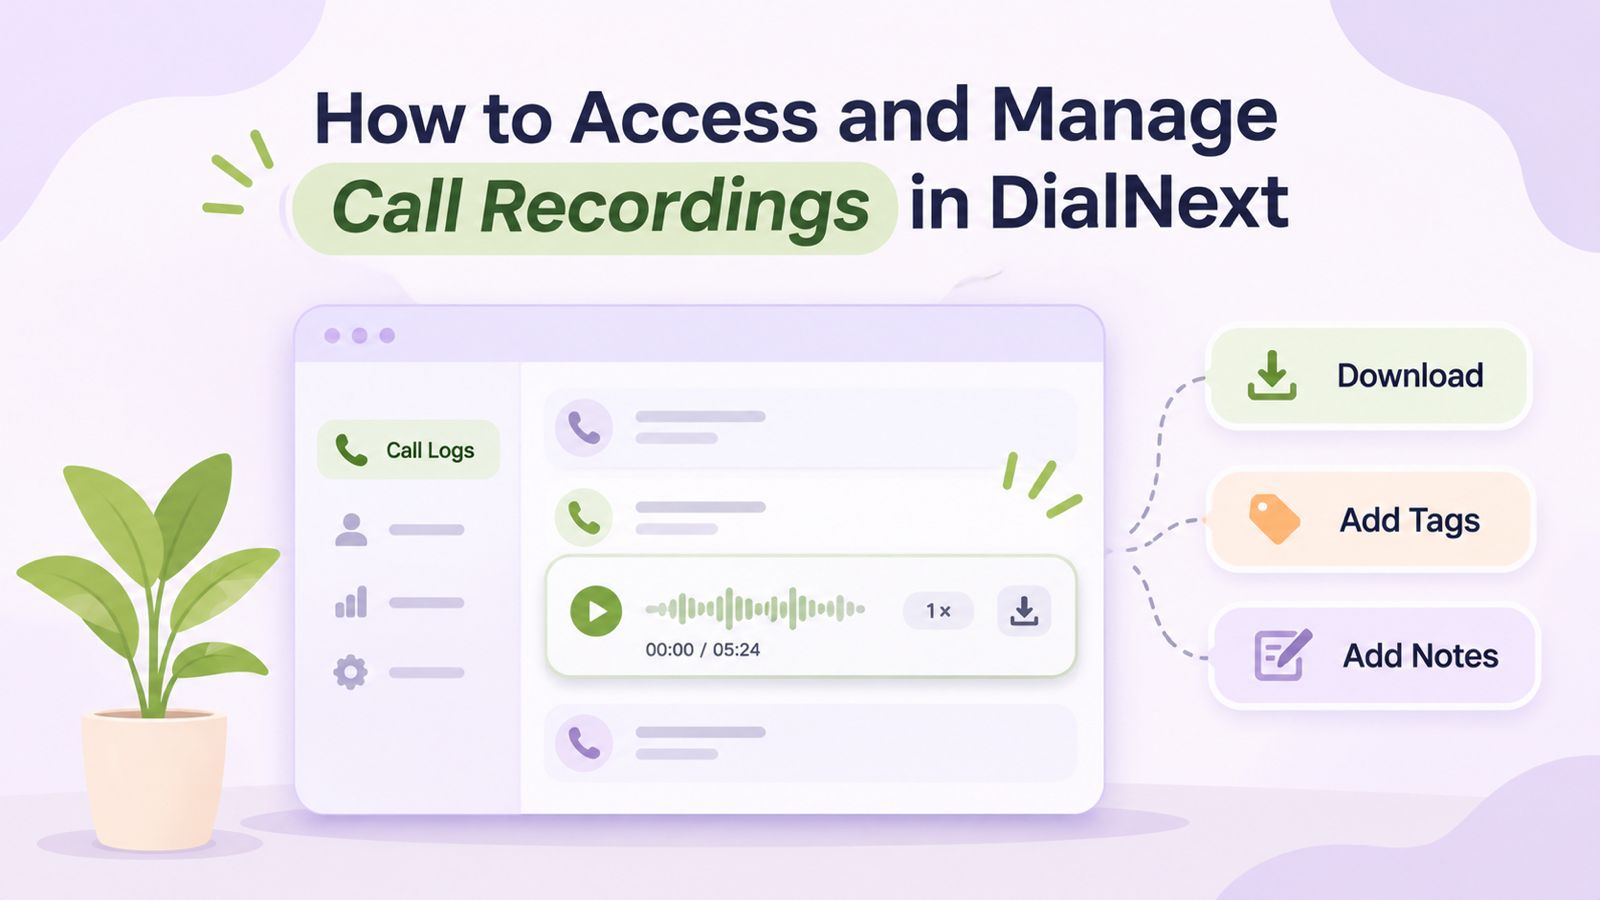
    Call recordings in DialNext help businesses review customer conversations, revisit important details, and maintain useful records of previous interactions. Through the Call Logs section, users can access available recordings, listen to conversations, download audio files, and organize call information using notes and tags.

    Moreover, these features make it easier for teams to understand previous customer interactions and find relevant information when needed. Whether you want to review a customer query, check a conversation, or organize call details, DialNext provides useful tools to manage your calling activity.

    In this guide, you will learn how to access, play, download, and manage call recordings in DialNext, along with practical tips for keeping your call records organized.

    How to Access Call Recordings in DialNext

    You can access available call recordings directly through the Call Logs section of your DialNext dashboard. Before proceeding, make sure you can sign in to your account and access the relevant call records.

    Follow these steps to find and play a recording.

    Step 1: Navigate to Call Logs in DialNext

    First, log in to your DialNext account using your login credentials.

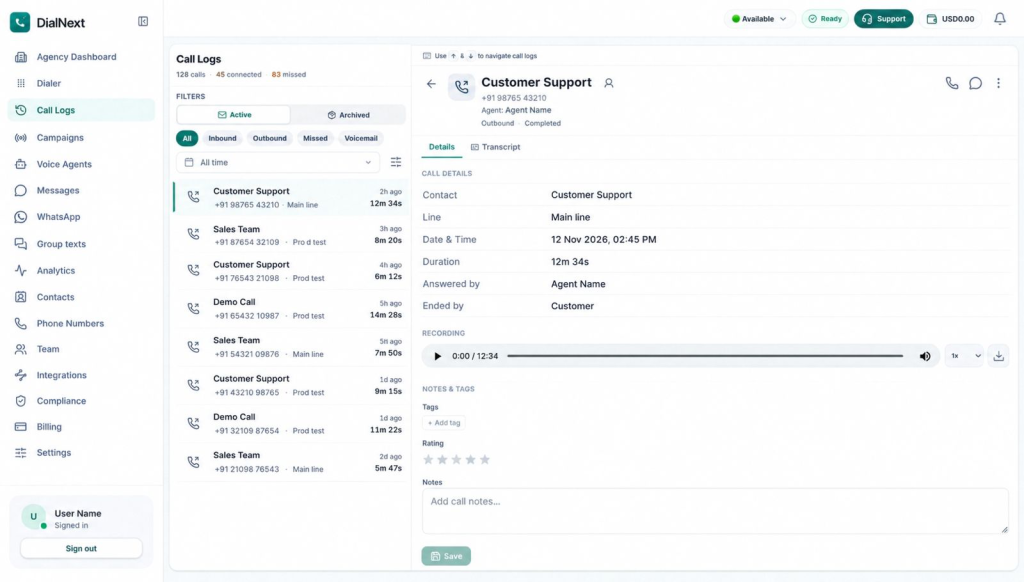
    Next, locate the navigation menu on the left side of your dashboard. Then, click Call Logs to open your call history and view the available call records.

    Step 2: Select a Call Record

    Once the Call Logs page opens, browse the available records to find the conversation you want to review.

    Additionally, you can use the available filters, such as Inbound, Outbound, Missed, and Voicemail, to narrow down the list. This makes it easier to locate a specific call without reviewing your entire call history.

    After finding the relevant record, select it to open its details.

    For more information about using these filters, read our guide on How to View and Filter Call Logs in DialNext.

    Step 3: Open the Call Details

    After selecting a call, locate the Details tab in the call details panel on the right side of the screen.

    Here, you can review information associated with the selected call, including the contact, calling line, date and time, duration, and answering agent.

    Next, locate the Recording section to check whether an audio recording is available for that call.

    Step 4: Play Call Recordings in DialNext

    If a recording is available, locate the audio player in the Recording section.

    Then, click the Play button to listen to the conversation. Additionally, you can use the playback speed control to adjust how quickly the recording plays, depending on the available options.

    As a result, you can revisit important parts of a conversation, understand customer queries, and check specific details without relying only on written notes.

    Step 5: Download Call Recordings in DialNext

    If you want to save an available recording to your device, locate the Download icon next to the audio player.

    Next, select the icon to download the audio file, provided the download option is available for that recording.

    This allows you to keep a copy for future reference. However, always follow your organization’s recording, privacy, and data-handling policies when accessing or downloading customer conversations.

    How to Manage Call Recordings in DialNext

    Accessing a recording is only one part of managing call information. In addition to listening to conversations, DialNext provides options to organize additional details associated with individual call records.

    For example, you can use notes, tags, and ratings to make previous interactions easier to understand and review.

    1. Add Tags to Call Records in DialNext

    Tags help categorize call records based on their purpose or outcome.

    To add a tag, follow these steps:

    1. First, open the required call record from the Call Logs section.
    2. Next, navigate to the Notes & Tags section in the call details panel.
    3. Then, click + Add tag under the Tags section.
    4. Finally, select the relevant tag from the available options.

    For example, your team may use suitable tags to identify calls that require follow-up or additional attention, depending on the available tag options.

    Furthermore, using consistent tags can make it easier to organize and identify important call records.

    2. Review Call Ratings in DialNext

    DialNext also provides a star-rating field in the Notes & Tags section.

    You can review the rating associated with an individual call record to understand its recorded assessment. Additionally, this information provides more context when reviewing previous customer interactions.

    3. Add and Save Call Notes in DialNext

    Call notes help your team retain important information about a conversation. For instance, you can add a short summary or mention details that another team member may need later.

    To add notes:

    1. First, open the required call record.
    2. Next, navigate to the Notes & Tags section.
    3. Then, locate the Notes text box.
    4. Enter a short summary or other relevant information about the conversation.
    5. Before saving, review the note to ensure it contains the correct details.
    6. Finally, click Save to store your changes.

    As a result, your team can refer to relevant call information without having to listen to the entire recording again.

    You can also explore How to Use Call Transcription and AI Insights in DialNext to learn more about reviewing call conversations and accessing available call insights.

    Benefits of Using Call Recordings in DialNext

    Call recordings can support several everyday business activities. When used appropriately, they help teams revisit conversations and maintain better visibility into customer interactions.

    Here are some practical ways businesses can use call recordings:

    • Review customer conversations: Listen to previous interactions to understand customer queries, responses, and important discussion points.
    • Maintain useful call records: Keep available recordings for future reference, subject to organizational policies.
    • Support team coordination: Provide relevant conversation context to team members when appropriate.
    • Organize call information: Use notes and tags to keep important details associated with individual call records.
    • Verify conversation details: Revisit recordings when specific information needs to be checked.

    Furthermore, combining recordings with call details, notes, and tags can make it easier to review customer interactions. Therefore, teams can find relevant information and understand previous conversations more efficiently.

    Best Practices for Managing Call Recordings in DialNext

    Managing recordings effectively requires more than simply accessing and downloading audio files. Instead, a consistent process can help teams keep call information organized and handle customer data responsibly.

    Consider the following best practices:

    Follow Recording and Privacy Policies

    First, make sure your team follows applicable recording requirements and organizational privacy policies. Additionally, access recordings only when there is a legitimate business need.

    Use Relevant Tags

    Apply consistent tags to categorize calls based on their purpose or outcome. As a result, your team can identify relevant records more easily.

    Add Clear and Useful Notes

    Keep call notes short, accurate, and relevant. For example, include information that may help another team member understand the conversation without listening to the entire recording.

    Review Recordings When Needed

    Use recordings to revisit important conversation details, clarify information, or support internal call reviews. However, avoid accessing recordings unnecessarily.

    Handle Downloaded Files Carefully

    If you download a recording, store it only in approved locations. Furthermore, follow your organization’s access, privacy, and retention policies. Avoid sharing customer recordings through unauthorized channels.

    Frequently Asked Questions About Call Recordings in DialNext

    1. When are Call Recordings Available in DialNext?

    Call recordings are available through Call Logs when a recording has been generated and is accessible for the selected call. Therefore, you can open the relevant call record and check its Recording section.

    2. Where Can I Find Call Recordings in DialNext?

    You can find available recordings in the Call Logs section of your DialNext dashboard. First, select the relevant call. Then, open its Details tab and locate the Recording section.

    3. Can I Listen to a Call Recording More Than Once?

    Yes. If a recording is available, you can play it again whenever you need to revisit the conversation. Additionally, this makes it easier to check specific details from previous interactions.

    4. Can I Download Call Recordings in DialNext?

    Yes. You can download an available recording using the Download icon next to the audio player, provided the download option is enabled for that recording.

    5. Can I Adjust the Playback Speed of Call Recordings?

    Yes. You can use the playback speed control in the audio player to adjust the listening speed. This allows you to review recordings at a pace that suits your requirements.

    6. Can I Add Notes and Tags to a Call Record?

    Yes. The Notes & Tags section provides options to add notes and tags to the selected call record. Additionally, you can review the available star rating associated with that call.

    7. What Should I Do If a Call Recording Is Unavailable?

    First, open the correct call record and check its Details tab for the Recording section. If no recording is available, contact your workspace administrator to confirm the relevant recording settings and access permissions.

    However, if the issue continues, contact DialNext Support for further assistance.

    Conclusion

    DialNext makes it easier to access and manage available call recordings through the Call Logs section. Users can listen to previous conversations, download recordings when the option is available, and organize call information using notes and tags.

    Moreover, keeping relevant call details organized helps teams revisit customer interactions and refer to important conversation details whenever needed. By following appropriate recording and data-handling practices, businesses can manage their call records more effectively.

    Manage Your Business Calls with DialNext

    Looking for a simpler way to manage business conversations? DialNext brings business calling and call management features together to help teams handle customer interactions more effectively.

    Explore DialNext to learn more about its business communication solutions.

    Need assistance? Contact our team at support@dialnext.io.

    Related Articles

    Explore these guides to learn more about managing calls and using DialNext features:

  • The Hidden Cost of Switching Between Calling and CRM: How to Build a Zero-Context-Switching Workflow

    The Hidden Cost of Switching Between Calling and CRM: How to Build a Zero-Context-Switching Workflow

    When a customer calls your business, your team needs more than a phone connection. They need the right customer information, conversation history, call details, and next steps in one connected workflow.

    But when calling and CRM activities happen in separate tools, employees constantly switch between screens. They may search for a customer record before a call, return to the CRM to update details afterward, and move to another tool to manage the follow-up. Each switch adds friction and makes it harder to maintain context throughout the customer interaction.

    A connected calling and CRM workflow brings these activities closer together. Instead of treating the phone system and CRM as separate parts of the sales or support process, businesses can connect communication with the customer data and workflows their teams already use.

    In this guide, we’ll explore why context switching happens, how it affects everyday calling workflows, and what businesses can do to create a more connected experience for their teams.

    What Is Context Switching Between Calling and CRM?

    Context switching happens when employees have to move between different tools to complete tasks that are part of the same customer interaction.

    For example, a sales representative may receive a call through a business phone system, open the CRM to find the customer’s record, return to the calling application to manage the conversation, and then switch back to the CRM to record what happened. If a follow-up is required, they may need another tool or workflow to manage the next action.

    The individual steps may seem small, but repeated switching can make a simple customer interaction feel fragmented.

    A connected calling and CRM workflow brings communication and customer information into a more coordinated process. Instead of treating calling as a separate activity from CRM work, teams can connect the two so that important customer context remains available throughout the interaction.

    This is particularly useful for teams that handle a high volume of customer calls and need to keep records updated while maintaining consistent follow-ups.

    Why Switching Between Calling and CRM Creates Friction

    When calling and CRM systems operate separately, small tasks can quickly add up. The problem is not necessarily the number of tools a team uses, but the repeated effort required to move information between them.

    Searching for Customer Information

    Before or during a call, employees may need to search for the correct customer record in the CRM. If the calling system and CRM are disconnected, this can mean manually looking up names, numbers, or previous interactions.

    Manually Updating Call Records

    After a conversation, important details may need to be added to the CRM manually. This creates another step in the workflow and makes it easier for information to be incomplete or entered later than intended.

    Losing Conversation Context

    When customer information and communication history are spread across different systems, employees may have to reconstruct the context of an interaction themselves. This can make it harder to understand what happened during previous conversations and what needs to happen next.

    Delayed Follow-Ups

    A call may create an important next step, such as sending information, scheduling another conversation, or contacting the customer again. When follow-up activities are disconnected from the calling workflow, those actions can be easier to overlook.

    Limited Team Visibility

    When call information is not connected with customer records, other team members may have less visibility into recent interactions. This becomes particularly important when multiple representatives handle the same customer at different stages of the relationship.

    The goal, therefore, is not simply to reduce the number of applications a team uses. It is to connect the steps that belong to the same customer interaction so employees can move from conversation to action without repeatedly rebuilding context.

    What a Connected Calling and CRM Workflow Looks Like

    A connected workflow keeps the key steps of a customer interaction linked instead of treating each activity as a separate task.

    A typical workflow can look like this:

    Customer Record → Call → Conversation → Call Outcome → CRM Update → Follow-Up → Team Visibility

    Here’s how each stage fits together:

    1. Customer Record

    The workflow starts with customer information. The team should be able to identify who they are communicating with and access the relevant context without unnecessary searching.

    2. Call

    The employee handles the conversation through the business calling system while keeping it connected to the broader customer workflow.

    3. Conversation

    During the call, the representative focuses on the customer’s needs rather than switching between multiple systems to reconstruct information.

    4. Call Outcome

    Once the conversation ends, the outcome should be recorded. This could include the result of the conversation, required action, or whether another interaction is needed.

    5. CRM Update

    Relevant information can then be associated with the customer’s CRM record, helping maintain a more complete history of interactions.

    6. Follow-Up

    If the conversation requires another action, the next step should be clear. This could involve another call, a message, or another customer-facing task.

    7. Team Visibility

    When customer communication and CRM information are connected, relevant team members can have better visibility into what has already happened and what needs to happen next.

    The result is a workflow where calling is part of the customer management process rather than a separate activity sitting outside the CRM.

    Key Features of a Low-Context-Switching Workflow

    A connected calling and CRM workflow is most useful when it supports the entire customer communication process, not just the phone call itself.

    CRM Integration

    Connecting the calling system with the CRM helps teams keep customer communication closer to the records they already use. This reduces the need to repeatedly move between systems to find or update customer information.

    Business Calling

    A business calling system provides the communication layer for customer and sales conversations. When calling is connected to the rest of the workflow, the call becomes part of the broader customer interaction rather than an isolated activity.

    Call Management

    Teams need tools to manage their calls efficiently, particularly when multiple employees handle customer conversations. A connected workflow can make it easier to keep calling activities organized alongside customer information.

    Call Analytics

    Call data can provide useful visibility into communication activity and calling patterns. When this information is part of the broader workflow, managers can better understand calling activity without relying on disconnected records.

    Follow-Ups

    A customer conversation often leads to another action. Keeping follow-up activities connected to the original interaction helps teams maintain continuity instead of relying entirely on memory or separate manual processes.

    Team Visibility

    Customer communication is rarely handled by just one person. Shared visibility into relevant calling activity can help team members understand previous interactions and continue conversations with better context.

    Communication Workflows

    The biggest benefit comes from connecting these individual capabilities into a single process. Instead of calling → switching tools → updating information → finding another tool for follow-up, teams can build a workflow where communication, customer information, and next actions work together.

    These are the areas where DialNext can support a more efficient business communication workflow, including business calling, CRM integrations, call management, analytics, team visibility, and follow-up workflows.

    How DialNext Helps Connect Calling and CRM Workflows

    A calling workflow becomes more practical when the calling system can work alongside the tools a business already uses to manage customer relationships.

    DialNext brings business calling and communication workflows together with capabilities such as CRM integrations, call management, call analytics, team visibility, SMS, and follow-ups. This allows businesses to build a more connected process around customer communication rather than managing every activity separately.

    Connect Calling With CRM

    DialNext supports CRM integrations that connect calling activities with the customer-management systems teams already use. This can reduce the need to repeatedly move between a phone system and CRM when handling customer conversations.

    Keep Customer Communication Connected

    Calling is often only one part of a larger customer interaction. With business calling, SMS, and communication workflows available in the same setup, teams can manage different stages of customer communication more systematically.

    Improve Visibility Across the Team

    When communication activity is integrated into the broader workflow, teams can have better visibility into customer interactions. This can be particularly useful when multiple representatives work with the same customers.

    Turn Calls Into Follow-Up Actions

    A completed call should not always be the end of the customer interaction. DialNext can be used as part of communication and follow-up workflows, helping teams move from a customer conversation toward the next action.

    Understand Calling Activity

    Call analytics can provide teams with visibility into their communication activity. Combined with call management and team visibility, this can help businesses manage customer calls more systematically.

    The goal is not to eliminate every tool from a team’s workflow. It is to connect calling with the customer information and actions that matter, so employees spend less time managing the process and more time communicating with customers.

    How to Build a Better Calling and CRM Workflow

    Building a connected workflow does not necessarily require replacing every tool your team already uses. The focus should be on connecting the key steps so customer communication can move smoothly from one stage to the next.

    1. Connect Your Calling System With Your CRM

    Start by connecting your business calling platform with the CRM your team already uses. This creates a closer relationship between customer records and calling activity.

    2. Define What Happens Before, During, and After a Call

    Map the complete workflow:

    Before the call: Identify the customer and relevant context.
    During the call: Handle the conversation and manage the interaction.
    After the call: Record the outcome and determine the next action.

    This makes it easier to identify where employees are switching between tools unnecessarily.

    3. Reduce Manual Data Entry

    Look for repetitive activities that require employees to copy information from one system to another. Wherever possible, reduce these manual steps so employees can spend more time on customer conversations.

    4. Make Follow-Ups Part of the Workflow

    A call should have a clear next step when additional action is required. Whether that means another call, an SMS, or another customer communication, keeping follow-ups connected to the original interaction helps maintain continuity.

    5. Give Teams Shared Visibility

    Make relevant customer communication accessible to the people who need it. Shared visibility can help representatives understand previous interactions instead of asking customers to repeat information.

    6. Use Call Data to Improve the Process

    Review available call analytics and communication data regularly. This can help teams identify workflow bottlenecks, understand calling activity, and find opportunities for automation or process improvement.

    7. Review the Workflow Regularly

    The process should evolve with the team. As call volumes, CRM processes, and customer communication needs change, review where employees are still switching tools or performing repetitive tasks.

    The objective is simple: make the path from customer conversation to CRM record to next action as connected as possible.

    Best Practices to Reduce Context Switching

    Even with connected tools, the way a team manages its workflow can determine how much context switching actually occurs. A few practical habits can make the process more consistent.

    Keep Customer Information in One Place

    Decide which system should serve as the primary source of customer information. This helps employees know where to look when they need customer details or interaction history.

    Standardize Call Outcomes

    Use consistent categories or notes for common call outcomes. A standardized approach makes information easier for other team members to understand and reduces unnecessary clarification.

    Automate Repetitive Steps Where Possible

    Identify tasks that employees regularly perform after calls, such as updating records or initiating routine follow-ups. If connected tools support automation, use it to reduce repetitive manual work.

    Keep Follow-Ups Specific

    Instead of simply marking a conversation as requiring follow-up, define what needs to happen next and when. Clear next actions make it easier for teams to maintain momentum after a call.

    Give Employees the Right Context

    Employees should have access to the information they need without being overwhelmed by unnecessary data. A focused workflow can make customer interactions easier to manage.

    Monitor the Workflow Over Time

    Use call activity and team feedback to identify where employees continue to switch between systems. These points can reveal opportunities to improve integrations and processes or automate repetitive tasks.

    A zero-context-switching workflow does not mean that employees will never open another application. The goal is to remove unnecessary switching and keep the important parts of the customer interaction connected.

    FAQs

    What is context switching between calling and CRM?

    Context switching happens when employees repeatedly move between their calling system, CRM, and other tools to complete tasks related to the same customer interaction. A connected workflow helps reduce unnecessary switching.

    Why should calling be integrated with a CRM?

    CRM integration can connect customer information with calling activity, making it easier for teams to manage conversations, maintain records, and handle follow-up actions in one workflow.

    How can businesses reduce manual work after customer calls?

    Businesses can reduce repetitive work by connecting their calling and CRM systems, standardizing call outcomes, and using available automation for tasks such as record updates and follow-ups.

    What features should a connected calling and CRM workflow include?

    Important capabilities can include CRM integration, business calling, call management, call analytics, follow-ups, team visibility, and communication workflows.

    Can DialNext connect calling with CRM workflows?

    DialNext supports CRM integrations alongside business calling, call management, call analytics, team visibility, SMS, and communication workflows, allowing businesses to build more connected customer communication processes. 

    Conclusion

    A calling workflow should not end when the conversation ends. For teams that rely on both business calling and CRM systems, keeping customer information, call activity, and follow-up actions connected can make everyday communication more organized and consistent.

    Reducing unnecessary context switching helps employees spend less time moving information between tools and more time focused on customer conversations. The right CRM integration, calling capabilities, call management, analytics, and follow-up workflows can help create that connection.

    With DialNext, businesses can connect calling and customer communication workflows with CRM integrations and capabilities designed to support more connected team communication. 

    The goal is simple: less time switching between tools, more time maintaining meaningful customer conversations.
  • Call Routing System: What Is It and How Does It Work?

    Call Routing System: What Is It and How Does It Work?

    Call routing is a phone system feature that directs incoming calls to the right person, team, or destination based on predefined rules. It helps businesses manage incoming calls more efficiently, reduce unnecessary transfers, and connect callers with the appropriate agent faster.

    What Is Call Routing?

    Call routing is a phone system feature that automatically directs incoming calls to the right person, team, department, or destination based on predefined rules. These rules can consider factors such as the caller’s needs, business hours, agent availability, or the caller’s location.

    Instead of manually transferring every call, businesses can use call routing to create an organized call flow. This helps callers reach the appropriate destination faster and makes it easier for teams to manage incoming calls efficiently.

    For example, a business can route sales calls to the sales team, support calls to customer service, and calls received outside business hours to voicemail or an after-hours team.

    How Does Call Routing Work?

    Call routing works by applying predefined rules to incoming calls and directing each call to the most appropriate person, team, or destination.

    A typical call routing process works like this:

    1. Incoming call: A customer calls the business phone number.
    2. Routing rules are checked: The system evaluates rules such as business hours, agent availability, caller location, or team.
    3. Call is directed: The system sends the call to the appropriate agent, team, queue, or destination.
    4. Fallback routing: If the selected agent is unavailable, the call can be redirected to another agent, voicemail, or a backup destination.

    This process helps businesses handle incoming calls efficiently without requiring someone to manually transfer every call.

    Types of Call Routing

    1. Round-Robin Routing

    Calls are distributed evenly among available agents, giving each agent a turn to handle the next incoming call.

    2. Sequential Routing

    The system tries agents in a specific order. If the first agent does not answer, the call moves to the next available agent.

    3. Skills-Based Routing

    Calls are directed to agents based on their skills, expertise, or department, helping callers reach the most suitable person.

    4. Time-Based Routing

    Calls are routed differently depending on the time of day and business hours. For example, calls outside working hours can be sent to voicemail or an after-hours team.

    5. Location-Based Routing

    Calls are routed based on the caller’s location or region. This can help businesses connect customers with the appropriate local team or office.

    Benefits of Call Routing

    Call routing helps businesses manage incoming calls more efficiently and create a better experience for callers. Key benefits include:

    • Faster call handling: Connect callers with the right person or team without unnecessary transfers.
    • Better agent efficiency: Distribute calls based on agent availability, skills, or other routing rules.
    • Fewer missed calls: Route unanswered calls to another agent, team, or backup destination.
    • Improved customer experience: Help callers reach the appropriate department faster.
    • Flexible call management: Adjust routing rules for business hours, holidays, locations, and changing team availability.

    Common Business Use Cases

    • Sales teams: Route new customer inquiries directly to sales representatives.
    • Customer support: Send support calls to the appropriate support team or queue.
    • Remote teams: Connect callers with available employees regardless of their location.
    • After-hours calls: Route calls received outside business hours to voicemail, an on-call team, or another destination.
    • Multi-location businesses: Direct callers to the appropriate office or regional team based on routing rules.

    Call Routing vs IVR

    Call routing and Interactive Voice Response (IVR) are related phone system features, but they serve different purposes.

    IVR interacts with callers by providing voice prompts and allowing them to select options, such as pressing a number to choose Sales or Support. Call routing determines where the call should go based on predefined rules such as department, agent availability, business hours, or caller information.

    For example, an IVR can ask a caller to “Press 1 for Sales or 2 for Support,” while call routing sends the caller to the appropriate team after the selection is made.

    Businesses can use both features together to create an organized and efficient incoming call flow.

    Call Routing vs Call Queues

    Call routing determines where an incoming call should be sent, while a call queue manages callers waiting to speak with an available agent.

    For example, call routing can direct a customer to the Support team, while the call queue can place the customer in a waiting line until a support agent becomes available.

    Businesses often use both together to manage incoming calls efficiently and reduce missed calls.

    Common Call Routing Problems

    • Incorrect routing rules: Calls may reach the wrong team or agent if routing rules are not configured correctly.
    • Uneven call distribution: Some agents may receive more calls than others, affecting response times and workload.
    • Missed calls: Calls can be missed when agents are unavailable and no backup routing is configured.
    • Complex call flows: Too many routing conditions can make the call flow difficult to manage and maintain.
    • Outdated routing settings: Changes in team availability, working hours, or business structure can make existing routing rules ineffective.

    Call Routing Best Practices

    • Keep routing rules simple: Use clear and straightforward rules that are easy to manage and update.
    • Route calls based on agent availability: Send calls only to available agents whenever possible.
    • Set up fallback options: Configure voicemail, backup teams, or alternate numbers for unanswered calls.
    • Review routing rules regularly: Update rules when business hours, team structure, or agent availability changes.
    • Test call flows: Regularly test different scenarios to make sure calls reach the correct destination.

    How to Set Up a Call Routing System

    Setting up a call routing system involves defining how incoming calls should be handled and where they should be directed.

    1. Define your call flow: Decide how incoming calls should move through your phone system.
    2. Choose routing rules: Set rules based on factors such as agent availability, business hours, department, or location.
    3. Assign call destinations: Select the appropriate agents, teams, queues, or external numbers for each rule.
    4. Set up fallback options: Configure voicemail or alternate destinations for calls that cannot be answered.
    5. Test the call flow: Make test calls to confirm that each routing rule works as expected.
    6. Monitor and update: Review call performance and adjust routing rules as your business needs change.

    When Should a Business Use Call Routing?

    Call routing is useful for businesses that receive a high volume of incoming calls or need to connect callers with specific teams or agents.

    Businesses should consider call routing when they:

    • Receive calls for multiple departments, such as Sales and Support.
    • Have remote or distributed teams handling customer calls.
    • Need to manage calls outside regular business hours.
    • Want to reduce missed calls and unnecessary transfers.
    • Need to route calls based on agent availability, location, or specific business rules.

    A well-configured call routing system can make incoming call management more organized and help businesses provide a faster, more consistent caller experience.

    FAQs

    What is call routing?

    Call routing is a phone system feature that directs incoming calls to the appropriate person, team, department, or destination based on predefined rules.

    How does call routing work?

    Call routing uses configured rules such as agent availability, business hours, location, or department to determine where an incoming call should be sent.

    What is the difference between call routing and IVR?

    IVR interacts with callers through voice prompts and menu options, while call routing determines where the call should be directed based on predefined rules.

    Can call routing reduce missed calls?

    Yes. Businesses can configure fallback options such as another agent, team, external number, or voicemail when the primary destination is unavailable.

    Can call routing work outside business hours?

    Yes. Time-based routing can direct after-hours calls to voicemail, an on-call team, or another designated destination.

    Is call routing useful for remote teams?

    Yes. Call routing can direct incoming calls to available agents regardless of their physical location, making it useful for remote and distributed teams.

    Conclusion

    Call routing helps businesses manage incoming calls by directing callers to the right person, team, or destination based on predefined rules. With the right routing strategy, businesses can reduce missed calls, improve agent efficiency, and provide a smoother caller experience.

    As business needs change, regularly reviewing and updating routing rules can help keep the call flow efficient and reliable.