Group Texting in DialNext allows users to bring multiple participants together in a shared SMS conversation. Instead of sending the same message individually, you can create a group, assign it a name, select a sending number, and send an initial message to all participants.
Moreover, Group Texting makes it easier to organize business communication when multiple people need to receive the same information. In this guide, you’ll learn how to create a Group Text in DialNext, select a sending number, add participants, and send your first message step by step.
Before You Begin
Before creating a Group Text in DialNext, make sure you have:
Access to your DialNext account.
At least two participants to create a group.
The phone numbers of the participants you want to add.
Access to a DialNext line for sending the group message.
Additionally, keep your group name and initial message ready before starting the creation process.
How to Use Group Texting in DialNext to Create a Group
Follow these steps to create a new Group Text conversation in DialNext.
Step 1: Access Group Texting in DialNext
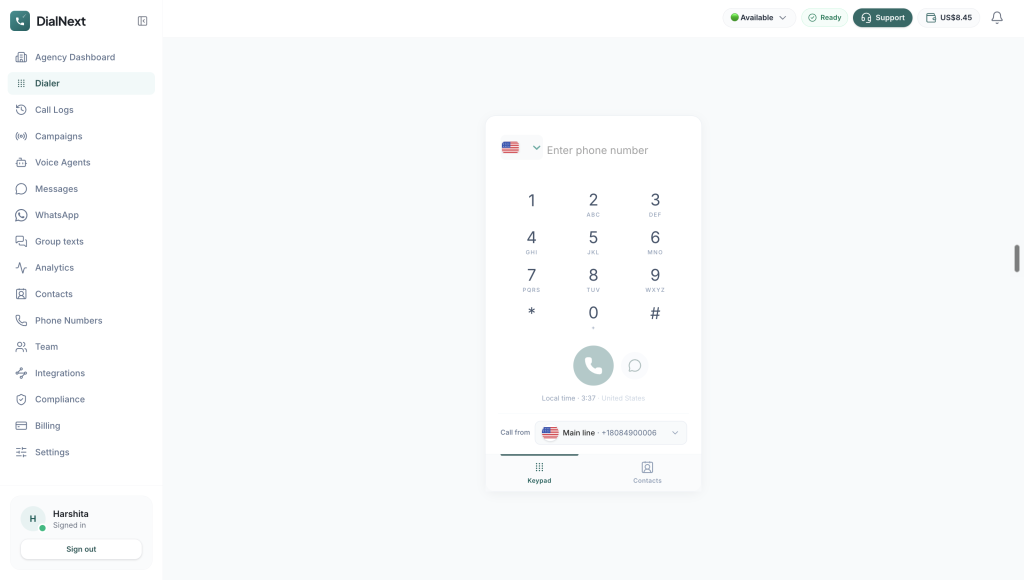
First, log in to your DialNext account using your credentials.
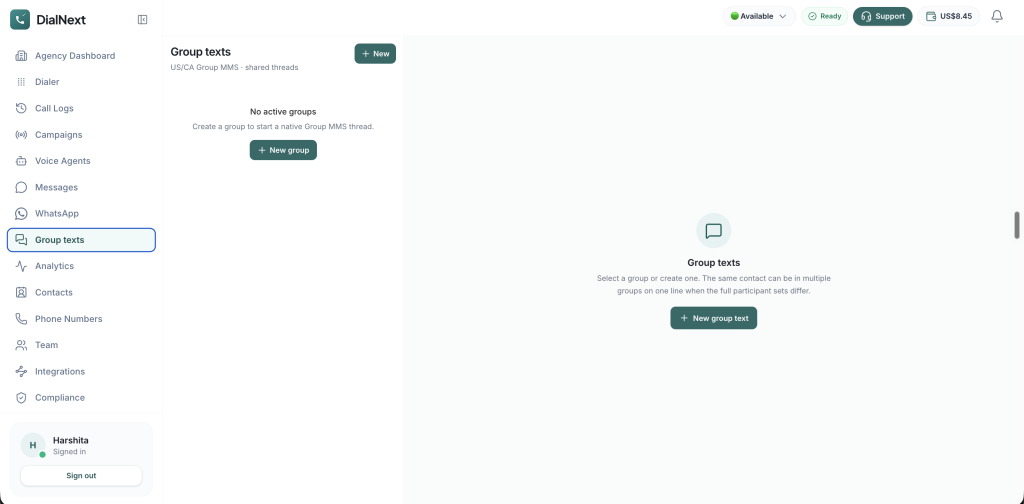
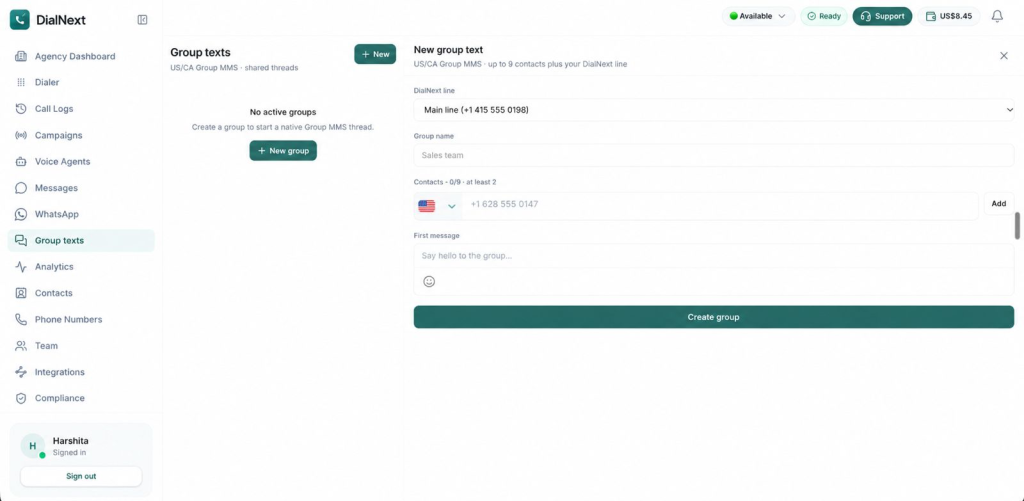
Next, locate the left-hand navigation menu in your dashboard. Then, click Group texts to access the Group Texts dashboard.
Here, you can start creating a new group conversation.
Step 2: Start a New Group Text Conversation
Once the Group Texts dashboard opens, locate the New group text button.
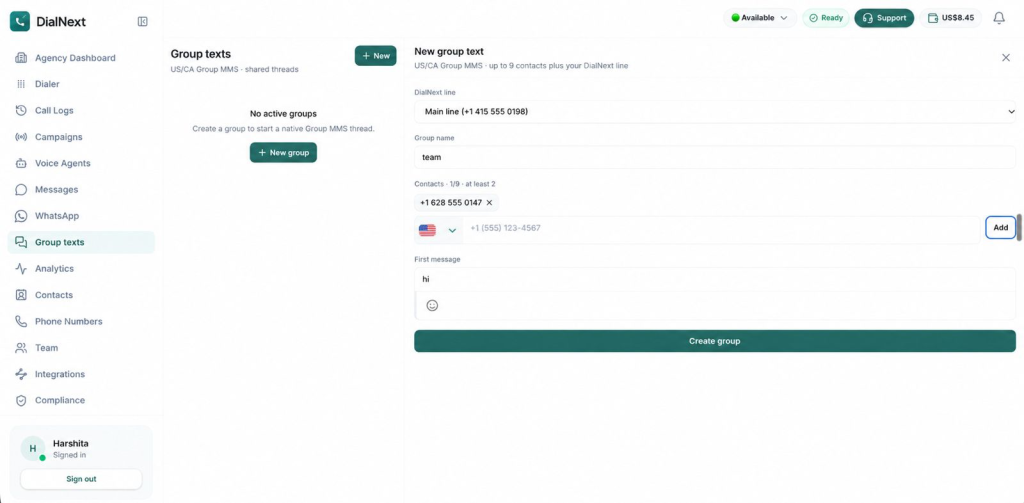
Next, click this button to open the group creation form. You can then enter the required group details and add participants.
Step 3: Select a DialNext Line
Under the DialNext line field, select the phone number you want to use for the group conversation.
This number will serve as the sending line for your Group Text. Therefore, make sure you select the correct number before proceeding.
Step 4: Enter a Group Name
Next, locate the Group name field and enter a suitable name for your conversation.
For example, choose a name that clearly identifies the purpose of the group. This makes it easier to recognize the conversation when reviewing your group messages later.
Step 5: Add Participants to Your Group Text
Under the Contacts section, enter the phone numbers of the participants you want to include in your group.
Follow these steps:
First, select the appropriate country code.
Next, enter the participant’s phone number.
Then, click Add to include the contact in the group.
Finally, repeat the process to add additional participants, if required.
Important: Group Texting in DialNext requires at least 2 participants. You can add up to 9 contacts to a group, in addition to your selected DialNext line.
Before proceeding, review the participant list carefully to make sure the correct contacts have been added.
Step 6: Compose Your First Group Text Message
Once you have added the participants, locate the First message field.
Enter the message you want to send to all participants when the group is created.
For example, you can write a short introductory message explaining the purpose of the group. Additionally, make sure the message is clear and relevant to everyone included in the conversation.
Before proceeding, review your message carefully to check for any errors or missing information.
Step 7: Review and Create Your Group Text
Before creating the group, review all the information you have entered.
Make sure the following details are correct:
Selected DialNext line.
Group name.
Participant phone numbers.
First message.
Once you have checked these details, click the Create group button to create your Group Text conversation in DialNext.
The initial message is sent to the added participants as part of the group creation process. Therefore, review its content carefully before selecting Create group.
Important Group Texting Requirements in DialNext
Before creating a Group Text conversation, keep the following requirements in mind:
Minimum participants: At least 2 participants are required to create a group.
Maximum participants: You can add up to 9 contacts, in addition to your selected DialNext line.
DialNext line: Select the correct sending number before creating the group.
Group name: Choose a clear and recognizable name for your conversation.
First message: Review your initial message carefully because it is sent when the group is created.
Additionally, check the participant details before completing the process to avoid adding an incorrect phone number.
Frequently Asked Questions About Group Texting in DialNext
1. How Many Participants Can I Add to Group Texting in DialNext?
You need at least 2 participants to create a group. Additionally, DialNext allows you to add up to 9 contacts to a group, along with your selected DialNext line.
2. Can I Assign a Custom Name to My Group Text?
Yes. You can enter a custom name in the Group name field while creating a new group. This helps you identify the conversation more easily.
3. Can I Select a Phone Number for Sending Group Texts?
Yes. You can select your preferred number from the DialNext line dropdown before adding participants and creating the group.
4. Can I Send an Initial Message While Creating a Group?
Yes. The First message field allows you to compose your initial message. Once you create the group, this message is sent to the added participants.
5. Is Adding Two Participants Mandatory?
Yes. At least two participants are required to create a Group Text conversation in DialNext.
Conclusion
Group Texting in DialNext makes it easier to bring multiple participants together in a shared SMS conversation. Users can select a sending number, assign a group name, add contacts, and send an initial message when creating the group.
Moreover, organizing participants in a shared conversation can make business communication more convenient when multiple people need to receive the same information. By reviewing the group details before creation, you can ensure that the correct participants and message are included.
Get Started with DialNext Group Texting
Ready to simplify communication with multiple participants? Group Texting in DialNext helps you bring people together in a shared conversation and send messages through your selected business number.
Explore DialNext to learn more about its business communication solutions.
Call recordings in DialNext help businesses review customer conversations, revisit important details, and maintain useful records of previous interactions. Through the Call Logs section, users can access available recordings, listen to conversations, download audio files, and organize call information using notes and tags.
Moreover, these features make it easier for teams to understand previous customer interactions and find relevant information when needed. Whether you want to review a customer query, check a conversation, or organize call details, DialNext provides useful tools to manage your calling activity.
In this guide, you will learn how to access, play, download, and manage call recordings in DialNext, along with practical tips for keeping your call records organized.
How to Access Call Recordings in DialNext
You can access available call recordings directly through the Call Logs section of your DialNext dashboard. Before proceeding, make sure you can sign in to your account and access the relevant call records.
Follow these steps to find and play a recording.
Step 1: Navigate to Call Logs in DialNext
First, log in to your DialNext account using your login credentials.
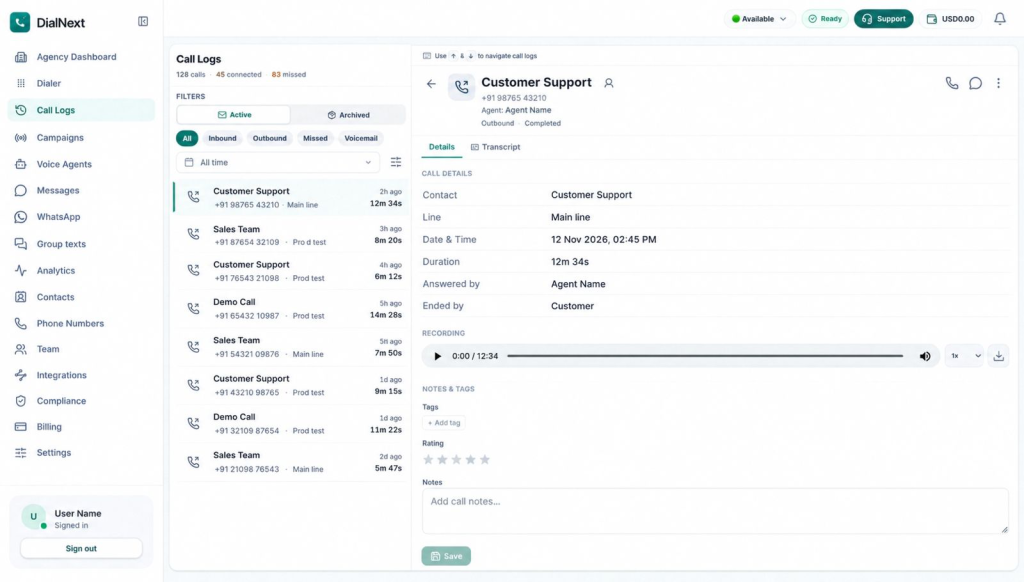
Next, locate the navigation menu on the left side of your dashboard. Then, click Call Logs to open your call history and view the available call records.
Step 2: Select a Call Record
Once the Call Logs page opens, browse the available records to find the conversation you want to review.
Additionally, you can use the available filters, such as Inbound, Outbound, Missed, and Voicemail, to narrow down the list. This makes it easier to locate a specific call without reviewing your entire call history.
After finding the relevant record, select it to open its details.
After selecting a call, locate the Details tab in the call details panel on the right side of the screen.
Here, you can review information associated with the selected call, including the contact, calling line, date and time, duration, and answering agent.
Next, locate the Recording section to check whether an audio recording is available for that call.
Step 4: Play Call Recordings in DialNext
If a recording is available, locate the audio player in the Recording section.
Then, click the Play button to listen to the conversation. Additionally, you can use the playback speed control to adjust how quickly the recording plays, depending on the available options.
As a result, you can revisit important parts of a conversation, understand customer queries, and check specific details without relying only on written notes.
Step 5: Download Call Recordings in DialNext
If you want to save an available recording to your device, locate the Download icon next to the audio player.
Next, select the icon to download the audio file, provided the download option is available for that recording.
This allows you to keep a copy for future reference. However, always follow your organization’s recording, privacy, and data-handling policies when accessing or downloading customer conversations.
How to Manage Call Recordings in DialNext
Accessing a recording is only one part of managing call information. In addition to listening to conversations, DialNext provides options to organize additional details associated with individual call records.
For example, you can use notes, tags, and ratings to make previous interactions easier to understand and review.
1. Add Tags to Call Records in DialNext
Tags help categorize call records based on their purpose or outcome.
To add a tag, follow these steps:
First, open the required call record from the Call Logs section.
Next, navigate to the Notes & Tags section in the call details panel.
Then, click + Add tag under the Tags section.
Finally, select the relevant tag from the available options.
For example, your team may use suitable tags to identify calls that require follow-up or additional attention, depending on the available tag options.
Furthermore, using consistent tags can make it easier to organize and identify important call records.
2. Review Call Ratings in DialNext
DialNext also provides a star-rating field in the Notes & Tags section.
You can review the rating associated with an individual call record to understand its recorded assessment. Additionally, this information provides more context when reviewing previous customer interactions.
3. Add and Save Call Notes in DialNext
Call notes help your team retain important information about a conversation. For instance, you can add a short summary or mention details that another team member may need later.
To add notes:
First, open the required call record.
Next, navigate to the Notes & Tags section.
Then, locate the Notes text box.
Enter a short summary or other relevant information about the conversation.
Before saving, review the note to ensure it contains the correct details.
Finally, click Save to store your changes.
As a result, your team can refer to relevant call information without having to listen to the entire recording again.
Call recordings can support several everyday business activities. When used appropriately, they help teams revisit conversations and maintain better visibility into customer interactions.
Here are some practical ways businesses can use call recordings:
Review customer conversations: Listen to previous interactions to understand customer queries, responses, and important discussion points.
Maintain useful call records: Keep available recordings for future reference, subject to organizational policies.
Support team coordination: Provide relevant conversation context to team members when appropriate.
Organize call information: Use notes and tags to keep important details associated with individual call records.
Verify conversation details: Revisit recordings when specific information needs to be checked.
Furthermore, combining recordings with call details, notes, and tags can make it easier to review customer interactions. Therefore, teams can find relevant information and understand previous conversations more efficiently.
Best Practices for Managing Call Recordings in DialNext
Managing recordings effectively requires more than simply accessing and downloading audio files. Instead, a consistent process can help teams keep call information organized and handle customer data responsibly.
Consider the following best practices:
Follow Recording and Privacy Policies
First, make sure your team follows applicable recording requirements and organizational privacy policies. Additionally, access recordings only when there is a legitimate business need.
Use Relevant Tags
Apply consistent tags to categorize calls based on their purpose or outcome. As a result, your team can identify relevant records more easily.
Add Clear and Useful Notes
Keep call notes short, accurate, and relevant. For example, include information that may help another team member understand the conversation without listening to the entire recording.
Review Recordings When Needed
Use recordings to revisit important conversation details, clarify information, or support internal call reviews. However, avoid accessing recordings unnecessarily.
Handle Downloaded Files Carefully
If you download a recording, store it only in approved locations. Furthermore, follow your organization’s access, privacy, and retention policies. Avoid sharing customer recordings through unauthorized channels.
Frequently Asked Questions About Call Recordings in DialNext
1. When are Call Recordings Available in DialNext?
Call recordings are available through Call Logs when a recording has been generated and is accessible for the selected call. Therefore, you can open the relevant call record and check its Recording section.
2. Where Can I Find Call Recordings in DialNext?
You can find available recordings in the Call Logs section of your DialNext dashboard. First, select the relevant call. Then, open its Details tab and locate the Recording section.
3. Can I Listen to a Call Recording More Than Once?
Yes. If a recording is available, you can play it again whenever you need to revisit the conversation. Additionally, this makes it easier to check specific details from previous interactions.
4. Can I Download Call Recordings in DialNext?
Yes. You can download an available recording using the Download icon next to the audio player, provided the download option is enabled for that recording.
5. Can I Adjust the Playback Speed of Call Recordings?
Yes. You can use the playback speed control in the audio player to adjust the listening speed. This allows you to review recordings at a pace that suits your requirements.
6. Can I Add Notes and Tags to a Call Record?
Yes. The Notes & Tags section provides options to add notes and tags to the selected call record. Additionally, you can review the available star rating associated with that call.
7. What Should I Do If a Call Recording Is Unavailable?
First, open the correct call record and check its Details tab for the Recording section. If no recording is available, contact your workspace administrator to confirm the relevant recording settings and access permissions.
However, if the issue continues, contact DialNext Support for further assistance.
Conclusion
DialNext makes it easier to access and manage available call recordings through the Call Logs section. Users can listen to previous conversations, download recordings when the option is available, and organize call information using notes and tags.
Moreover, keeping relevant call details organized helps teams revisit customer interactions and refer to important conversation details whenever needed. By following appropriate recording and data-handling practices, businesses can manage their call records more effectively.
Manage Your Business Calls with DialNext
Looking for a simpler way to manage business conversations? DialNext brings business calling and call management features together to help teams handle customer interactions more effectively.
Explore DialNext to learn more about its business communication solutions.
When customers contact a business for support, they expect a quick and complete solution. First Call Resolution (FCR) helps businesses measure how effectively their support teams resolve customer issues during the first phone interaction, without requiring customers to call back about the same problem.
However, many customer support teams still struggle with repeated calls, unnecessary transfers, unresolved complaints, and delayed follow-ups. As a result, customers may have to explain the same problem multiple times.
This is where First Call Resolution becomes important.
A higher FCR rate can indicate more effective problem-solving, better agent training, and more organized customer communication. It can also help businesses reduce avoidable repeat interactions and improve the overall customer experience.
In this guide, we will explain what First Call Resolution means, how to calculate it, what makes a good FCR rate, and how businesses can improve it through practical customer support strategies.
What Is First Call Resolution (FCR)?
First Call Resolution (FCR) is a customer service performance metric that measures the percentage of eligible customer issues successfully resolved during the initial phone interaction, without requiring another call about the same issue.
In other words, it indicates how effectively support agents understand customer problems, access the information they need, and provide appropriate solutions during the first call.
For example, imagine a customer calls a company’s support team because they cannot access their account.
First, the agent verifies the customer’s information.
Next, the agent identifies the reason for the login problem.
Then, the agent guides the customer through the required steps.
Finally, the customer confirms that the issue is resolved.
If the customer does not need to call again about the same issue, the interaction qualifies as a first-call resolution.
However, if the customer has to call again because the original problem remains unresolved, it does not qualify as FCR.
First Call Resolution vs. First Contact Resolution
Although these terms are closely related, they are not always interchangeable.
First Call Resolution: Focuses specifically on resolving customer issues during the initial phone interaction.
First Contact Resolution: Measures whether an issue is resolved during the first interaction across a particular support channel, such as a phone call, email, or live chat.
For example, if a customer contacts a company through live chat and receives a complete solution during that conversation, it may count as First Contact Resolution. However, it would not count as First Call Resolution because no phone call occurred.
The measurement method should clearly define which channels and interactions are included.
Why Is First Call Resolution Important?
First Call Resolution is more than a customer support metric. It also provides insight into how effectively a business manages customer communication and problem-solving.
When customers receive effective assistance during their first interaction, they spend less time waiting, explaining problems, and following up. Consequently, support teams can manage their workload more efficiently.
Here are five important benefits of improving FCR.
1. Improves Customer Satisfaction
Customers generally prefer quick and complete solutions rather than multiple conversations about the same issue.
When support agents resolve problems during the first interaction, customers are more likely to feel that the business understands their needs. As a result, businesses can create a smoother support experience and strengthen customer relationships.
2. Reduces Repeat Calls
Unresolved issues often result in additional calls, which increases the workload for support agents.
By improving FCR, businesses can reduce avoidable repeat interactions. Consequently, agents can dedicate more time to new customer enquiries instead of repeatedly handling the same problems.
3. Improves Agent Productivity
When customers repeatedly contact support about the same issue, agents spend valuable time reviewing previous conversations and understanding what went wrong.
However, an organized support process helps agents access customer history, understand previous actions, and provide more effective assistance. This allows teams to focus on resolving problems rather than collecting the same information repeatedly.
4. Reduces Customer Effort
Customers should not have to repeat their account information or explain the same problem to multiple representatives.
A higher FCR rate can indicate that customers are receiving more consistent support with fewer unnecessary interactions. Therefore, businesses should consider FCR when evaluating the overall customer experience.
5. Helps Identify Operational Problems
A consistently low FCR rate can indicate deeper issues within a customer support operation.
For instance, some common problems include:
Agents may not have sufficient product knowledge.
Call routing may connect customers to the wrong department.
Customer information may be incomplete.
Internal processes may require unnecessary approvals.
Support documentation may be outdated.
By monitoring FCR, managers can identify these problems. More importantly, they can improve the processes responsible for unresolved interactions.
How to Calculate First Call Resolution Rate
Businesses can calculate First Call Resolution using a straightforward formula.
First Call Resolution Formula:
FCR Rate = (Number of Issues Resolved During the First Call ÷ Total Eligible Customer Issues) × 100
For example, suppose a customer support team handles 500 eligible customer issues in one month.
Out of these:
375 issues are resolved during the first interaction.
125 issues require additional contact.
The calculation would be:
FCR = (375 ÷ 500) × 100
FCR = 75%
This means the support team successfully resolved 75% of eligible customer issues during the first interaction. Meanwhile, the remaining 25% required additional contact or were not resolved during the initial interaction.
Another Practical Example
Consider a company that receives customer calls about billing issues.
During one week:
Metric
Number
Eligible customer issues
200
Issues resolved on first contact
150
Issues requiring follow-up
50
First Call Resolution Rate
75%
Therefore, the team has an FCR rate of 75%.
However, the company should also investigate why the remaining 50 issues required additional contact. Perhaps agents lack access to billing information, approval processes are too complicated, or customers are being transferred between departments.
As a result, the formula identifies the performance level, while further analysis helps explain the reasons behind it.
Important Considerations When Measuring FCR
For an accurate FCR calculation, businesses should establish consistent measurement rules.
Consider the following points:
Use unique customer issues: Avoid counting every repeat call about the same problem as a separate issue.
Define a repeat-contact period: Decide how long after the initial interaction a repeat call will be associated with the original issue.
Set eligibility criteria: Specify which customer interactions should be included in the calculation.
Account for transfers: Define whether an issue resolved after an internal transfer during the same interaction qualifies as FCR.
Validate resolution: Use customer feedback where possible to confirm that the issue was actually resolved.
Different measurement methods can produce different FCR results. Therefore, businesses should document their methodology before comparing performance across teams or periods.
What Is a Good First Call Resolution Rate?
There is no single FCR target that works for every business. The appropriate target depends on several factors, including:
Industry and service complexity.
Types of customer enquiries.
Agent experience and training.
Available support resources.
Measurement methodology.
Whether the business handles simple enquiries or complex technical issues.
According to SQM Group’s published contact center research:
71%: Reported industry benchmark average.
70%–79%: Considered a good FCR performance range.
80% or higher: Considered a world-class FCR rate by SQM Group.
SQM Group also notes that only a small proportion of benchmarked call centers achieve world-class performance.
However, these figures are reference points rather than universal standards. Actual results can vary depending on industry, call complexity, customer expectations, and how FCR is measured.
For example, resolving a basic billing enquiry may require less time and fewer resources than troubleshooting a complex technical issue.
Therefore, businesses should compare their performance with relevant industry benchmarks and their own historical results.
Ultimately, rather than focusing only on a percentage, businesses should also monitor whether customers are actually receiving complete and satisfactory solutions.
10 Ways to Improve First Call Resolution in Your Contact Center
Improving FCR requires more than asking agents to resolve calls faster. Instead, businesses need to improve the entire support process, from the moment a customer calls to the point where the issue is confirmed as resolved.
Here are ten practical strategies businesses can implement.
1. Improve Call Routing and Connect Customers to the Right Agent
One of the common reasons for repeated calls is incorrect call routing.
When customers reach the wrong department, they may need to explain their problems again or wait while the call is transferred. Consequently, this creates unnecessary delays and increases customer effort.
Businesses can improve this process through:
IVR menus.
Department-based routing.
Ring groups.
Business-hours routing.
Agent availability rules.
For example, a customer calling about a payment issue should be directed to the billing team instead of a general support representative who cannot access billing information.
By connecting customers to the appropriate department at the beginning of the interaction, businesses can reduce unnecessary transfers. As a result, they can improve the chances of resolving the issue during the first call.
2. Provide Agents With Complete Customer Information
Support agents need context to understand customer problems.
If agents cannot access previous conversations, customer details, or relevant account information, they may spend a significant portion of the call collecting information that the business already has.
Therefore, businesses should maintain organized customer records containing:
Customer contact details.
Previous call history.
Open support issues.
Relevant account information.
Previous resolutions.
Pending follow-up actions.
CRM integrations can help bring customer information and communication history into a more organized workflow.
As a result, agents can spend more time solving problems instead of searching for information.
3. Invest in Continuous Agent Training
An agent may understand the communication process but still struggle to resolve specific customer issues.
This often happens when agents lack product knowledge, technical understanding, or the authority to make decisions.
To address this, regular training should cover:
Product and service knowledge.
Common customer complaints.
Troubleshooting procedures.
Communication skills.
Handling difficult conversations.
Escalation procedures.
Additionally, managers can review recorded calls and use real customer scenarios during training sessions.
The goal is to help agents understand problems independently and provide accurate solutions without unnecessary transfers. Over time, this can improve both resolution quality and customer confidence.
4. Build an Updated Knowledge Base
A knowledge base gives support agents access to important information while handling customer enquiries.
For example, it can include:
Frequently asked questions.
Troubleshooting instructions.
Product documentation.
Billing procedures.
Account management steps.
Common error explanations.
If multiple customers contact support about the same login problem, agents should be able to access a documented troubleshooting process rather than searching for a solution during every call.
Moreover, businesses should regularly update their knowledge base whenever products, policies, or internal processes change. This ensures agents can rely on accurate information while resolving customer issues.
5. Reduce Unnecessary Call Transfers
Call transfers are sometimes necessary, especially when an issue requires specialized knowledge.
However, repeated transfers can create a frustrating customer experience and increase the time needed to resolve an issue.
Before transferring a call, agents should:
Understand the reason for the transfer.
Confirm which department can resolve the issue.
Share relevant customer information with the receiving agent.
Explain the next steps to the customer.
Avoid asking customers to repeat information unnecessarily.
Whenever possible, businesses should use structured routing processes to connect customers with the appropriate team from the beginning. This can reduce repeated explanations and make support interactions more efficient.
6. Use Call Recording and Quality Assurance
Call recordings allow managers to understand how customer interactions are handled in practice.
By reviewing recordings, businesses can identify:
Repeated customer complaints.
Incomplete explanations.
Incorrect information.
Unnecessary transfers.
Communication gaps.
Missed opportunities to resolve problems.
For example, if customers frequently call back after receiving unclear billing explanations, managers can review relevant calls and improve agent training or documentation.
Therefore, call quality reviews should focus on resolution quality, not just conversation length. In addition, regular reviews can help managers identify recurring issues and provide more targeted coaching.
7. Analyze Call Data and Identify Repeat-Call Patterns
Call analytics can help managers understand why customers contact support repeatedly.
Instead of reviewing only the total number of calls, businesses should examine patterns across different types of enquiries.
For instance, useful data points include:
Call volume.
Missed calls.
Call duration.
Call outcomes.
Repeat interactions.
Agent performance.
Common enquiry categories.
If repeat calls increase significantly after a product update, this could indicate a technical issue or a gap in customer communication.
By identifying these patterns, businesses can address the underlying problem instead of treating every repeat call as an individual incident. Consequently, support teams can make improvements based on actual customer interaction data.
8. Give Agents the Authority to Resolve Common Issues
Sometimes, agents know exactly what a customer needs but cannot complete the required action without supervisor approval.
As a result, routine issues can create unnecessary delays and additional interactions.
To prevent this, businesses should establish clear decision-making guidelines that allow trained agents to handle routine issues within approved limits.
Examples include:
Updating basic account information.
Correcting eligible billing errors.
Explaining standard policies.
Processing authorized requests.
Resolving common technical issues.
Of course, sensitive, high-value, or complex cases should still follow appropriate approval and escalation procedures.
The objective is to remove avoidable delays without compromising business policies or customer security.
9. Establish Clear Escalation Procedures
Not every customer problem can be resolved by the first agent.
Some issues require technical specialists, supervisors, or other departments. Nevertheless, a structured escalation process helps ensure that complex cases reach the right person without creating confusion.
An effective escalation process should define:
Which issues require escalation.
Which team is responsible for each issue.
What information must be shared.
Who owns the customer interaction.
How the customer will receive updates.
Even when an issue cannot be resolved immediately, clear ownership and communication can prevent customers from repeatedly chasing the business for updates.
Therefore, escalation should be treated as a managed process rather than simply transferring responsibility to another team.
10. Collect Customer Feedback After Support Interactions
An agent marking a call as resolved does not always mean the customer considers the issue resolved.
That is why customer feedback should be part of FCR measurement.
For example, businesses can use short post-interaction surveys, such as:
Was your issue resolved during this interaction?
Did you receive the information you needed?
Was the solution clear?
Would you need to contact support again about this issue?
Customer feedback helps validate internal resolution records and identify cases where agents may have closed an issue prematurely.
Additionally, it provides insight into the overall support experience. By combining customer feedback with call data, managers can make more informed decisions about service improvements.
Common Reasons Why First Call Resolution Rates Are Low
Before implementing improvement strategies, businesses should understand why their existing FCR performance may be weak.
Common Problem
How It Affects FCR
Recommended Action
Incorrect call routing
Customers reach the wrong department.
Improve IVR and routing rules.
Incomplete customer information
Agents lack the context needed to resolve issues.
Improve CRM data access and integration.
Insufficient agent training
Agents struggle with common customer problems.
Provide regular product and process training.
Outdated documentation
Agents cannot find accurate solutions.
Maintain an updated knowledge base.
Unnecessary approvals
Routine issues take longer to resolve.
Define agent decision-making authority.
Poor call documentation
Previous interactions are difficult to understand.
Standardize call notes and outcomes.
Weak escalation processes
Customers experience repeated transfers.
Define escalation ownership and procedures.
Inadequate feedback collection
Businesses cannot validate resolution quality.
Introduce customer feedback surveys.
By understanding these causes, businesses can prioritize improvements based on actual operational problems. More importantly, they can focus on fixing the root causes instead of simply trying to increase the FCR percentage.
Key Metrics to Track Alongside First Call Resolution
FCR should not be evaluated in isolation.
A support team may achieve a high FCR rate while customers still experience long waiting times, poor communication, or unsatisfactory service.
Therefore, combining FCR with other customer support metrics provides a more complete picture of operational performance.
Metric
What It Measures
Why It Matters
First Call Resolution
Issues resolved during the first phone interaction.
Measures resolution effectiveness.
Average Handle Time (AHT)
Average time spent handling an interaction, including talk time, hold time, and after-call work.
Helps evaluate support workload and efficiency.
Customer Satisfaction (CSAT)
Customer satisfaction with a support interaction.
Shows how customers perceive the experience.
Average Speed of Answer (ASA)
Average time customers wait before an agent answers.
Helps evaluate accessibility.
Call Abandonment Rate
Percentage of eligible callers who disconnect before reaching an agent.
Identifies potential waiting-time problems.
Repeat Contact Rate
Percentage of customers who contact support again about an issue within a defined period.
Helps identify unresolved problems.
Service Level
Percentage of eligible calls answered within a specified time target.
Measures responsiveness.
For example, a support team may improve its FCR rate while Average Handle Time increases slightly because agents are spending more time understanding and resolving issues properly.
That is not necessarily a problem. Instead, the objective should be to provide complete, accurate solutions while maintaining an efficient and sustainable support operation.
In other words, businesses should balance resolution quality, customer satisfaction, and operational efficiency rather than optimizing a single metric.
How Call Analytics and Communication Tools Help Improve FCR
Improving First Call Resolution requires visibility into customer interactions and the processes surrounding them.
Communication tools can help businesses organize these interactions, understand call outcomes, and identify areas that need improvement.
Some important capabilities include:
Intelligent Call Routing: Directs incoming calls to appropriate departments or available agents, reducing unnecessary transfers.
Call Recording: Allows managers to review conversations, identify communication gaps, and support agent training.
Call Tags and Notes: Help categorize customer interactions and maintain useful records of call outcomes.
CRM Integration: Keeps customer information and previous interaction history accessible to support teams.
Call Analytics: Helps managers monitor calling activity, identify patterns, and evaluate team performance.
SMS Follow-Ups: Allow businesses to share relevant information and communicate next steps after a call when appropriate.
Together, these capabilities create a more organized support workflow. Furthermore, they give managers better visibility into how customer interactions are handled and where improvements may be needed.
How DialNext Helps Support Teams Improve First Call Resolution
First Call Resolution depends on more than the performance of individual support agents. It also depends on how effectively a business manages incoming calls, customer information, and communication history.
DialNext provides a cloud-based business communication platform that helps customer support teams organize these workflows.
With DialNext, businesses can use several communication capabilities:
Intelligent Call Routing and IVR
Direct customers to the appropriate department through configurable IVR menus, ring groups, and business-hours routing. As a result, businesses can organize incoming calls and reduce avoidable transfers.
Call Recording and Playback
Review customer conversations for quality assurance, agent coaching, and a better understanding of unresolved issues. In addition, recordings can help managers identify recurring communication gaps.
Call Tags and Notes
Categorize call outcomes and maintain useful information about customer interactions. This helps teams keep customer communication records more organized.
CRM Integrations
Connect calling workflows with supported CRM platforms to keep customer information and communication records organized. Consequently, agents can access relevant context while handling customer interactions.
Call Analytics
Monitor call volume, handle times, and available call activity data to identify operational patterns. Moreover, these insights can help managers understand trends that may affect support efficiency.
SMS Support
Continue customer conversations through text messaging when sharing information or following up is more appropriate than another phone call.
Together, these capabilities can help businesses improve call management, maintain better customer context, and create more consistent support workflows.
However, technology alone cannot guarantee a higher FCR rate. Businesses must also invest in agent training, accurate documentation, clear escalation procedures, and reliable resolution processes.
First Call Resolution (FCR) refers to the percentage of eligible customer issues successfully resolved during the first phone interaction without requiring another call about the same problem.
2. How is First Call Resolution calculated?
FCR is calculated by dividing the number of eligible customer issues resolved during the first call by the total number of eligible customer issues, then multiplying the result by 100.
According to SQM Group, 70%–79% is considered a good FCR performance range, while 80% or higher is considered world-class. However, the appropriate target depends on the industry, issue complexity, and measurement methodology.
4. Why is First Call Resolution important for customer support teams?
FCR helps businesses evaluate how effectively their support teams resolve customer problems. By improving it, businesses can reduce repeat interactions, improve customer experience, and make support operations more efficient.
5. What causes a low First Call Resolution rate?
Common causes include incorrect call routing, insufficient agent training, incomplete customer information, outdated documentation, unnecessary transfers, and unclear escalation procedures.
6. How can businesses improve First Call Resolution?
Businesses can improve FCR by training agents, improving call routing, providing access to customer history, maintaining knowledge bases, reviewing call recordings, and collecting customer feedback. Additionally, they should regularly analyze repeat-contact patterns to identify unresolved issues.
7. What is the difference between First Call Resolution and First Contact Resolution?
First Call Resolution focuses on issues resolved during the initial phone interaction. In contrast, First Contact Resolution measures resolution during the initial interaction across a specified support channel, such as calls, email, or live chat.
8. Does increasing First Call Resolution reduce Average Handle Time?
Not necessarily. Resolving an issue completely may require a slightly longer initial interaction. However, it can reduce the total time spent across multiple interactions about the same problem.
9. How do CRM integrations help improve FCR?
CRM integrations help agents access customer details, previous interactions, and relevant records. Consequently, this reduces the need to collect the same information repeatedly and helps agents understand the context of customer enquiries.
10. Can call analytics improve First Call Resolution?
Yes. Call analytics can help businesses identify repeat-call patterns, monitor call outcomes, evaluate team performance, and understand where support workflows need improvement. As a result, managers can make more informed decisions about operational changes.
Conclusion
First Call Resolution is an important indicator of how effectively a business handles customer support interactions.
When customers receive complete solutions during their first interaction, they spend less time following up, agents can focus on other enquiries, and businesses can create more consistent support experiences.
However, improving FCR requires more than setting performance targets. It involves better call routing, continuous agent training, accurate customer information, effective escalation processes, and regular performance monitoring.
By combining these practices with the right communication technology, businesses can build support operations that focus on resolving customer problems rather than simply handling more calls.
Ultimately, successful customer support is not about how quickly a call ends. Instead, it is about whether the customer’s problem is actually solved.
Improve Your Customer Support Workflows with DialNext
Want to reduce unnecessary transfers, organize customer conversations, and make your support operations more efficient?
DialNext brings business calling, call routing, CRM connectivity, call recordings, and messaging capabilities together to help teams manage customer interactions more effectively.
Give your support team the tools to create more organized and consistent customer conversations.
Ready to improve the way your business handles customer calls? Explore DialNext and discover how better communication workflows can support your team.
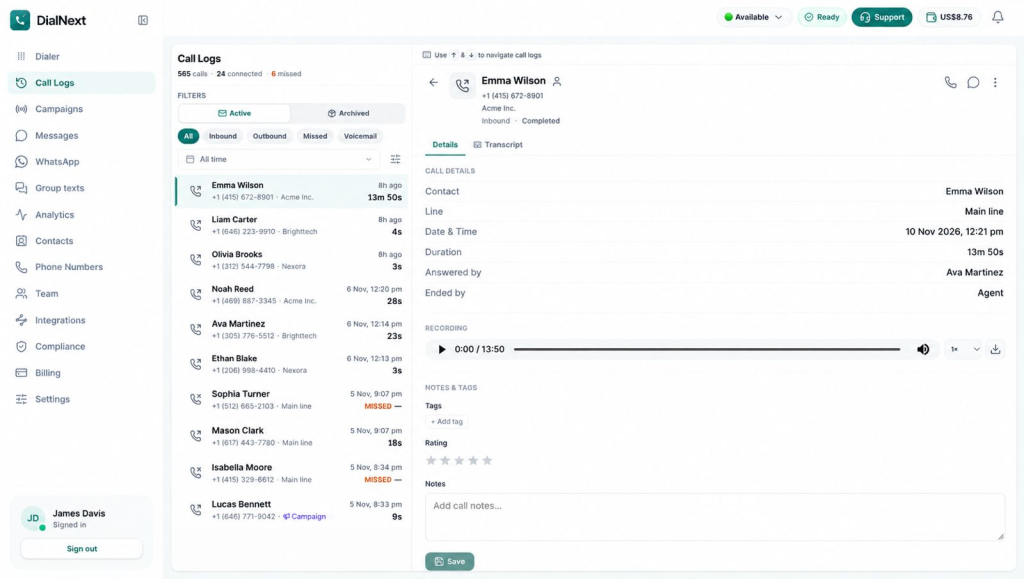
DialNext Call Logs help you review your previous calling activity in one place. You can view incoming calls, outgoing calls, missed calls, and voicemail records directly from your dashboard.
Additionally, you can select individual call records to review call details, recordings, notes, and other available information. Moreover, you can use the available filters to find specific calls without reviewing your entire call history.
In this guide, you will learn how to access DialNext Call Logs, filter records by call type and date, view archived calls, and review important call details step by step.
Before You Begin
Before you access Call Logs, first make sure that:
You can sign in to your DialNext account.
Your workspace has calling activity available to review.
You can access the Call Logs section from your dashboard.
Step 1: Access Call Logs in DialNext
First, log in to your DialNext account.
Next, locate the navigation menu on the left side of your dashboard.
Then, click Call Logs, located directly below the Dialer option.
Once the Call Logs page opens, you can review your previous calling activity.
Step 2: Understand the Call Logs Interface
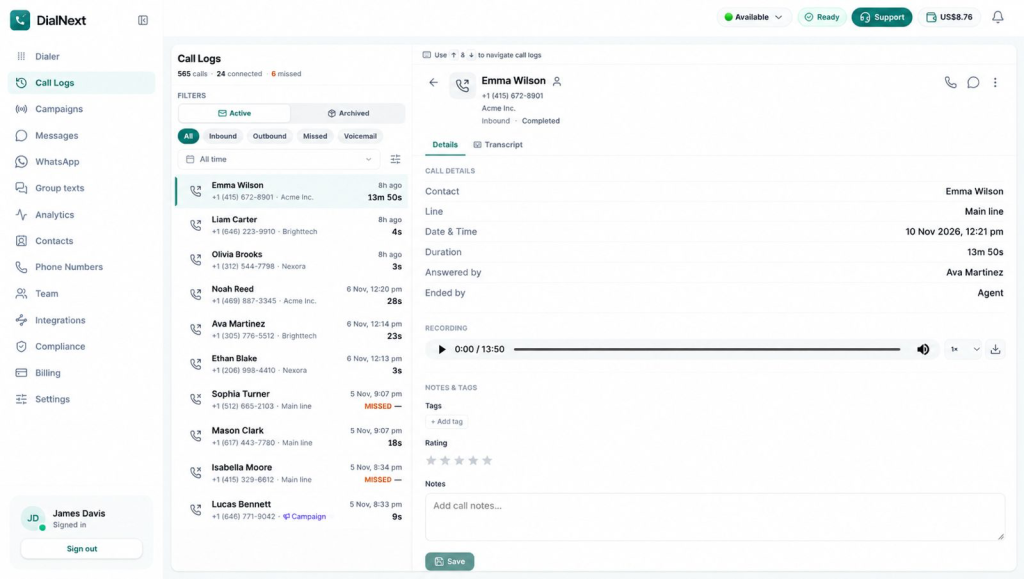
After opening Call Logs, you can review your calling activity in the records panel.
The call records list displays several details to help you identify each call:
Contact Name: Shows the contact associated with the call.
Phone Number: Displays the phone number linked to the record.
Call Direction: Indicates whether the call was inbound or outbound.
Date and Time: Shows when the call took place.
Call Duration: Displays how long the call lasted.
Missed Status: Identifies calls that were not answered.
Next, select a call record from the list to view more information. Its details will appear in the panel on the right.
Additionally, the details panel displays information such as the contact, calling line, date and time, call duration, answering agent, and available call recording. The panel also includes sections for notes, tags, and ratings.
Step 3: Filter Calls by Type
DialNext provides different call-type filters to help you find specific records. For example, instead of reviewing your entire call history, you can select a filter to narrow down the list.
You will find the following options below the Active and Archived sections:
All: Displays all available call records.
Inbound: Shows calls received by your team.
Outbound: Shows calls made by your team.
Missed: Displays calls that were not answered.
Voicemail: Displays records associated with voicemail.
How to Apply a Call-Type Filter
Follow these steps to filter your call records:
First, open the Call Logs page.
Next, locate the call-type filters below the Active and Archived options.
Then, select the required filter, such as Inbound, Outbound, Missed, or Voicemail.
Once selected, DialNext will update the records list to show matching calls.
Finally, select any record to review its details in the right-side panel.
Moreover, you can switch between the available filters whenever you need to review a different type of calling activity.
Step 4: Filter Call Logs by Date
DialNext allows you to filter call records by date. This makes it easier to find calls from a specific day or review calling activity over a selected period.
To apply a date filter, follow these steps:
First, open the Call Logs page.
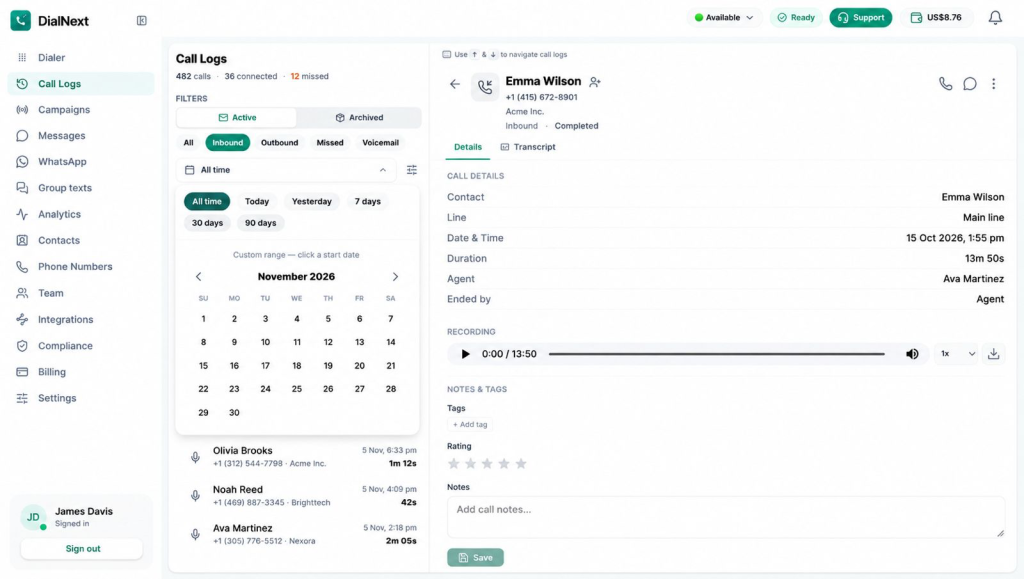
Next, locate the All time dropdown below the call-type filters.
Then, click the dropdown to view the available date options.
Select a predefined date range based on your requirements:
All time: View call records from all available dates.
Today: View calls from the current day.
Yesterday: View calls from the previous day.
7 days: View calls from the last seven days.
30 days: View calls from the last 30 days.
90 days: View calls from the last 90 days.
Alternatively, select Custom range to choose specific start and end dates using the calendar.
Once you select a date range, DialNext updates the call records to match your selection. For example, you can select Today to review calls from the current day or use Custom range to check records from a specific period.
Step 5: View Archived Call Logs
In addition to active call records, DialNext provides an Archived tab where you can view archived call records separately.
To access archived calls, follow these steps:
First, open the Call Logs page.
Next, locate the Active and Archived options under Filters.
Then, click Archived to view archived call records.
Once the archived records appear, review the available calls and select a record to check its details.
However, if no records appear, check whether any call-type or date filters are active. You can also click Clear filters to remove the applied filters and check again.
Step 6: Review Call Details and Recordings
DialNext allows you to review additional information about individual calls. To access these details, simply select a call record from the list.
Review Call Details
To review a call, follow these steps:
First, open the Call Logs page.
Next, select the call you want to review.
The call details will then appear in the panel on the right.
Under the Details tab, review the available information:
Contact: Displays the contact associated with the call.
Line: Shows the calling line used for the call.
Date & Time: Displays when the call took place.
Duration: Shows the total call duration.
Answered by: Identifies the agent who answered the call.
Ended by: Shows who ended the call.
Listen to or Download Call Recordings
Additionally, if a recording is available, you can listen to it directly from the call details panel.
First, locate the Recording section.
Click the Play button to listen to the recording.
Next, use the playback speed dropdown to select an available playback speed.
Finally, select the Download icon to download the recording, if this option is available.
As a result, you can review previous conversations and keep track of important call information.
Step 7: Add Call Notes, Tags, and Ratings
DialNext provides a Notes & Tags section where you can add information to individual call records. Additionally, this helps your team keep track of important conversations and customer interactions.
Add Tags to a Call
To add a tag to a call record, follow these steps:
First, open the required call record.
Next, navigate to the Notes & Tags section.
Then, click + Add tag under the Tags section.
Select the relevant tag from the available options.
Add Notes to a Call
You can also add notes to keep important information about a conversation.
First, locate the Notes text box.
Next, enter the information you want to save about the call.
Before saving, review your note to make sure it contains the relevant details.
Finally, click Save to save your changes.
Review Call Ratings
In addition to notes and tags, the Notes & Tags section also displays a star-rating field. You can review the rating associated with an individual call record here.
Step 8: Troubleshoot Common Call Log Issues
Sometimes, you may not find the call record you are looking for. In such cases, try the following checks to identify the issue.
1. No Call Records Are Displayed
If the Call Logs page does not display any records:
First, check whether you have selected the correct call-type filter.
Next, review the selected date range.
Additionally, switch between the Active and Archived tabs.
If no matching records appear, click Clear filters to remove the applied filters.
2. Unable to Find a Specific Call
If a call does not appear in the records list:
First, check the contact name or phone number.
Next, select the appropriate filter, such as Inbound, Outbound, Missed, or Voicemail.
Then, change the date range to include the expected call date.
Finally, check both Active and Archived records.
3. Call Recording Is Not Available
If you cannot find a recording for a selected call, first check whether the Recording section is displayed in the call details panel.
However, if the recording is still unavailable, contact your workspace administrator or DialNext Support for further assistance.
4. Call Notes Are Not Saved
If your call notes do not appear after entering them:
First, check that you entered the information in the Notes text box.
Next, click Save after adding your note.
Then, reopen the call record to check whether the note appears.
If the issue continues, contact DialNext Support for assistance.
Frequently Asked Questions (FAQs)
1. Where can I find Call Logs in DialNext?
You can access Call Logs from the left navigation menu of your DialNext dashboard. Simply click Call Logs to view your calling activity.
2. Can I filter calls by type in DialNext?
Yes. DialNext provides filters such as All, Inbound, Outbound, Missed, and Voicemail. Simply select the required option to find specific call records.
3. Can I filter call records by date?
Yes. You can use predefined date filters, including Today, Yesterday, 7 days, 30 days, and 90 days. Additionally, you can select a Custom range to review calls from a specific period.
4. Can I listen to or download call recordings?
Yes, if a recording is available for the selected call. First, open the call record and locate the Recording section. From there, you can play the recording or use the download option, if available.
5. Can I add notes to individual call records?
Yes. First, open the required call record and navigate to the Notes & Tags section. Next, enter your information in the Notes text box. Finally, click Save to save your changes.
Need Help with DialNext Call Logs?
Still have questions about viewing or managing your call records? Don’t worry! The DialNext team is here to help.
Visit our official website to learn more about DialNext’s calling solutions and features.
For assistance with Call Logs, recordings, or other product-related queries, contact our support team at support@dialnext.io.
We’re always happy to help!
Related Articles
Explore these resources to learn more about DialNext features and integrations:
During a customer call, an agent may need assistance from another team member to resolve a query or provide additional support. DialNext allows agents to transfer calls in DialNext using the Transfer option on the active call screen, helping customers connect with the appropriate teammate without interrupting the ongoing conversation.
This guide explains how to transfer an active call in DialNext, from opening the Transfer panel and reviewing teammate details to checking availability, selecting the right teammate, and troubleshooting common call transfer issues.
For more information about managing incoming calls efficiently, explore our guide on Call Queue Management.
How to Transfer Calls in DialNext
Before you begin, log in to your DialNext account.
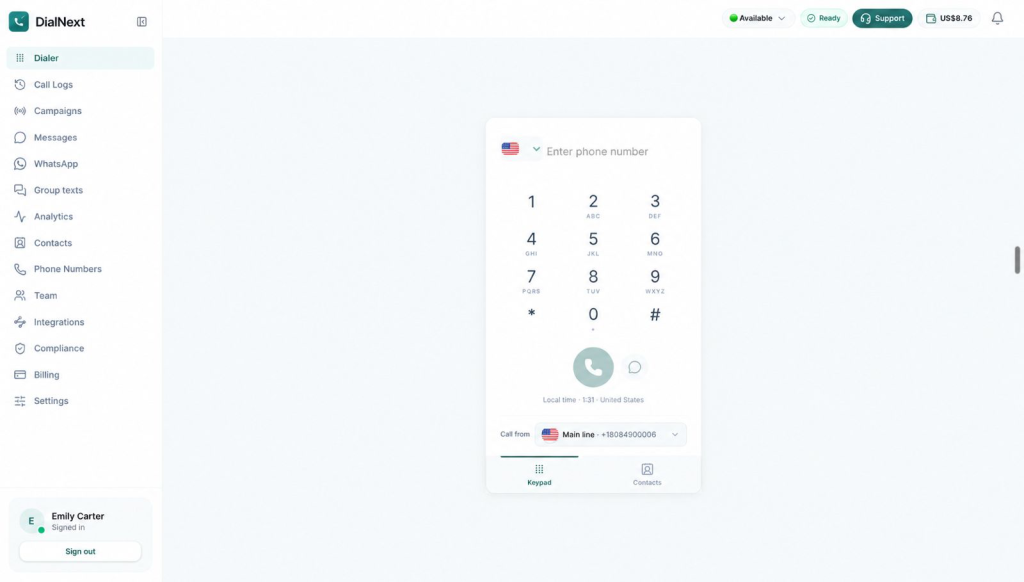
Step 1: Open the Dialer
From the dashboard, select Dialer in the left navigation menu.
Once the Dialer opens, start a new call or receive an incoming call. The Transfer option becomes available on the active call screen.
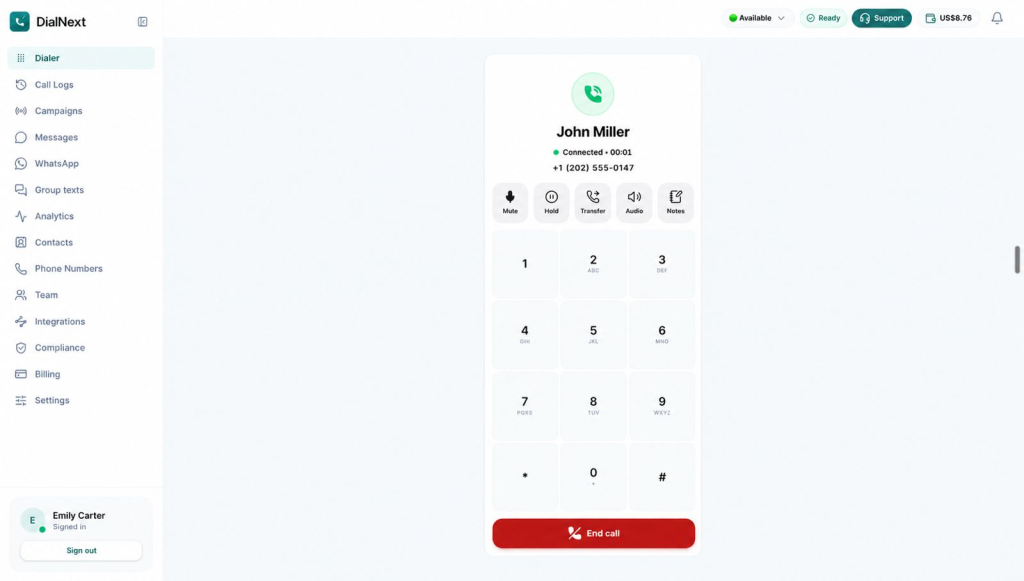
The Dialer dashboard provides access to the calling interface, phone keypad, and other calling features.
Step 2: Find the Call Transfer Option in DialNext
After connecting a call, locate the calling controls on the active call screen.
You will find the following options:
Mute
Hold
Transfer
Audio
Notes
End Call
To transfer calls in DialNext, select Transfer to open the teammate selection panel.
The active call screen displays the available calling controls, including the Transfer option, which allows agents to initiate a call transfer.
Step 3: Open the Teammate Selection List
After selecting Transfer, the Transfer To panel appears.
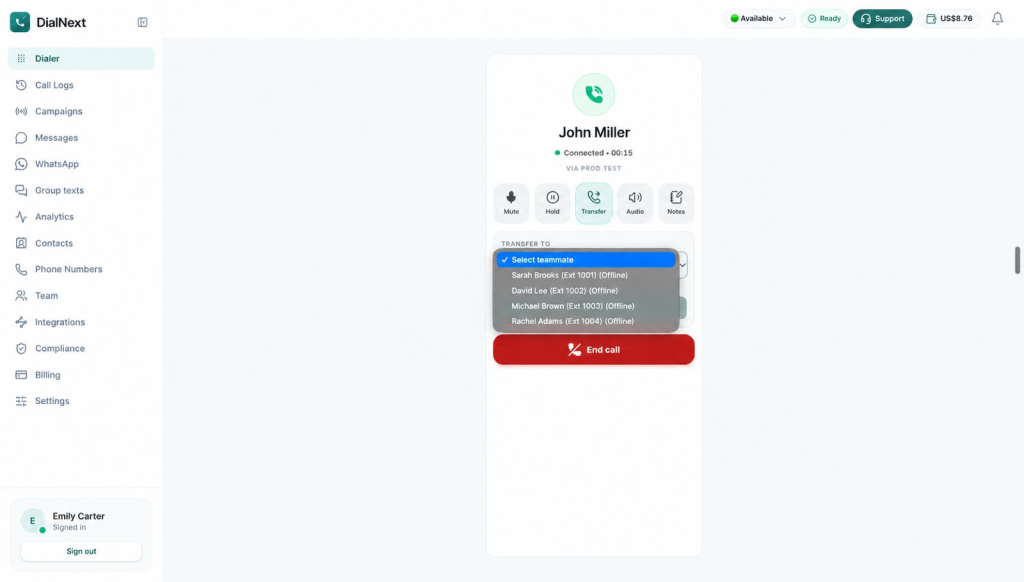
Open the Select teammate dropdown to view the teammates listed in your DialNext workspace, along with their extensions and availability statuses.
Review these details before selecting the teammate you want to transfer the call to.
The Select teammate dropdown displays the available teammates in the workspace, along with their assigned extensions and availability statuses.
Step 4: Check Teammate Availability
Before selecting a teammate, review the availability status displayed in the dropdown.
The list displays teammate names, extensions, and availability statuses, such as Offline. Check these details before proceeding with the transfer.
If your preferred teammate appears as Offline, ask your workspace administrator whether they can receive transferred calls. When no suitable teammate is available, contact your workspace administrator for assistance.
Step 5: Select a Teammate
Once you identify the appropriate teammate, select their name from the Select teammate dropdown.
After making your selection, review the teammate’s details in the Transfer To panel to confirm that you have selected the correct person before proceeding.
Step 6: Select Transfer Call
Check whether the Transfer Call button is enabled. When it is, select Transfer Call to initiate the transfer.
If the button remains disabled, review the selected teammate and their availability status. Should the issue persist, contact your DialNext administrator or support team for assistance.
Understanding the Call Transfer Process in DialNext
The Transfer To panel allows you to select a teammate for transferring an active call. It displays teammate details and availability statuses to help you review your selection before proceeding.
The following table explains the main elements of the call transfer interface:
Interface Element
Purpose
Transfer
Opens the call transfer panel.
Select teammate
Displays the list of teammates in your workspace.
Teammate name
Identifies the teammate selected for the transfer.
Extension
Displays the teammate’s assigned extension.
Availability status
Shows the teammate’s displayed availability status.
Transfer Call
Allows you to proceed with the transfer when the button is enabled.
Common Issues When You Transfer Calls in DialNext
You may occasionally encounter issues while transferring an active call in DialNext. The following troubleshooting steps can help you identify possible causes and determine what to do next.
1. No Teammates Available for Transfer
If DialNext displays a message such as “No teammates available for transfer right now,” review the teammate list and check the displayed availability statuses.
If no suitable teammate is available, contact your workspace administrator for assistance.
2. Transfer Call Button Is Disabled
If the Transfer Call button is disabled, check whether you have selected a teammate from the dropdown.
Also, review the selected teammate’s availability status. If the button remains disabled, contact your DialNext administrator or support team for assistance.
3. The Teammate Is Not Listed
If a particular teammate does not appear in the dropdown, first verify that you are using the correct DialNext workspace.
Next, ask your workspace administrator whether they added the teammate to the workspace. If the teammate still does not appear, contact your administrator for assistance.
4. The Call Transfer Does Not Proceed
If you have selected a teammate but cannot proceed with the transfer, check your internet connection and confirm that the active call is still connected.
If the issue persists, contact your DialNext administrator or support team for further assistance.
A well-managed call transfer helps customers reach the right team member without unnecessary delays. Follow these best practices to make the transfer process smoother:
Check teammate availability: Review the selected teammate’s displayed availability status before initiating a transfer.
Choose the right teammate: Direct the call to someone with the relevant knowledge and experience to address the customer’s query.
Avoid unnecessary transfers: Understand the customer’s concern before deciding whether another team member needs to handle the call.
Keep the customer informed: Briefly explain that you are connecting them with another team member so they know what to expect.
Follow up when needed: If the transfer cannot be completed, explain the available next steps and ensure the customer is not left without assistance.
A consistent post-call process also helps teams manage customer interactions more effectively. Learn how to organize follow-up activities in our guide to building a better post-call workflow.
Frequently Asked Questions About Call Transfers in DialNext
1. Where can I find the Transfer option in DialNext?
You can find the Transfer option on the active call screen in the Dialer. It appears alongside other calling controls, including Mute, Hold, Audio, and Notes.
2. How Do You Transfer Calls in DialNext?
To transfer an active call, select Transfer on the active call screen. Choose a teammate from the dropdown and select Transfer Call when the button is enabled.
3. Why does DialNext show that no teammates are available for transfer?
This message may appear when no suitable teammates are available for transfer. Check the displayed availability statuses. If no appropriate teammate is available, contact your workspace administrator.
4. Can I transfer a call to an offline teammate?
The teammate selection list displays availability statuses, including Offline. Contact your workspace administrator to confirm whether an offline teammate can receive transferred calls.
5. What should I do if the Transfer Call button is disabled?
Check whether you have selected a teammate from the dropdown and review their displayed availability status. If the Transfer Call button remains disabled, contact your DialNext administrator or support team for assistance.
Final Thoughts
Transferring calls to the appropriate teammate helps businesses handle customer queries more efficiently. With DialNext, agents can access the Transfer option during an active call, review teammate details and availability statuses, and select the appropriate person.
Before proceeding with a transfer, review the selected teammate’s details and availability status. Maintaining good call quality also helps ensure clear conversations. Learn more in our guide on how to improve VoIP call quality.
Get Started with DialNext
Looking for a reliable way to manage business calls and customer conversations? DialNext helps your team streamline business communication and connect customers with the right teammates.
Ready to simplify your business calling experience?
Call transcription helps businesses turn recorded conversations into searchable, readable text. Speech-to-text technology converts spoken words into written text. With DialNext, users can review customer and agent conversations, follow timestamps, and revisit important parts of a call.
DialNext also provides AI Insights through the Overview section. Users can explore call summaries, conversation chapters, identified topics, action items, sentiment indicators, and call quality metrics.
This guide explains how to access call transcripts, review recordings, understand AI-generated insights, and use call quality information to get more value from every conversation.
How to Access Call Transcription in DialNext
You can access call transcripts directly from the Call Logs section in DialNext. Follow these steps to find and open a transcript:
Log in to your DialNext account.
Click Call Logs in the left sidebar.
Select Active or Archived, depending on where the call is listed.
Use the available filters to find the call. You can filter by All, Inbound, Outbound, Missed, or Voicemail.
Select the call you want to review from the call list.
Open the Transcript tab in the call details panel.
DialNext displays the available transcript for the selected call. You can then review the conversation and explore the related call information.
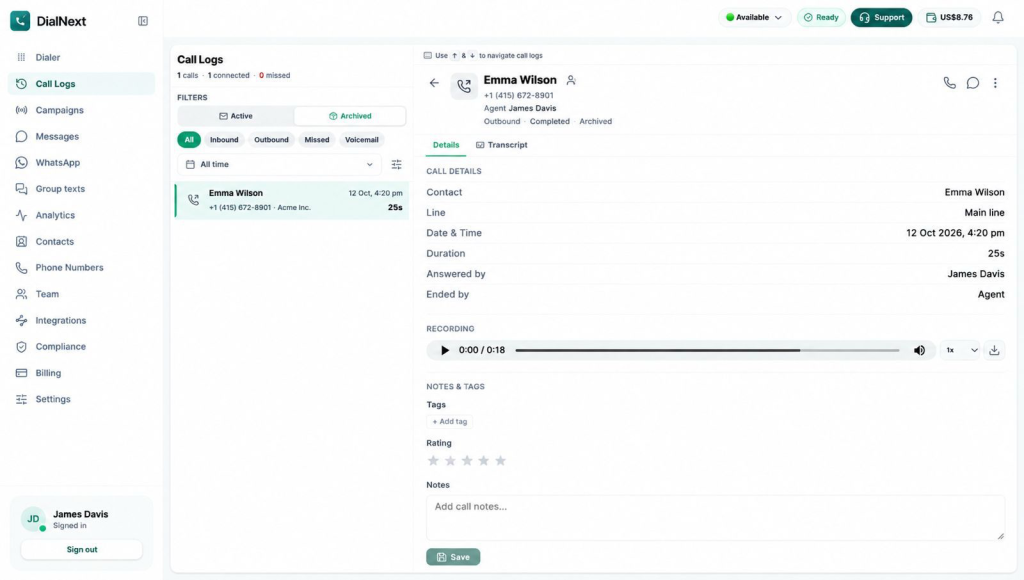
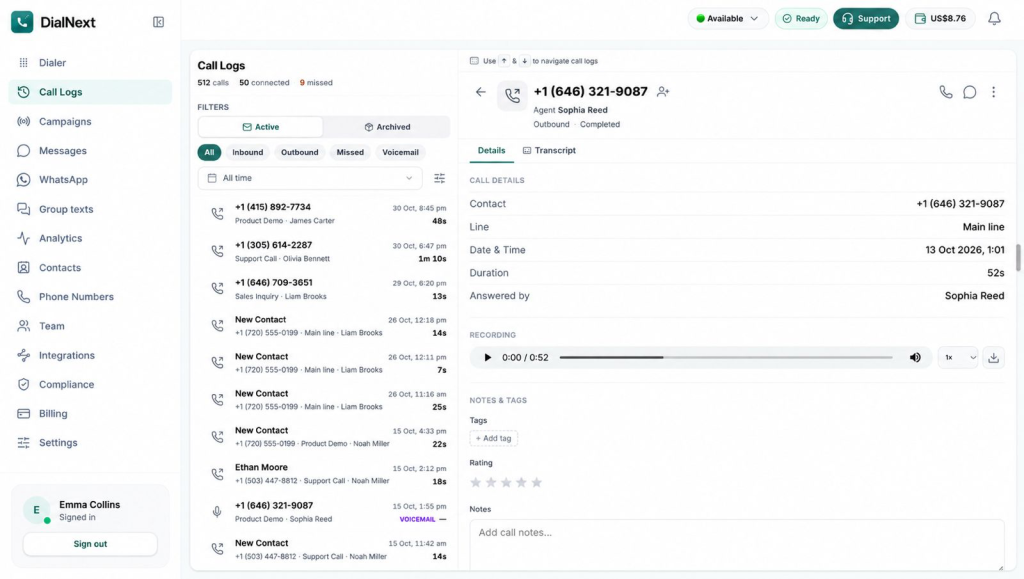
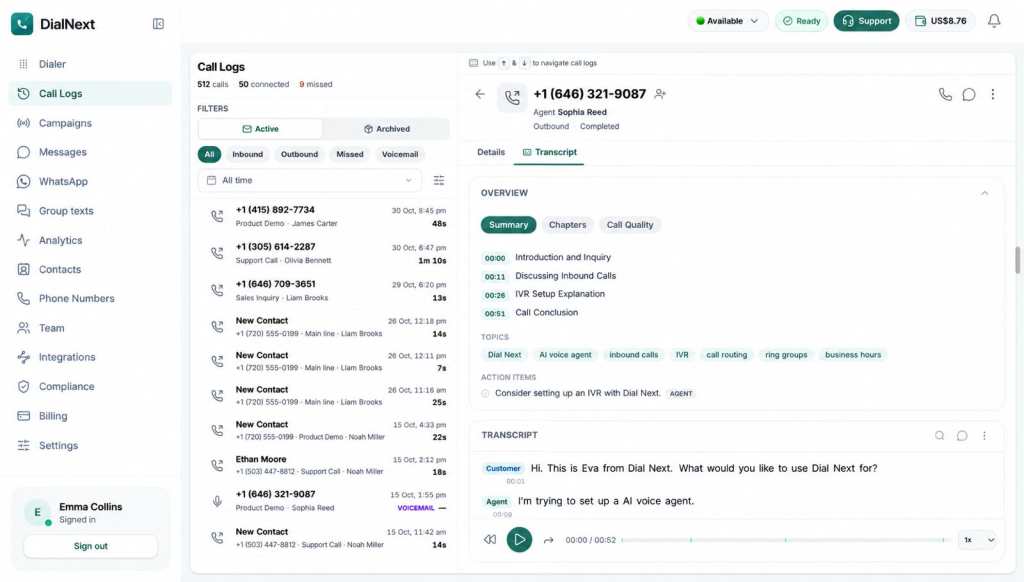
Figure 1: Call Logs in DialNext. This screen displays the Active and Archived call views, available call filters, and selected call details. Users can review call information, access recording controls, and navigate to the Transcript tab.
How to View and Read Call Transcripts in DialNext
After opening the Transcript tab, you can review the conversation between the Customer and Agent. DialNext displays the recognized speech along with speaker labels and timestamps.
The transcript interface helps you follow the conversation and review specific parts of a call.
You can find the following details:
Speaker Labels: Identify whether each conversation entry belongs to the Customer or Agent.
Timestamps: See when each part of the conversation occurred.
Recognized Conversation Text: Read the spoken words converted into text.
Audio Playback: Use the available audio player to listen to the call while reviewing the transcript.
These details make it easier to follow conversations, revisit important exchanges, and understand what was discussed during a call.
Figure 2: Call Transcript and AI Overview in DialNext. This screen displays the call summary, conversation chapters, identified topics, and action items. The transcript section shows Customer and Agent conversations with timestamps, along with audio playback controls for reviewing the recording.
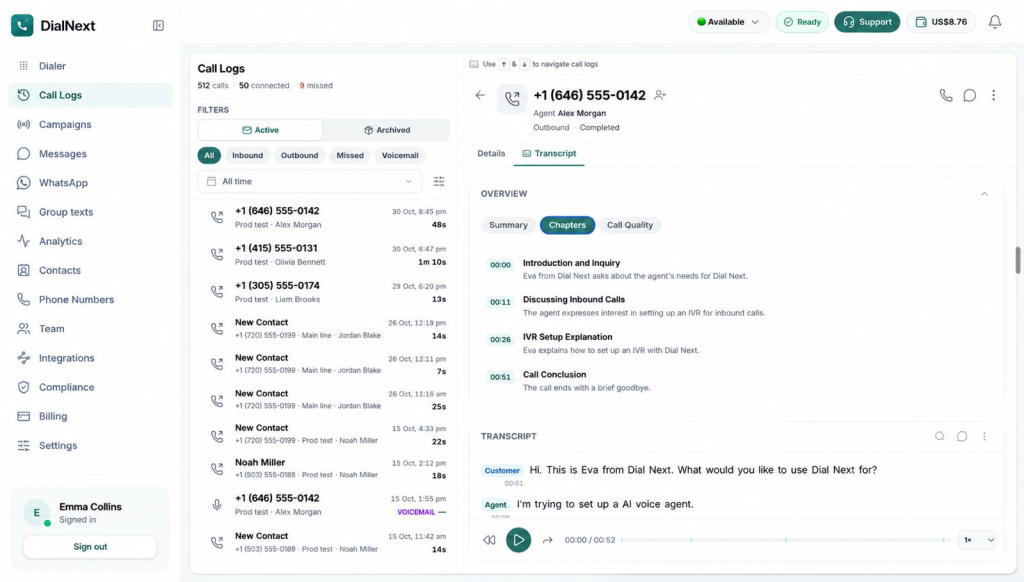
Understanding Chapters
The Chapters tab organizes a call into separate discussion segments. It helps you navigate the conversation without having to review the entire transcript from beginning to end.
Each chapter includes three key details:
Timestamp: Shows when the discussion segment begins.
Chapter Title: Highlights the main subject discussed in that segment.
Description: Provides a brief overview of the discussion.
To explore the chapters, open the Chapters tab under Overview. Review the chapter timestamps and descriptions to find the discussion segment relevant to your needs.
This makes it easier to review specific discussions, understand the flow of a call, and find relevant information quickly.
Figure 3: Chapters Overview in DialNext. The Chapters tab organizes call conversations into individual discussion segments. Each segment displays a timestamp, chapter title, and brief description, helping users quickly understand the key stages of a conversation.
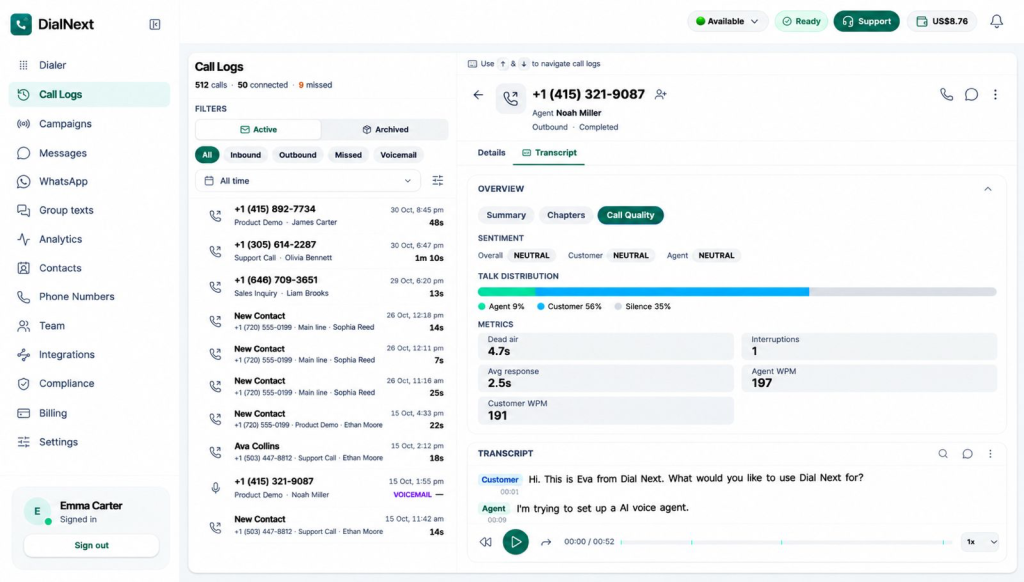
Understanding Call Quality
The Call Quality tab provides an overview of different aspects of a recorded conversation. It brings together sentiment indicators, talk distribution, and call metrics to help users review call performance.
You can explore three types of information:
1. Sentiment Analysis
The Sentiment section displays sentiment indicators for different parts of the call:
Overall: Shows the overall sentiment of the conversation.
Customer: Displays the customer’s sentiment.
Agent: Displays the agent’s sentiment.
2. Talk Distribution
Talk Distribution shows how speaking time is divided between the participants and silence.
Agent: Displays the percentage of time the agent speaks.
Customer: Displays the percentage of time the customer speaks.
Silence: Displays the percentage of time without speech.
3. Call Metrics
The Metrics section displays additional information about the conversation:
Dead Air: Displays the dead air value for the call.
Interruptions: Shows the number of interruptions.
Avg Response: Displays the average response value.
Agent WPM: Shows the agent’s words per minute.
Customer WPM: Shows the customer’s words per minute.
To access these details, open the selected call and navigate to the Call Quality tab under Overview.
Figure 4: Call Quality Overview in DialNext. This screen displays overall, customer, and agent sentiment, along with talk distribution and key call metrics such as dead air, interruptions, Avg Response, and words per minute (WPM) for both participants.
How to Play and Download Call Recordings in DialNext
DialNext lets you play and download call recordings directly from the call details panel. The built-in audio player provides playback controls to help you review conversations at your preferred speed.
Follow these steps to access a call recording:
Open Call Logs from the left sidebar.
Select the call you want to review.
Open the Details tab in the call details panel.
Locate the Recording section.
Click the Play button to listen to the recording.
Use the playback timeline to move to a specific part of the recording.
Adjust the volume using the volume control.
Select a playback speed: 0.75x, 1x, 1.25x, 1.5x, or 2x.
Click the Download icon to download the recording.
These controls help you review conversations, revisit specific moments, and access recordings when needed.
Figure 5: Call Recording Player in DialNext. Users can play recordings, navigate the audio timeline, adjust volume and playback speed, and download recordings.
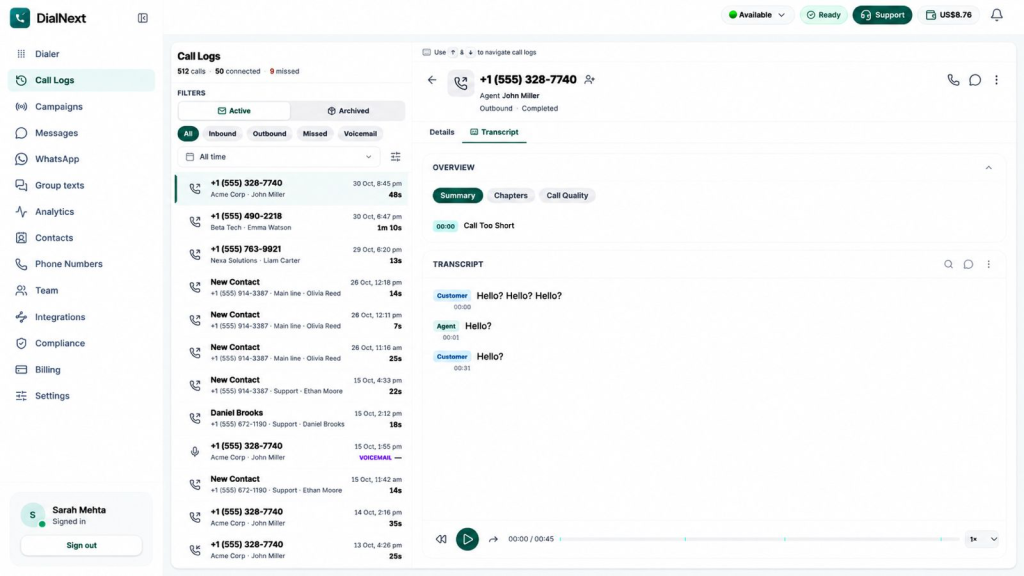
Call Too Short
Sometimes, DialNext may not generate an AI summary for a call because the conversation does not contain enough speech.
In such cases, the Summary tab displays a Call Too Short status instead of the usual AI-generated insights.
Why does this happen?
Short conversations, brief exchanges, or repeated greetings may not provide enough speech for DialNext to generate a meaningful summary.
What can you do?
Review the transcript: Open the Transcript tab to check the recognized conversation text.
Check the conversation: See whether the call contains enough meaningful speech.
Review the call recording: Use the audio player to listen to the conversation again.
Even when a meaningful summary is unavailable, you may still be able to review the available transcript entries.
Figure 6: Call Too Short Status in DialNext. When a call does not contain enough speech, DialNext displays the Call Too Short status instead of generating a meaningful AI summary. The transcript remains available for reviewing the recognized conversation.
Frequently Asked Questions
1. How can I access call transcripts in DialNext?
Open Call Logs, select the call you want to review, and click the Transcript tab in the call details panel.
2. What information does a DialNext call transcript include?
A call transcript displays recognized conversation text, Customer and Agent labels, and timestamps for individual conversation entries.
3. What are AI Insights in DialNext?
AI Insights help users review conversations through the Summary, Chapters, and Call Quality tabs. These sections display conversation summaries, topics, action items, sentiment indicators, and call metrics.
4. Why does DialNext show a Call Too Short status?
DialNext displays this status when a call does not contain enough speech to generate a meaningful AI summary. You may still be able to review the available transcript entries.
5. Can I play and download call recordings in DialNext?
Yes. Open the selected call’s Details tab and locate the Recording section. You can play the recording, adjust its volume and playback speed, navigate the timeline, and download it.
6. What metrics are available under Call Quality?
The Call Quality tab displays sentiment indicators, talk distribution, dead air, interruptions, average response, and Agent and Customer words-per-minute (WPM) values.
Conclusion
Call Transcription and AI Insights help businesses get more value from their customer conversations. With DialNext, teams can review call transcripts, explore AI-generated summaries, navigate conversation chapters, and understand call quality through sentiment indicators and performance metrics.
These features make it easier to revisit important discussions, identify follow-up actions, and gain a clearer understanding of customer interactions. By using call recordings and AI Insights together, teams can make more informed decisions and improve their communication processes.
Explore more setup guides, tutorials, and product documentation in the DialNext Help Center.
Long caller wait times can frustrate customers and put extra pressure on support teams. Call queue management helps businesses organize incoming calls, direct callers to the right team, and handle busy periods more consistently.
The right approach starts with clear call routing, realistic staffing, and regular reviews of call data. In this guide, you will learn how call queues work, which metrics to monitor, and practical ways to reduce caller wait times without making the customer experience more complicated.
What Is Call Queue Management?
Call queue management is the process of organizing incoming calls when agents are busy or unavailable. It helps businesses place callers in a waiting queue and connect them with the right team when an agent becomes available.
A call queue management system helps teams handle high call volumes in a more organized way. Instead of sending every call to the same person, businesses can use call routing rules to direct callers to the appropriate department or group.
For example, a customer calling a support team may need help with billing, a technical issue, or an order. A well-planned call queue helps direct that customer to the appropriate team and reduces unnecessary transfers.
Effective call queue management involves more than placing callers on hold. Businesses also need to review staffing levels, monitor waiting times, and understand why callers disconnect before reaching an agent.
The goal is simple: help customers reach the right person with as little unnecessary waiting as possible.
How Does a Call Queue Work?
A call queue manages incoming calls when multiple customers contact a business at the same time. It organizes waiting callers and connects them to an appropriate agent as availability changes.
Here is how a typical call queue works:
A customer calls: The business receives an incoming call through its phone system.
The caller selects an option: If an Interactive Voice Response (IVR) menu is available, the caller can choose a department or service.
The system routes the call: Routing rules direct the call to the appropriate team or queue.
The caller waits: If no suitable agent is available, the caller may remain in the queue until an agent can answer.
An agent answers: When an eligible agent becomes available, the system connects the caller according to its configured routing rules.
The exact process depends on the phone system and its configuration. Some systems also offer alternative handling options, such as voicemail or callback functionality.
For a smoother experience, businesses should keep routing options clear and review how calls move through each stage. This helps identify unnecessary transfers and delays that can increase caller wait times.
Why Call Queue Management Matters
Effective call queue management helps businesses handle incoming calls without creating unnecessary frustration for customers. It also helps support teams manage their workload during busy periods.
Here are the main benefits of managing call queues effectively.
1. Reduces Caller Frustration
Long waits can make customers feel ignored, especially when they need urgent assistance. Clear routing and helpful waiting messages make the experience more predictable. As a result, callers know what to expect while they wait.
2. Improves Agent Productivity
Without a clear call handling process, agents may receive calls outside their area of responsibility. Proper routing helps direct customers to the right team. This reduces unnecessary transfers and allows agents to focus on the issues they are trained to resolve.
3. Helps Reduce Call Abandonment
Call abandonment occurs when a caller disconnects before speaking to an agent. Long waits, unclear instructions, and repeated transfers can contribute to this problem. Monitoring queue performance helps businesses identify these issues and take corrective action.
4. Supports Better Staffing Decisions
Call volumes often change throughout the day. Reviewing historical call patterns helps managers identify peak hours and plan staff coverage accordingly. This can reduce pressure on agents during busy periods.
5. Creates a More Consistent Customer Experience
Customers expect reliable service whenever they contact a business. A well-organized queue helps standardize how calls are routed and handled. Consequently, customers are more likely to reach the appropriate team without unnecessary delays.
Overall, call queue management helps businesses balance customer needs with available resources. Regular reviews of call activity and queue performance can reveal where improvements are needed.
Call Queues vs. IVR vs. Ring Groups
Call queues, Interactive Voice Response (IVR), and ring groups help businesses manage incoming calls. However, each serves a different purpose. Understanding these differences makes it easier to design an efficient call handling process.
What Is the Difference?
Feature
Main purpose
How it works
Call queue
Manage callers waiting for an agent
Holds calls in a queue until an eligible agent can answer.
IVR
Guide callers to the right destination
Uses recorded prompts and menu options to collect caller input.
Ring group
Alert a group of agents or phones
Rings configured destinations according to the system’s rules.
When Should You Use Each One?
Call queues: Use a call queue when several customers may call at the same time and agents cannot answer every call immediately. It helps organize waiting callers and manage demand.
IVR: Use IVR when callers need to choose a department or service before speaking to someone. Clear menu options can reduce misrouted calls and unnecessary transfers.
Ring groups: Use ring groups when multiple team members should receive an incoming call alert. Depending on the configuration, the system may ring several destinations together or follow a defined sequence.
Can These Features Work Together?
Yes. Many business phone systems combine these features to create a more organized call flow.
For example, a customer calls a support number and selects the technical support option through IVR. The system then routes the call to the appropriate team. If no agent can answer immediately, the caller may enter a queue, depending on the configured call flow.
This approach helps businesses direct callers efficiently while providing a consistent experience during busy periods.
When choosing call routing software, consider how these features work together. The best setup depends on your call volume, team structure, and customer support requirements.
Best Practices for Managing Incoming Call Queues
Managing incoming call queues effectively requires clear routing, appropriate staffing, and regular performance reviews. Small improvements in these areas can help businesses reduce unnecessary waiting and deliver a more consistent customer experience.
Simplify the Caller Journey
Keep your phone menu short and easy to understand. Too many options can confuse callers and make it harder to reach the right department.
Use clear menu labels and review them whenever your services or team structure changes. This helps customers choose the correct option without navigating unnecessary steps.
Route Calls to the Right Team
Use call routing rules to direct customers to agents who can resolve their queries. For example, billing questions should reach the billing team rather than general technical support.
Review your routing setup regularly. If customers are frequently transferred between departments, your current rules may need improvement.
Keep Callers Informed While They Wait
Waiting without any information can make callers feel uncertain. Use clear greetings and appropriate hold messages to explain what customers should expect.
If your phone system supports queue position or estimated waiting time announcements, consider whether these options would help your callers. Do not provide estimates that your system cannot reliably calculate.
Match Staffing to Call Demand
Call volumes often vary by time of day, day of the week, and season. Review historical call data to identify recurring busy periods.
Use these patterns to plan staff schedules and breaks. Adequate coverage during peak hours can help prevent queues from growing faster than agents can handle them.
Monitor Agent Availability
Make sure calls are routed to the intended agents and teams. Incorrect availability settings or outdated routing rules can prevent calls from reaching staff who are ready to answer.
Review these settings whenever team responsibilities or working hours change. This helps keep the call handling process aligned with actual staffing.
Review Queue Performance Regularly
Track waiting times, abandoned calls, and missed calls to understand how your queue performs. Look for recurring problems rather than reacting to individual busy periods.
For example, consistently long waits during lunchtime may indicate a scheduling gap. Adjusting staff coverage could help address the underlying issue.
Effective call queue management is an ongoing process. Review your call flows, listen to customer feedback, and make adjustments based on the results.
What Happens When All Agents Are Busy?
When all agents are busy, incoming callers may need to wait until someone becomes available. Without a clear plan, this situation can lead to longer queues, frustrated customers, and more abandoned calls.
Businesses can prepare for these situations by defining what should happen when no agent can answer.
Keep Callers in a Queue
A call queue can hold incoming calls until an eligible agent becomes available. Depending on the phone system, callers may hear hold music or recorded messages while they wait.
Keep these messages clear and relevant. Avoid making promises about waiting times unless the system can provide reliable estimates.
Set Up an Appropriate Fallback
Some callers may not be able to remain on hold. A fallback process gives businesses another way to handle calls when agents are unavailable.
Depending on the system’s capabilities, options may include:
Sending callers to voicemail.
Directing calls to another available team.
Playing a message with alternative contact instructions.
Offering a callback option, if supported.
Choose a fallback that suits your business and the type of assistance callers need. For example, a support team may direct callers to voicemail outside operating hours, while another team may route calls to an alternative department.
Plan for Peak Call Volumes
A sudden increase in incoming calls can overwhelm an otherwise well-managed team. Review historical call patterns to identify busy periods and prepare staffing plans in advance.
You can also review recurring causes of high call volumes. If customers frequently call to ask about the same issue, clearer website instructions or self-service resources may help reduce avoidable calls.
Review Unanswered and Abandoned Calls
Do not focus only on the calls that agents answer. Review missed calls and abandoned calls to identify gaps in your handling process.
Look for patterns by time of day, department, and call volume where the available data allows it. These insights can help you decide whether to adjust staffing, routing rules, or fallback options.
A clear overflow plan helps businesses respond more consistently when demand exceeds available capacity. It also gives callers a more predictable experience when an immediate answer is not possible.
How to Reduce Caller Wait Times
Reducing caller wait times requires more than adding agents to a support team. Businesses also need to identify delays, improve call routing, and manage incoming demand effectively.
The following practices can help shorten queues and improve customer support.
Match Staffing to Call Demand
Review historical call volumes to identify peak hours and busy days. Schedule enough agents during these periods to handle expected demand.
Also, account for breaks, meetings, and training sessions when planning staff coverage. This helps prevent situations where too few agents are available to answer incoming calls.
Reduce Unnecessary Call Transfers
Customers may wait longer when their calls move between departments. Clear IVR menus and appropriate routing rules can help direct callers to the right team from the start.
Review common transfer patterns and identify where calls frequently reach the wrong department. Then, update your routing rules or menu options to address the problem.
Review Long Call Handling Times
Long conversations can reduce the number of calls agents handle during busy periods. However, rushing agents to finish calls may harm the quality of support.
Instead, identify common reasons for lengthy conversations. Better training, clear troubleshooting guides, and access to relevant customer information can help agents resolve queries more efficiently.
Simplify IVR Menus
Complicated phone menus can delay callers before they even enter a queue. Keep options short, use familiar language, and organize departments logically.
Review menu choices regularly to remove outdated options. Make sure callers can identify the correct destination without listening to unnecessary instructions.
Improve Queue Messages
Clear waiting messages help customers understand what is happening while they wait. If your phone system supports queue position or estimated waiting time announcements, use them carefully.
Keep recorded messages concise and avoid repeating lengthy promotional content. If alternative contact options are available, explain them clearly.
Analyze Call Patterns and Adjust
Use available call reports to identify recurring delays and missed calls. Compare performance across different days, hours, and teams to find areas that need attention.
For example, if waiting times rise consistently during a particular hour, review staffing levels and agent availability during that period. If delays occur across the entire day, investigate routing rules and overall team capacity.
Reducing caller wait times is an ongoing process. Make one change at a time where practical, then review the results to determine whether it improves queue performance.
Call Queue Metrics Businesses Should Monitor
Effective call queue management depends on understanding how incoming calls move through your business. Tracking the right metrics helps managers identify delays, improve staffing decisions, and spot problems before they affect more customers.
Here are six important call queue metrics to monitor.
1. Average Waiting Time
Average waiting time measures how long callers spend waiting before receiving assistance. Depending on the reporting system, this metric may cover only time spent in the queue or a broader part of the call journey.
Review waiting times across different hours and departments. Consistently high values may indicate insufficient staffing, inefficient routing, or increased call demand.
2. Average Speed of Answer
Average speed of answer (ASA) measures the average time taken to answer calls. Its exact calculation depends on the reporting system and whether abandoned calls are included.
A rising ASA may indicate that incoming demand is exceeding available capacity. Compare this metric over time to identify periods when additional staffing or routing changes may be needed.
3. Call Abandonment Rate
Call abandonment rate measures the percentage of callers who disconnect before reaching an agent. A high rate may indicate long waits, confusing menus, or a mismatch between call demand and staffing.
Use the following formula when measuring abandonment among calls that entered the queue:
Call Abandonment Rate = (Abandoned Queue Calls / Total Calls Entering the Queue) x 100
For example, if 20 out of 200 callers abandon the queue, the abandonment rate is 10%.
Make sure your reporting system uses the same definitions for every reporting period. Some systems exclude short calls or apply other rules to the calculation.
4. Missed Call Rate
The missed call rate measures the proportion of incoming calls that are not answered, based on the phone system’s reporting rules. Depending on the system, missed calls may include calls that ring without an answer or calls handled through other outcomes.
Review missed calls alongside abandoned calls. This helps you distinguish problems with queue waiting from problems with call routing or agent availability.
5. Service Level
Service level measures the percentage of eligible calls answered within a defined time threshold. For example, a business might measure the percentage of calls answered within 30 seconds.
The target should reflect your business needs and customer expectations. Review the calculation rules carefully because reporting systems may treat abandoned calls differently.
6. Agent Occupancy
Agent occupancy measures the proportion of an agent’s available working time spent handling calls and related work, depending on the system’s definition.
High occupancy over extended periods can indicate that agents have little time between interactions. This may increase pressure on the team and make it harder to manage sudden increases in call volume.
How to Use These Metrics Together
No single metric explains every queue problem. Average waiting time and ASA help identify delays, while abandonment and missed call rates reveal where calls are not reaching agents successfully.
Service level shows whether the team meets its defined response target. Agent occupancy adds context about workload and available capacity.
Review these metrics together and compare them across consistent reporting periods. This approach helps you identify the underlying causes of poor call queue performance and choose appropriate improvements.
Common Call Queue Management Mistakes
Even with call queue software in place, poor configuration and inconsistent processes can create unnecessary delays. Identifying these mistakes helps businesses improve call handling and deliver a better customer experience.
1. Using Complicated IVR Menus
Too many menu options can confuse callers and delay them before they reach the right team. Customers may also select the wrong option and need to call another department.
Keep menus short and use clear, familiar language. Review the options regularly to remove outdated choices and simplify the caller journey.
2. Ignoring Peak-Hour Demand
Staffing levels that work during quiet periods may not be sufficient during busy hours. When incoming calls exceed the team’s capacity, queues can grow quickly.
Review historical call volumes and adjust staff schedules to match demand. Include breaks and planned absences when calculating available coverage.
3. Routing Calls to the Wrong Team
Incorrect routing rules can send callers to agents who cannot resolve their issues. This leads to transfers, repeated explanations, and longer handling times.
Review common transfer patterns and update routing rules when responsibilities change. Clear department options can also help customers reach the appropriate team.
4. Leaving Callers Without Useful Information
Silence or repetitive messages can make waiting feel longer and leave customers unsure about what to do next.
Use concise greetings and helpful hold messages. If the phone system supports reliable wait-time announcements or alternative contact options, consider using them where appropriate.
5. Ignoring Abandoned Calls
A completed call does not tell the whole story of queue performance. Callers who disconnect before reaching an agent may represent unresolved customer needs or lost business opportunities.
Review abandonment patterns alongside waiting times and call volume. Investigate recurring problems instead of assuming every abandoned call has the same cause.
6. Failing to Review Queue Performance
A call queue that worked well last month may struggle after a change in staffing, demand, or business processes.
Review available call reports regularly and compare performance across consistent periods. Use the findings to adjust staffing, routing, and queue procedures.
7. Choosing Software Without Checking Its Capabilities
Not every phone system offers the same queue controls, reporting features, or fallback options. Assuming that a platform supports a particular function can create problems during implementation.
Before choosing call queue software, confirm which features are included, how they are configured, and whether they meet your team’s requirements.
Avoiding these mistakes helps businesses manage incoming calls more consistently. Regular reviews and small, evidence-based improvements can make the queue easier for both customers and agents to navigate.
How to Choose a Call Queue Management Solution
Choosing the right call queue management solution helps businesses handle incoming calls efficiently as customer demand changes. The right system should support your team’s workflow, make call handling easier, and provide useful information for improving performance.
Before selecting a solution, evaluate the following factors.
Check Call Routing Options
Look for a system that can direct incoming calls to the appropriate teams or agents. Clear routing rules can reduce unnecessary transfers and help customers reach the right department.
Check whether the available routing options match your team’s structure and support requirements.
Evaluate Queue Management Features
Review how the system handles calls when agents are busy or unavailable. Check whether it supports queue waiting, hold messages, and appropriate fallback options.
If you need advanced features such as callbacks, queue position announcements, or priority routing, confirm their availability before making a decision.
Check which metrics the platform provides and whether reports can be filtered by team or time period. Reliable reporting makes it easier to identify recurring delays and plan improvements.
Consider IVR and Ring Group Support
IVR menus can help callers select the right department, while ring groups can alert multiple configured destinations to an incoming call.
Choose a system that supports the call flow your business needs. Also, check how these features work together when all agents are busy.
Check Business-Hours and Fallback Rules
Your call handling process should account for evenings, weekends, holidays, and periods when staff are unavailable.
Look for configurable business-hours routing and suitable after-hours handling. Confirm that the available options match your operational requirements.
Assess Scalability and Integration Needs
Your call handling requirements may change as your business grows. Consider whether the solution can support additional agents, departments, and higher call volumes.
If your team uses a CRM or help desk, check whether the phone system supports the integrations you need. Verify the specific integration capabilities rather than assuming every connection offers the same functionality.
Compare Costs and Support
Review pricing, included features, usage limits, and any additional charges. A low starting price may not reflect the total cost of operating the system.
Also, evaluate documentation, onboarding assistance, and technical support. These factors can affect how easily your team adopts and maintains the solution.
The best call queue management solution is one that fits your actual workflow and business requirements. Compare the available features carefully, test the call flow where possible, and confirm important capabilities before committing to a provider.
Frequently Asked Questions
What Is a Call Queue Management System?
A call queue management system organizes incoming calls when agents are busy or unavailable. It places callers in a waiting queue and connects them to an appropriate agent when one becomes available, depending on the system’s configuration.
How Can Businesses Reduce Caller Wait Times?
Businesses can reduce caller wait times by matching staffing to call demand, improving call routing, simplifying IVR menus, and reviewing queue performance. Analyzing call data also helps identify recurring delays and missed calls.
What Is the Difference Between Call Queuing and Call Routing?
Call routing directs incoming calls to the appropriate destination based on configured rules. Call queuing manages callers who must wait until an agent becomes available. Both features can work together to improve inbound call management.
What Causes High Call Abandonment Rates?
High call abandonment rates may result from long waiting times, insufficient staffing, confusing phone menus, or poor routing. Reviewing abandonment data alongside call volume and waiting times can help businesses identify the underlying causes.
Which Metrics Should Businesses Track for Call Queues?
Important metrics include average waiting time, average speed of answer, call abandonment rate, missed call rate, service level, and agent occupancy. Tracking these metrics together provides a more complete picture of queue performance.
What Should Happen When All Agents Are Busy?
When all agents are busy, callers may wait in a queue until someone becomes available. Depending on the phone system, businesses may also offer voicemail, alternative routing, recorded messages, or callback options if supported.
Is Call Queue Software Suitable for Small Businesses?
Yes. Small businesses that receive multiple incoming calls can benefit from organized call handling. The right solution depends on call volume, team size, routing requirements, budget, and the features the business actually needs.
Improve Your Call Queue Management with DialNext
Effective call queue management starts with understanding your customers’ needs and identifying where delays occur. Clear routing, appropriate staffing, and regular performance reviews can help businesses manage incoming calls more efficiently.
DialNext offers business communication features such as call queuing, IVR, ring groups, and business-hours routing to support organized call handling. Its available analytics and reporting capabilities can also help teams review call activity and identify areas for improvement.
Explore the DialNext website to learn more about its business calling solutions, or visit the DialNext Help Center for product information and support resources.
With the right processes and tools in place, your business can create a more consistent calling experience while making better use of its support team’s time.
The DialNext Zoho CRM integration helps businesses manage customer communication by connecting call and SMS activity with Zoho CRM contact records. Incoming and outgoing calls are logged under Calls, while SMS conversations are recorded as Notes. This helps teams keep customer communication history organized and easily accessible.
How to Integrate DialNext with Zoho CRM
Step 1: Log in to your DialNext account.
Log in to your DialNext account. Use your registered credentials to access the dashboard.
Step 2: Open the Integrations section.
Go to the Integrations section in your DialNext dashboard. Look for the available CRM integrations.
Step 3: Select Zoho CRM.
Find ZohoCRM in the integrations list. Click the Zoho CRM integration card to view its details.
Step 4: Authorize the Connection Between DialNext and Zoho CRM
Click the Integrate button on the Zoho CRM card. This starts the connection process.
Step 5: Complete the Zoho CRM Authorization.
Follow the on-screen instructions to authorize the connection. Complete the required steps to proceed.
Step 6: Configure the Integration
Choose the settings you want to enable. Review your selections and save the changes to complete the setup.
Step 7: Verify the Integration
Open your DialNext dashboard and check the integration status. Make sure Zoho CRM is connected.
Next, check Zoho CRM for call and SMS activity. Incoming and outgoing calls appear under Calls. SMS conversations appear as Notes on the relevant contact records.
How to View Calls and SMS in Zoho CRM
Once the integration is configured, you can review call and SMS activity in Zoho CRM. Open the relevant contact record to find these details.
1. View Call Logs
Open the relevant contact record in Zoho CRM. Go to the Calls section to view incoming and outgoing call records.
2. View SMS Conversations
Open the same contact record and navigate to Notes. Here, you can review the recorded SMS conversations.
Key Features of the DialNext Zoho CRM Integration
1. Incoming and Outgoing Call Logging
DialNext records incoming and outgoing calls in Zoho CRM. You can review these activities under Calls.
2. SMS Conversation Logging
DialNext records SMS conversations as Notes on relevant contact records. This helps you keep messaging history organized.
3. Contact Communication History
View available call and SMS activity through the relevant contact record. This makes customer interactions easier to review.
4. Organized Customer Records
Keep supported communication records in one place. This helps your team manage customer information more efficiently.
Frequently Asked Questions
1. How does the DialNext Zoho CRM integration work?
DialNext connects communication activity with Zoho CRM. It records calls and SMS conversations on relevant contact records.
2. Where can I find call logs in Zoho CRM?
Open the relevant contact record. Check the Calls section to view incoming and outgoing calls.
3. Where are SMS conversations stored?
SMS conversations appear as Notes on the relevant Zoho CRM contact records.
4. Does DialNext support automatic call logging?
Incoming and outgoing calls are logged as Calls in Zoho CRM. Contact DialNext Support if you need details about sync timing.
5. What should I do if activity is missing?
Check the relevant contact record first. Look under Calls for call logs and Notes for SMS conversations. If the activity is still missing, contact DialNext Support.
Conclusion
The DialNext Zoho CRM integration helps you organize customer communication. It records incoming and outgoing calls under Calls. SMS conversations appear as Notes on relevant contact records.
These records make it easier to review customer interactions in Zoho CRM.
Visit DialNext to learn more about our business communication solutions. If you need help with setup, contact DialNext Support.
The DialNext GoHighLevel integration helps businesses connect their communication workflows with customer relationship management. DialNext offers business calling, dialer, voice, SMS, and WhatsApp solutions to support customer interactions.
By connecting DialNext with GoHighLevel, businesses can work toward streamlining communication, organizing customer information, and reducing manual work. The available features depend on the supported integration capabilities.
How to Integrate DialNext with GoHighLevel
1. Log in or sign up to your DialNext account.
2. In the left sidebar, click Integrations.
3. Find GoHighLevel in the integrations list and click Integrate.
4. Authorize the connection between DialNext and GoHighLevel.
5. Choose the features you want to enable.
6. Click Save settings to complete the integration.
7. Make a test call or send an SMS from DialNext to verify that the activity is logged in GoHighLevel.
8. Your DialNext account is now connected to GoHighLevel. Verify that the supported call and SMS activities appear in the relevant contact records.
What does the DialNext GoHighLevel integration do?
The integration connects DialNext with GoHighLevel to help businesses manage customer communication and CRM workflows more efficiently. It aims to reduce manual work and keep customer interactions organized.
Business calling: Support calling workflows through DialNext.
Call activity logging: Review call records in GoHighLevel, if supported by the integration.
SMS integration: Manage SMS communication through the supported workflow.
Customer communication: Keep relevant customer information organized for easier follow-ups.
Note: Confirm each feature against the actual integration before publishing these capabilities as available.
How to use the integration
After completing the DialNext GoHighLevel integration, ensure the supported features are enabled in the integration settings. Once you save the settings, test the connection to confirm that the configured communication workflows are working correctly.
You can also explore our DialNext Intercom Integration guide to learn more about connecting DialNext with another customer communication platform.
Frequently Asked Questions
1. How do I connect DialNext with GoHighLevel?
Log in to DialNext, open Integrations, and look for GoHighLevel. If the integration is available, follow the on-screen instructions to authorize and configure the connection.
2. Which features does the integration support?
Supported features depend on the implemented integration. Confirm calling, SMS, and other communication capabilities before enabling them.
3. Will calls automatically appear in GoHighLevel?
Automatic call logging must be verified by placing a test call and checking the relevant contact record.
4. Do SMS messages sync automatically with GoHighLevel?
SMS syncing depends on the implemented integration. Send a test message and check the relevant conversation record to confirm the behavior.
In conclusion, the DialNext GoHighLevel integration aims to help businesses streamline customer communication and organize their CRM workflows. Visit DialNext to learn more about its business communication solutions and integrations.
Bulk SMS helps businesses send text messages to many customers at once. It can be used for promotions, reminders, updates, alerts, and sales follow-ups.
Instead of sending each message manually, businesses can use a messaging service to reach more customers quickly. With the right audience, timing, and consent, text messaging can become a simple part of a business communication plan.
In this guide, you will learn what bulk SMS is and how it works. You will also learn how businesses use it, its benefits and limits, and the best ways to send effective messages.
What Is Bulk SMS?
Bulk SMS lets businesses send the same or similar text message to many people at once. Companies can use it for promotions, reminders, alerts, updates, and other important information.
Unlike regular SMS, which usually goes to one person at a time, this method is made for large-scale messaging. Businesses can select a contact list, write a message, and send it to the right audience through a messaging platform.
For example, a retail business can send a sale announcement to its customers. Similarly, a service business can send appointment reminders to customers with upcoming bookings.
However, effective messaging is not just about reaching a large list. Businesses also need to focus on audience selection, consent, message relevance, timing, and clear communication.
How Does Bulk SMS Work?
Bulk SMS follows a simple process. It helps businesses send messages to many recipients at once.
1. Select Your Audience
First, create or select a contact list. This list can include customers, leads, subscribers, or other relevant contacts.
2. Create the Message
Next, write the SMS. Keep the message clear, short, and relevant to the audience.
3. Segment the Audience
Then, group contacts based on factors such as customer type, location, interests, or past interactions. This helps businesses send more relevant messages.
4. Send the Messages
After that, the messaging platform sends the SMS to the selected recipients. Depending on the setup, messages may be sent in batches when working with large contact lists.
5. Monitor Responses
Finally, review delivery information and customer responses if the messaging platform supports these features. This information can help teams understand customer responses and improve future SMS campaigns.
Why Do Businesses Use Bulk SMS?
Businesses use this messaging method to reach many customers quickly. It can support marketing, sales, customer service, and daily business communication.
Common reasons include:
Reach customers quickly: Businesses can send important messages to many people at once.
Send timely updates: SMS can help share reminders, alerts, and status updates.
Support sales follow-ups: Sales teams can use SMS to follow up with leads and existing customers.
Promote offers: Marketing teams can share promotions, new products, and event announcements.
Improve customer communication: Businesses can use SMS with other channels to keep customers informed.
However, the goal is not just to reach more people. Businesses should send useful messages to the right audience at the right time.
Common Bulk SMS Use Cases
Businesses use SMS for many types of customer communication. The best use case depends on the audience, message, and goal.
Promotional Messages
Businesses can send offers, discounts, product launches, and event announcements to customers who have agreed to receive them.
Customer Updates
SMS can help businesses share important updates. For example, a company can notify customers about service changes, business hours, or planned maintenance.
Appointment Reminders
Service businesses can send reminders about upcoming appointments. This can help customers remember important dates and may reduce missed appointments.
Order and Delivery Updates
Retail and e-commerce businesses can use SMS to share order confirmations, shipping updates, and delivery notifications.
OTP and Verification Messages
Businesses can send one-time passwords and verification codes through SMS. Customers can use these codes to confirm their identity or complete an action.
Sales and Follow-Up Messages
Sales teams can use SMS to follow up with leads and share useful information. They can also remind prospects about an earlier conversation.
Overall, SMS works best when each message reaches the right audience and provides useful information.
Benefits of Bulk SMS for Businesses
This messaging method helps businesses reach many customers while keeping messages short and clear.
Fast Communication
Businesses can send important messages to many people without contacting each customer one by one. This makes SMS useful for urgent updates and reminders.
Scalable Messaging
As a business grows, its contact list may also grow. A messaging service can help reach larger groups without sending every message manually.
Direct Customer Reach
SMS sends business messages directly to a customer’s phone. Therefore, it can be useful for reminders, updates, alerts, and other important information.
Supports Different Business Teams
Marketing teams can use SMS campaigns for promotions. Sales teams can send follow-ups, while support teams can share customer updates and notifications.
Easy to Combine With Other Channels
SMS does not have to work alone. Businesses can combine it with calls, email, CRM workflows, and other channels. As a result, teams can create a more connected customer communication process.
Bulk SMS vs Regular SMS
Bulk SMS and regular SMS both use text messages. However, they serve different communication needs.
Bulk SMS
Regular SMS
Sent to multiple recipients
Usually sent to one recipient
Designed for large-scale messaging
Designed for one-to-one communication
Useful for campaigns, updates, and notifications
Useful for personal conversations and individual follow-ups
Often managed through a business messaging platform
Can be sent directly from a mobile phone
For example, a business can use regular SMS to follow up with one customer. In contrast, bulk messaging can help send an important update to a larger group of customers.
The main difference is scale and purpose. Bulk SMS is built for reaching multiple recipients efficiently, while regular SMS is better suited to individual conversations.
Bulk SMS vs SMS Marketing
Bulk SMS and SMS marketing are related. However, they do not mean the same thing.
Bulk SMS means sending text messages to many recipients at once. These messages can include promotions, reminders, alerts, notifications, or customer updates.
SMS marketing means using text messages to promote products, services, offers, or other marketing activities.
For example, a business may use bulk SMS to send an appointment reminder to 500 customers. This is bulk messaging, but it is not necessarily SMS marketing.
On the other hand, a business can send a special offer to opted-in customers through a bulk SMS campaign. In this case, the message is both bulk SMS and SMS marketing.
In simple terms, bulk SMS explains how messages are sent, while SMS marketing explains why they are sent.
Best Practices for Sending Bulk SMS
Businesses can improve bulk SMS campaigns by choosing the right audience and writing clear messages. Good timing and responsible messaging also play an important role.
Get the Right Permission
First, send messages only to people who have agreed to receive them. Also, follow the messaging and privacy rules that apply to your business.
Keep Messages Clear and Short
Keep your message simple and easy to understand. Instead of adding too much detail, share the main information and a clear next step.
Segment Your Audience
Next, group contacts based on factors such as customer type, location, or interests. As a result, you can send more useful messages to each group.
Personalize When Useful
Where possible, use relevant customer details in your messages. This personal touch can make a message more useful than a generic message sent to everyone.
Send at the Right Time
Timing can affect how people respond to an SMS. Therefore, consider the recipient’s location, routine, and the urgency of the message.
Make Opt-Outs Easy
Always give recipients a clear way to stop receiving messages when required. This also helps keep your contact list up to date.
Review Before Sending
Finally, check the contact list, message, links, and sender details before sending a bulk SMS campaign. This simple check can help prevent common mistakes.
Common Bulk SMS Mistakes to Avoid
Bulk SMS can help businesses reach customers quickly. However, simple mistakes can reduce the value of a campaign and create a poor customer experience.
Sending Without Proper Consent
First, make sure recipients have agreed to receive your messages. Sending unwanted texts can damage trust. It may also break local messaging rules.
Sending the Same Message to Everyone
A single message may not suit every customer. Instead, divide your audience into relevant groups. Then, send messages that match their needs.
Sending Too Many Messages
Too many texts can annoy customers. Therefore, send messages only when they provide useful or timely information.
Ignoring Messaging Rules
Messaging rules can vary by country and message type. Before sending a campaign, check the rules that apply to your business and audience.
Using Unclear Sender Information
Recipients should know who sent the message. Clear sender information makes business text messages easier to recognize and trust.
Writing Long or Confusing Messages
SMS works best when the message gets to the point. Keep the wording simple. Include only the information the recipient needs.
Failing to Review the Campaign
Finally, check your contact list, message, links, timing, and opt-out details before sending. A quick review can help prevent avoidable mistakes.
How Bulk SMS Fits Into a Business Communication Workflow
Bulk SMS works best as part of a wider communication process. Businesses can use SMS with calls, CRM tools, email, and other channels to keep customer communication organized.
Bulk Messaging for Marketing
Marketing teams can use SMS to share offers, product updates, event announcements, and other relevant messages with customers who have agreed to receive them.
SMS Follow-Ups for Sales
Sales teams can use SMS after calls or other customer interactions. For example, a sales representative can send the next steps or share useful information with a prospect.
SMS Updates for Customer Support
Support teams can use SMS to share reminders, status updates, and other important information. This gives customers another way to receive timely updates.
Connecting SMS With CRM Records
When SMS works with a CRM, teams can keep customer conversations and other interactions in one place. As a result, sales and support teams can get better context before contacting a customer.
A connected workflow can reduce manual work. It can also make customer communication easier to manage.
Frequently Asked Questions About Bulk SMS
What is bulk SMS?
Bulk SMS is a way for businesses to send text messages to multiple recipients at the same time. It can be used for promotions, reminders, updates, alerts, and other business messages.
How does bulk SMS work?
Businesses select a relevant contact list, create a message, and send it through a messaging platform. The platform then delivers the message to the selected recipients.
What is bulk SMS used for?
Businesses use bulk SMS for promotional campaigns, customer updates, appointment reminders, order notifications, sales follow-ups, and other time-sensitive communication.
Is bulk SMS the same as SMS marketing?
No. Bulk SMS refers to sending messages to multiple recipients at scale. SMS marketing refers to using text messages for marketing purposes. A bulk SMS campaign can be promotional or non-promotional.
What are the benefits of bulk SMS?
Bulk SMS helps businesses reach multiple customers quickly. It can also support sales, marketing, customer support, and other business communication.
Can businesses send bulk SMS to customers?
Yes, businesses can use bulk SMS to communicate with customers. However, they should first obtain the required permission and follow the messaging rules that apply to their audience and location.
What should businesses consider before sending bulk SMS?
Businesses should consider consent, audience selection, message content, timing, opt-out options, and applicable messaging rules before sending a campaign.